Wednesday, January 23, 2013

How to create a password reset disk in Windows 7

The password of a user account is to make that account security and password reset system allows a user to reset his forgotten password. We set a password to our desktop, laptop or any other device for secure our data and system. If you are using windows 7 then this OS will allow to create a password reset disk in a very simple way.

This disk will be your flash-drive and after creating a password reset disk, it will allow to reset your forgotten password in logging mode. It is no needed download any software or ISO file and burn them to a CD/DVD, if you have a flash-drive with 2.0 KB free space.
Simple way to create a password reset disk in windows 7
  • Plug-in your flash-drive or USB drive.

  • Open the Control Panel

  • Navigate to User Accounts (if the control panel is shows all control panel items) or User Account and Family Safety>User Accounts (if the control panel shows Computer Settings).

  • The previous action will turn you in current user account to Make Changes Current User Account.
Create password reset disk
  • Just look at the left side to find out Create a Password Reset Disk and click on it.
  • Now "forgotten password"  Wizard should come and if it is then press Next.
Forgotten password wizard
  • In this section select your flash-drive on which you want to create a password reset disk.
Select flash-dive
  • Select your disk and go Next where you have to provide a current account password.
Provide current account password
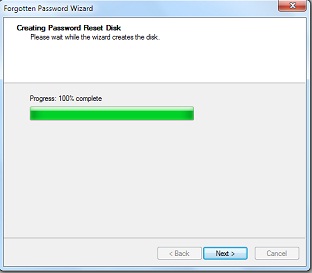
  • Hit the Next and the password reset disk will start to create it.
100% complete
  • Press Next after completing 100% progress.
  • Hit Finish to finish the wizard and you are done!

For now whenever you will forget your log on password just plug in your flash-drive and click on reset password. Windows 7 will show this option after hitting wrong password first time. You are also allowed to create a password reset disk when you are not the admin and not working under an admin account.
A new file named "userkey.psw" will be created on your flash drive which should keep save as it is needed to reset your password.

3 Ways to Enable Administrator Account in Window 7

The administrator account is a hidden, disabled and built-in account with Windows 7/Vista/xp. But a user can enable this account for some special actions. Such as troubleshooting, installing harmful software or some special networking tasks. By default, most of the user accounts are a part/member of the Administrator account. Others are standard accounts without being any part of an administrator account.


Windows disabled this account to prevent malicious programs and harmful activities on the system. So any special task of system needs administrative privilege and the annoying UAC (User Account Control) bar will pop up for the users, except the administrator account.

This post will show you how to enable Administrator account in three easy ways. Choose only one method from below to activate administrator account.

Method#1. Using command prompt:

Search cmd.exe in start menu and run cmd.exe as administrator.
Start menu > cmd.exe 


To enable Administrator account Type: net user administrator /active:yes

To enable administrator account 


Hit enter and the command should execute successfully.

Command line to disable this account: net user administrator /active:no
To disable administrator account 

Method#2. From Local Users and Groups

Go to control panel navigate to Administrative tools and computer management.
Control Panel > Administrative Tools > Computer management  
Expand the Local users and Groups arrow and select Users. Then, From the right pane, double-click on the Administrator.
Local users and Groups > Users & Administrator  
Un-check the "Account is disable" and it should be look like below.

Administrator account properties

OK it and your settings will be saved.

From here you can also disable the Administrator or other account.

Method#3. From Local Security Policy

Type secpol.msc in start menu and run it as administrator.
start menu > secpol.msc 

From this Local Security Policies, expand the security options under the Local Policies.

Find "Account: Administrator account status" from the right pane.
Local Security Policies 
Open the "Account: Administrator account status" and choose Enabled to enable it.
Administrator account status 


You can also disable it from here.

After completing any of above processes, reboot your PC or log off. Now you will see a new account "Administrator" which has no password by default. Log in to this account and enjoy the real administrator power of your PC.

Friday, January 11, 2013

How To Install Android-x86 4.0 Using QEMU On Ubuntu 11.10/12.04

In this guide we will see how to install Android-x86 4.0 (based on ICS) or any older version of Android-x86 under Ubuntu using the QEMU processor emulator. You can find all Android releases here, but in this tutorial we will see how to install the Android-x86 4.0 release available for ASUS laptops.


The installation will be in the home directory of Ubuntu, specifically in the android-x86 folder, you can set any other folder name, but make sure you set it correctly in the commands given below.

Getting Started


Download the Android-x86 4.0 iso file to your home directory (inside the "android-x86" folder) with the following commands:

mkdir ~/android-x86/ && cd ~/android-x86/


wget -O android-x86-4.0.iso http://goo.gl/zDvR6


Install now QEMU with the following command:


sudo apt-get install qemu-kvm


Let's now create a virtual machine called
android-4.0.img, you can rename it to whatever you want. The size for this virtual machine is 1GB, you can set it to any other value depending on the free space you have.
Create it now with this command:
qemu-img create ~/android-x86/android-4.0.img 1G


To start the installation, run these commands:


cd ~/android-x86/


kvm -m 512 -cdrom android-x86-4.0.iso -hda android-4.0.img -boot d


 Note: the -m 512 parameter is used to set the memory size for the virtual machine, you can adjust it to whatever you want.

In the fisrt screen, select "
Installation - Install Android-x86 to harddisk" and press Enter:


In the next screen, select "Create/Modify partitions" and press Enter:


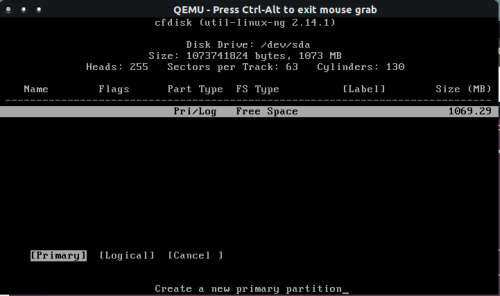
In the "cfdisk" screen, select "New" and press Enter:


Keep the "Primary" option selected and press Enter:


You will be prompted now to enter disk size, press simply Enter to use all available disk space:


Select the "Bootable" option and press Enter:


The disk  must be marked as bootable under the "Flags" label, then select "Write":


Type "yes" to confirm. After the operation is complete, quit the current screen:


The disk already created will now show up in the partition selection screen, select it and press Enter:


Select now the "ext3" filesystem and press Enter, then confirm your action:


If you receive this error:

cannot mount /dev/sdaX


Then select the "
ntfs" file system instead and repeat the operation. You will be then prompted whether to install or not the GRUB boot loader, select "Yes" and press Enter:


The next screen is optional, which is needed for debugging and may take much disk space. So, select "No" and press Enter:


 When the installation is successful, you will get this screen:


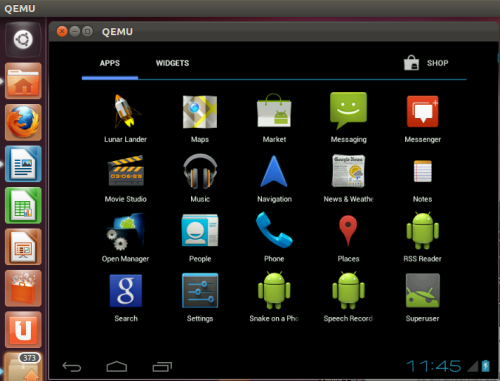
Select "Reboot" and press enter. Wait now while Android-x86 4.0 is starting up:


You can start later the Android OS with this command from the terminal:


kvm -m 512 -hda ~/android-x86/android-4.0.img


Note: Tested under Ubuntu 11.10 (Oneiric Ocelot) and Ubuntu 12.04 (Precise Pangolin) and may work in older versions of Ubuntu (11.04/10.10, etc.).


Source :  http://www.upubuntu.com/2012/03/how-to-install-android-x86-40-using.html

How To Install Ubuntu 12.10 Using VirtualBox