Tuesday, December 17, 2013

CentOS Linux: Add Static Routing

You can add static route On CentOS Enterprise Linux.
 
You can use any one of the following command line utility to add, delete, display, or manipulate the Linux kernel routing table on CentOS and friends:


  • ip command - A CentOS Linux command line tool to print / manipulate routing, devices, policy routing and tunnels.
  • route command - Older command line utility to show or manipulate the Linux kernel routing table. I suggest that you use ip command instead of route command. This command exists for historical and compatibility reasons only.
You need to edit the following configuration files for static route configuration :
  • /etc/sysconfig/network - Edit this file to set default gateway IP address.
  • /etc/sysconfig/network-scripts/route-ethX - Edit this file to set additional static gateway IP address.

CentOS: Displaying current routing table

Type any one of the following command:

# netstat -nr
# route -n
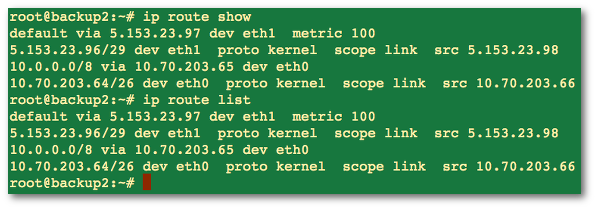
# ip route list


Sample outputs:
Fig.01: ip command displaying current CentOS Linux routing table

Warning: It is important that you configure routing correctly over ssh based session; otherwise, you will be locked out due to wrong network configuration.

CentOS Linux add a default gateway

In this example, route all traffic via 192.168.1.254 gateway connected via eth0 network interface. The following command will set a default gateway for both internal and external network (if any):

# route add default gw 192.168.1.254 eth0
OR
# ip route add 192.168.1.0/24 dev eth0

You can make routing changes persistent across CentOS Linux server reboots.

To set default gateway edit /etc/sysconfig/network as follows:

# cat /etc/sysconfig/network

Sample configuration file:
 
NETWORKING=yes
## server name ##
HOSTNAME=server1.cyberciti.biz
## Default route ##
GATEWAY=192.168.1.254
NETWORKING_IPV6=yes
IPV6_AUTOCONF=no
 
Save and close the file. Restart the networking service on CentOS Linux, type:

# service network restart
# ip route list


To verify new settings ping to the default gateway and external network:

# ping 192.168.1.254
# ping www.cyberciti.biz
# host google.com

CentOS Linux static routing config for eth1 interface

The following is a sample route-eth1 file. The default gateway set to 192.168.2.254, interface eth1. The static route is 10.10.29.65 for 10.0.0.0/8 network:

# cat /etc/sysconfig/network-scripts/route-eth1

Sample configurations:

default 192.168.2.254 dev eth1
10.0.0.0/8 via 10.10.29.65 dev eth1
 
Alert: For eth0 interface use /etc/sysconfig/network-scripts/route-eth0 file. Avoid setting duplicate default gateways; either use /etc/sysconfig/network or /etc/sysconfig/network-scripts/route-ethX file. Do not use both files to configure default gateways.

A note about GUI/TUI tool

If you don't have X windows GUI (gnome/kde desktop) installed on CentOS server / system, than type the following command at shell prompt. This method can only set the default gateway. It can not be used to set additional static routing for interface. Type the following command:

# system-config-network-tui &

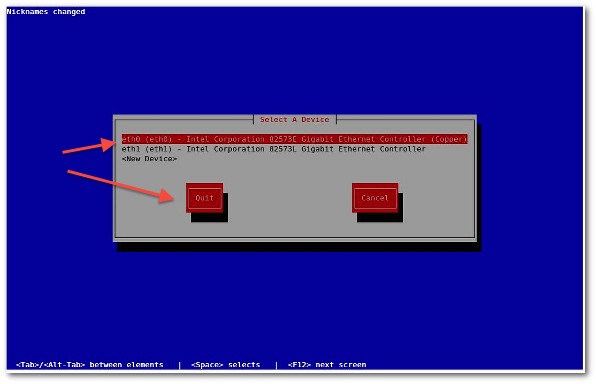
Fig.01: CentOS command line network config tool (click to large)

Fig.01: CentOS command line network config tool (click to large)
Select your Ethernet card such as eth0 or eth1 and hit [Enter] or [F12] special key to configure IP properties for selected NIC:

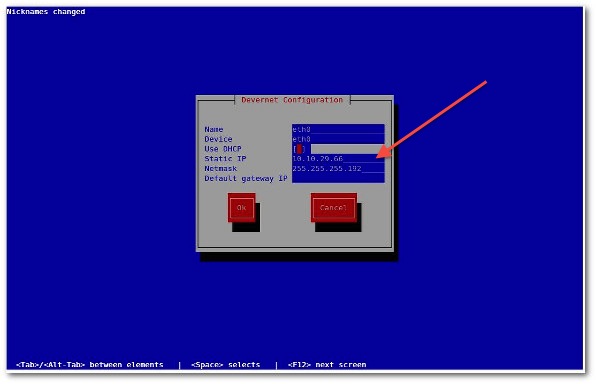
Fig.02: Setting up IPv4 properties on CentOS including default gateway (click to large)
Fig.02: Setting up IPv4 properties on CentOS including default gateway

You can obtain an IP address using DHCP or setup IP address manually. Once an IP address assigned, click on the Ok button to save the changes.

Debian Linux Install GNU GCC Compiler and Development Environment

How do I install GNU/GCC compiler and related tools (such as make, debugger, man pages) collection under Debian Linux system using command line options?

You need to install following packages on Debian and Ubuntu Linux:[a] build-essential package - Installs the following collection to compile c/c++ program on Debian/Ubuntu Linux:


  1. libc6-dev - C standard library.
  2. gcc - C compiler.
  3. g++ - C++ compiler.
  4. make - GNU make utility to maintain groups of programs.
  5. dpkg-dev - Debian package development tools.
Basically, build-essential package contains an informational list of packages which are considered essential for building Debian packages including gcc compiler, make and other required tools. This package also depends on the packages on that list, to make it easy to have the build-essential packages installed.

Installation

Open the Terminal and then type the following apt-get command as root user:

# apt-get update && apt-get upgrade
# apt-get install build-essential


OR

$ sudo apt-get install build-essential

Sample outputs:

Reading package lists... Done
Building dependency tree
Reading state information... Done
The following extra packages will be installed:
  dpkg-dev fakeroot g++ g++-4.7 gcc gcc-4.7 libalgorithm-diff-perl 
libalgorithm-diff-xs-perl libalgorithm-merge-perl libc-dev-bin libc6-dev libdpkg-perl
  libfile-fcntllock-perl libitm1 libstdc++6-4.7-dev libtimedate-perl 
linux-libc-dev make manpages-dev
Suggested packages:
  debian-keyring g++-multilib g++-4.7-multilib gcc-4.7-doc libstdc++6-4.7-dbg 
gcc-multilib autoconf automake1.9 libtool flex bison gdb gcc-doc gcc-4.7-multilib
  libmudflap0-4.7-dev gcc-4.7-locales libgcc1-dbg libgomp1-dbg libitm1-dbg 
libquadmath0-dbg libmudflap0-dbg libcloog-ppl0 libppl-c2 libppl7 binutils-gold glibc-doc
  libstdc++6-4.7-doc make-doc
The following NEW packages will be installed:
  build-essential dpkg-dev fakeroot g++ g++-4.7 gcc gcc-4.7 libalgorithm-diff-perl 
libalgorithm-diff-xs-perl libalgorithm-merge-perl libc-dev-bin libc6-dev libdpkg-perl
  libfile-fcntllock-perl libitm1 libstdc++6-4.7-dev libtimedate-perl linux-libc-dev 
make manpages-dev
0 upgraded, 20 newly installed, 0 to remove and 0 not upgraded.
Need to get 26.5 MB of archives.
After this operation, 67.6 MB of additional disk space will be used.
Do you want to continue [Y/n]? y
Get:1 http://mirrors.kernel.org/debian/ stable/main libitm1 amd64 4.7.2-5 [36.6 kB]
Get:2 http://mirrors.kernel.org/debian/ stable/main libc-dev-bin amd64 2.13-38 [224 kB]
.....
....
....
Setting up manpages-dev (3.44-1) ...
Setting up g++-4.7 (4.7.2-5) ...
Setting up g++ (4:4.7.2-1) ...
update-alternatives: using /usr/bin/g++ to provide /usr/bin/c++ (c++) in auto mode
Setting up build-essential (11.5) ...
Setting up libstdc++6-4.7-dev (4.7.2-5) ...

Verify installation

You can verify gcc compiler and make tool using the following syntax:

# whereis gcc make
# gcc -v
# make -v


Sample outputs:

gcc: /usr/bin/gcc /usr/lib/gcc /usr/bin/X11/gcc
make: /usr/bin/make /usr/bin/X11/make /usr/share/man/man1/make.1.gz
...
..
gcc version 4.7.2 (Debian 4.7.2-5)
...
..
GNU Make 3.81
..
 
Now, you should able to compile software, create Debian packages or simply write a code using C / C++ compilers.

Reset your Forgotten Password quickly Ubuntu/Linux Mint/ and Related Distributions

If you have forgotten your Linux password, Many people face this problem you are not alone. It is probably one of the most common tech support problems. Luckily if you are using Ubuntu/any Linux they made it incredibly easy to reset your password.

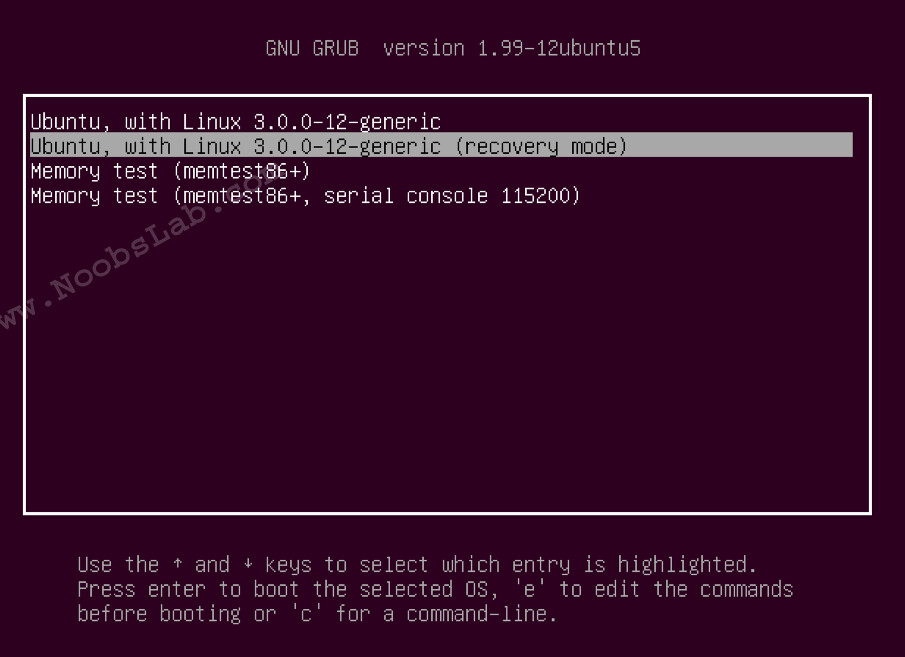
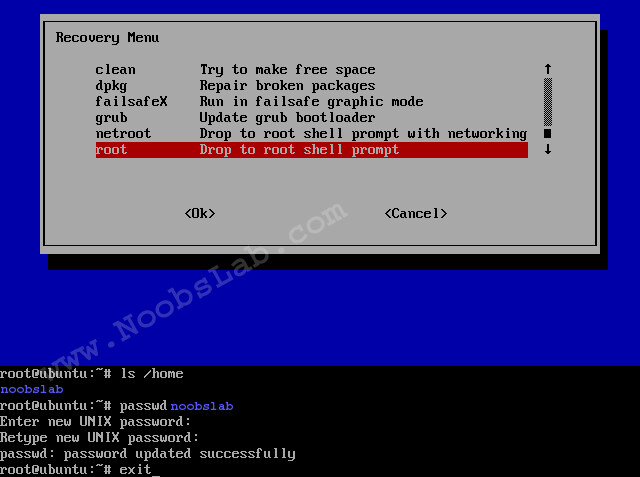
So First Step is Boot in to Recovery Mode:


ubuntu password

You will see the following screen. Now select "root - Drop to root shell prompt" and press "Ok"

Ubuntu reset password

Here is video tutorial

If you forgot your username enter this command to know:


In linux case is sensitive about username and password, If you have upper case than you need to enter same letters.
Mount root with following command:


Now Enter following command to reset your password:


For example (See the picture above):


Now enter your new password and confirm it.
Reboot pc:


That's all

Wednesday, December 11, 2013

DNS (Domain Name Server) Fundamentals


DNS stands for Domain Name System, or Domain Name Server. DNS resolves an IP address to a hostname or vice versa. DNS is basically a large database which resides on various computers that contains the names and IP addresses of various hosts/domains. Other than ip-address DNS also associates various information with the domain names.

Structure of a DNS

DNS uses a hierarchical tree based name structure. At top of the tree is the “root” ( represented as a dot (.) ) followed by the TLD ( Top Level Domain ), then by the domain-name and any number of lower level sob-domains separated by a dot.

The Top Level Domains are divided into 2 categories:
1. Generic TLD (gTLD)

2. Country Code TLD (ccTLD)

Below are some of the common Generic Top Level Domains:
  • .com – comercial web sites
  • .org – non profit organizations web sites
  • .edu – restricted to schools and institutions.
  • .net – originally for network infrastructures, now unrestricted
Below are some fo the Country Code Top Level Domains:
  • .us – United States
  • .in – India
  • .uk – United Kingdom
  • .ru – Russia
The following shows a sample representation of the structure of the DNS tree:


Authority, Delegation and Zone

The Authority for the root domain and gTLD lies with Internet Corporation for Assigned Numbers and Names (ICANN). ccTLD’s are delegated to individual countries for administration purpose. Each level in the hierarchy may delegate the authoritative control to the next lower level. There is a DNS server running in every level of the hierarchy and the responsibility of running the DNS server lies with the Authority at that level.

For Example, when the root domain gets a DNS query for www.example.com, the root will delegate responsibility for resolving to its lower level “.com”, which in-turn will delegate to “example”. Finally the DNS server in the “example” will respond with the IP address of the hostname “www”.
A zone is simply a portion of a domain. For example, the domain example.com may contain all the information for a.example.com, b.example.com and c.example.com. However, the zone example.com contains only information for example.com and delegates the responsibility to the authoritative name servers for the subdomains. In general, if there are no subdomains, then the zone and domain are essentially the same.

Resource Records

A DNS zone database is made up of a collection of resource records. Each resource record specifies information about a particular object. The DNS server uses these records to answer queries for hosts in its zone. For example, address mapping (A) record, map a host name to an IP address, and reverse-lookup pointer (PTR) records map an IP address to a host name. Here are some of commonly used Resource Records.
  • A Record: The ‘A’ record specifies the IP address of a host. ‘A’ record will have the details of the domainname and its associated IP address. When a Query is given to resolve domainname, DNS server will refer the ‘A’ record and answer with the IP address present in the record.
  • PTR Record: A PTR record maps the IP address to a specific host.
  • NS Record: An NS record or name server record maps a domain name to a list of DNS
  • servers authoritative for that domain. Delegations depend on NS records.
  • MX Record: An MX record or mail exchange record maps a domain name to a list of mail exchange servers for that domain. For example, when you send a mail to alpha@example.com, the mail will be routed to the Mail Server as specified in MX record.
You can use dig command to query DNS server and view the above information.

DNS Queries

A DNS query would be something like ‘what is the IP address of a.example.com’. A DNS server may receive such a query for any domain, to which it has no information about. The DNS server will respond is different ways for which it has no information about.
The following are the three types of DNS queries:
  • Recursive query
  • Iterative query
  • Inverse query
In Recursive query, the following are the steps involved when a host queries its local DNS server for ‘a.example.com’.
  • Host sends query ‘what is the IP address of a.example.com’ to locally configured DNS server.
  • DNS server looks up a.example.com in local tables – not found
  • DNS sends query to a root-server for the IP of a.example.com
  • The root-server replies with a referral to the TLD servers for .com
  • The DNS server sends query ‘what is the IP address a.example.com’ to one of the .com TLD servers.
  • The TLD server replies with a referral to the name servers for example.com
  • The DNS server sends query ‘what is the IP address a.example.com’ to name server for example.com.
  • Zone file defines a A record which shows ‘a”s IP address is x.x.x.x.
  • DNS returns the A record for ‘a’.
In Iterative query, if the DNS server doesn’t know the answer, it will refer other DNS server as response. So the client which initiates the query will once again contact the DNS server which came in as response.In Inverse query, an IP address will be provided and a hostname will be asked.

How to Access iCloud From Windows

access-icloud-from-windows-browser

iCloud is Apple’s cloud storage service, offering integrated online backup and syncing for Apple devices. iCloud is built-in on iPhones, iPads, and Macs, but can also be accessed on Windows.
While other services allow you to upload any type of file, Apple chooses to place your data into different compartments. This can be confusing — for example, iCloud will store your documents forever, but will delete your stored photos eventually.

What iCloud Syncs and Backs Up

iCloud is an online service linked to your Apple ID. When you set up a new iPad or iPhone, iCloud is enabled by default. Apple provides a free 5 GB of iCloud space to each account, which is used to store the following things online:
  • Mail: You can choose to use an @icloud.com email address on your device. If you do, iCloud will store your mail and it will also be accessible on icloud.com. If you use another email service, such as Gmail, Outlook.com, or Yahoo! Mail, this feature does nothing.
  • Contacts: iCloud syncs your contacts, or address book, between your devices and makes it accessible on icloud.com.
  • Calendars: Calendar events you create on your device can be synced along with your iCloud account.
  • Reminders: Reminders is Apple’s to-do list or tasks app. Reminders you create on one device are synced between your devices.
  • Safari: iCloud syncs Safari browsing data, including your bookmarks, open tabs, and reading list between your devices. On a Windows PC, you can use the iCloud Control Panel to sync Safari’s bookmarks with Internet Explorer, Firefox, or Chrome.
  • Notes: iCloud can sync notes you take in the included Notes app and make them available on the iCloud website.
  • Keychain: iCloud Keychain is a new feature that functions as a syncing password manager for Safari on iOS and Macs. It doesn’t work with third-party applications unless the apps were designed with iCloud keychain support in mind, and iOS doesn’t make it easy to copy-paste these passwords into apps. A dedicated password manager like LastPass is probably a better solution for now.
  • Photos: iCloud’s Photo Stream feature temporarily syncs some photos between your devices. Unlike many other iCloud features, Photo Stream isn’t a permanent back up, only a temporary one. In other words, iCloud isn’t backing up all your photos, so you’ll need your own backup solution.
  • Documents & Data: Documents you create with Apple’s now-free iWork apps — Pages, Numbers, and Keynote — can be synced to iCloud. They can then be accessed from iWork apps on another iOS device, a Mac, or via the iCloud website. Other apps can also choose to store their data in iCloud.
  • Find My iPhone/iPad/Mac: The “Find My” services aren’t for storage, but they’re considered part of iCloud. They can be used to track your device via the iCloud website if you lose it.
  • Device Backups: Rather than requiring regular device backups via iTunes, iOS devices can automatically back up their data over Wi-Fi to iCloud when iCloud is enabled.
These iCloud settings are all accessible in the Settings app’s iCloud section on an iPhone, iPad, or iPod Touch. You can see which types of data are set to synchronize and choose what you want to synchronize.

Apple also syncs other data — for example, your history of purchased apps and content, as well as your iMessage and SMS messages.


Using iCloud on a Mac

Apple makes both the Mac OS X and iOS operating systems, so iCloud is integrated on a Mac. When setting up your Mac, you should be prompted to sign in with an iCloud account. If you want to manage what settings sync,  you can click the Apple menu, select System Preferences, and click iCloud. From here, you can control which types of settings sync, just as you can on an iOS device.

Accessing Your iCloud Data From Windows

There are two ways to access synced iCloud data on Windows: via the iCloud Control Panel desktop application and via the iCloud website.

The iCloud Control Panel, available for download from Apple’s website, offers the following features:
  • Mail, Contacts, Calendar, and Tasks Sync: iCloud Control Panel can sync this information with Outlook 2007 or later. If you don’t use Outlook, don’t worry — you can access this data on the iCloud website. “Tasks” used here is the same thing is “Reminders.”
  • Manage iCloud Storage: This feature allows you to see what’s taking up space on your iCloud storage — for example, device backups and settings backups from apps you’ve used — and delete them to free up space.


The iCloud website, which you can access at icloud.com, offers the following features:
  • Mail, Contacts, Calendar, Notes, Reminders: Your data from these productivity apps can be viewed and edited on the iCloud website, so you can access to it from any PC, even one running Windows. You don’t have to sync via Outlook to access this.
  • Find My iPhone/iPad/iPod Touch/Mac: Apple’s Find service is accessible from here, so you can sign into iCloud on any PC and track your device if you lose it. This feature displays the GPS location of your device on a map and allows you to remotely lock or wipe it.
  • Pages, Numbers, Keynote: The iWork apps now have web versions you can access via the iCloud website. Using these, you can view and edit your synced documents on any device.
Note that some features are only accessible on the desktop, while some are only accessible on the iCloud website. For example, you can’t view your Photo Stream on the iCloud website, while you can’t edit your iWork documents outside of a browser.


If you find yourself running out of free iCloud space and don’t want to delete data, Apple allows you to purchase additional iCloud storage space.

Wednesday, October 30, 2013

Linux Crontab: Cron Job Examples


An experienced Linux sysadmin knows the importance of running the routine maintenance jobs in the background automatically.

Linux Cron utility is an effective way to schedule a routine background job at a specific time and/or day on an on-going basis.


Linux Crontab Format

MIN HOUR DOM MON DOW CMD
 
Table: Crontab Fields and Allowed Ranges (Linux Crontab Syntax)
Field Description Allowed Value
MIN Minute field 0 to 59
HOUR Hour field 0 to 23
DOM Day of Month 1-31
MON Month field 1-12
DOW Day Of Week 0-6
CMD Command Any command to be executed.


1. Scheduling a Job For a Specific Time

The basic usage of cron is to execute a job in a specific time as shown below. This will execute the Full backup shell script (full-backup) on 10th June 08:30 AM.

Please note that the time field uses 24 hours format. So, for 8 AM use 8, and for 8 PM use 20.

30 08 10 06 * /home/ramesh/full-backup
  • 30 – 30th Minute
  • 08 – 08 AM
  • 10 – 10th Day
  • 06 – 6th Month (June)
  • * – Every day of the week

2. Schedule a Job For More Than One Instance (e.g. Twice a Day)

The following script take a incremental backup twice a day every day.

This example executes the specified incremental backup shell script (incremental-backup) at 11:00 and 16:00 on every day. The comma separated value in a field specifies that the command needs to be executed in all the mentioned time.

00 11,16 * * * /home/ramesh/bin/incremental-backup
  • 00 – 0th Minute (Top of the hour)
  • 11,16 – 11 AM and 4 PM
  • * – Every day
  • * – Every month
  • * – Every day of the week

3. Schedule a Job for Specific Range of Time (e.g. Only on Weekdays)

If you wanted a job to be scheduled for every hour with in a specific range of time then use the following.

Cron Job everyday during working hours

This example checks the status of the database everyday (including weekends) during the working hours 9 a.m – 6 p.m

00 09-18 * * * /home/ramesh/bin/check-db-status
  • 00 – 0th Minute (Top of the hour)
  • 09-18 – 9 am, 10 am,11 am, 12 am, 1 pm, 2 pm, 3 pm, 4 pm, 5 pm, 6 pm
  • * – Every day
  • * – Every month
  • * – Every day of the week

Cron Job every weekday during working hours

This example checks the status of the database every weekday (i.e excluding Sat and Sun) during the working hours 9 a.m – 6 p.m.

00 09-18 * * 1-5 /home/ramesh/bin/check-db-status
  • 00 – 0th Minute (Top of the hour)
  • 09-18 – 9 am, 10 am,11 am, 12 am, 1 pm, 2 pm, 3 pm, 4 pm, 5 pm, 6 pm
  • * – Every day
  • * – Every month
  • 1-5 -Mon, Tue, Wed, Thu and Fri (Every Weekday)

4. How to View Crontab Entries?

View Current Logged-In User’s Crontab entries

To view your crontab entries type crontab -l from your unix account as shown below.

ramesh@dev-db$ crontab -l
@yearly /home/ramesh/annual-maintenance
*/10 * * * * /home/ramesh/check-disk-space

[Note: This displays crontab of the current logged in user]

View Root Crontab entries

Login as root user (su – root) and do crontab -l as shown below.

root@dev-db# crontab -l
no crontab for root

Crontab HowTo: View Other Linux User’s Crontabs entries

To view crontab entries of other Linux users, login to root and use -u {username} -l as shown below.

root@dev-db# crontab -u sathiya -l
@monthly /home/sathiya/monthly-backup
00 09-18 * * * /home/sathiya/check-db-status

5. How to Edit Crontab Entries?

Edit Current Logged-In User’s Crontab entries

To edit a crontab entries, use crontab -e as shown below. By default this will edit the current logged-in users crontab.

ramesh@dev-db$ crontab -e
@yearly /home/ramesh/centos/bin/annual-maintenance
*/10 * * * * /home/ramesh/debian/bin/check-disk-space
~
"/tmp/crontab.XXXXyjWkHw" 2L, 83C

[Note: This will open the crontab file in Vim editor for editing.
Please note cron created a temporary /tmp/crontab.XX... ]
 
When you save the above temporary file with :wq, it will save the crontab and display the following message indicating the crontab is successfully modified.
 
~
"crontab.XXXXyjWkHw" 2L, 83C written
crontab: installing new crontab

Edit Root Crontab entries

Login as root user (su – root) and do crontab -e as shown below.
 
root@dev-db# crontab -e

Edit Other Linux User’s Crontab File entries

To edit crontab entries of other Linux users, login to root and use -u {username} -e as shown below.
 
root@dev-db# crontab -u sathiya -e
@monthly /home/sathiya/fedora/bin/monthly-backup
00 09-18 * * * /home/sathiya/ubuntu/bin/check-db-status
~
~
~
"/tmp/crontab.XXXXyjWkHw" 2L, 83C

6. Schedule a Job for Every Minute Using Cron.

Ideally you may not have a requirement to schedule a job every minute. But understanding this example will will help you understand the other examples mentioned below in this article.
 
* * * * * CMD
 
The * means all the possible unit — i.e every minute of every hour through out the year. More than using this * directly, you will find it very useful in the following cases.
  • When you specify */5 in minute field means every 5 minutes.
  • When you specify 0-10/2 in minute field mean every 2 minutes in the first 10 minute.
  • Thus the above convention can be used for all the other 4 fields.

7. Schedule a Background Cron Job For Every 10 Minutes.

Use the following, if you want to check the disk space every 10 minutes.
 
*/10 * * * * /home/ramesh/check-disk-space
 
It executes the specified command check-disk-space every 10 minutes through out the year. But you may have a requirement of executing the command only during office hours or vice versa. The above examples shows how to do those things.

Instead of specifying values in the 5 fields, we can specify it using a single keyword as mentioned below.

There are special cases in which instead of the above 5 fields you can use @ followed by a keyword — such as reboot, midnight, yearly, hourly.
 
Table: Cron special keywords and its meaning
Keyword Equivalent
@yearly 0 0 1 1 *
@daily 0 0 * * *
@hourly 0 * * * *
@reboot Run at startup.

8. Schedule a Job For First Minute of Every Year using @yearly

If you want a job to be executed on the first minute of every year, then you can use the @yearly cron keyword as shown below.

This will execute the system annual maintenance using annual-maintenance shell script at 00:00 on Jan 1st for every year.
 
@yearly /home/ramesh/red-hat/bin/annual-maintenance

9. Schedule a Cron Job Beginning of Every Month using @monthly

It is as similar as the @yearly as above. But executes the command monthly once using @monthly cron keyword.

This will execute the shell script tape-backup at 00:00 on 1st of every month.
 
@monthly /home/ramesh/suse/bin/tape-backup

10. Schedule a Background Job Every Day using @daily

Using the @daily cron keyword, this will do a daily log file cleanup using cleanup-logs shell scriptat 00:00 on every day.
 
@daily /home/ramesh/arch-linux/bin/cleanup-logs "day started"

11. How to Execute a Linux Command After Every Reboot using @reboot?

Using the @reboot cron keyword, this will execute the specified command once after the machine got booted every time.
 
@reboot CMD

12. How to Disable/Redirect the Crontab Mail Output using MAIL keyword?

By default crontab sends the job output to the user who scheduled the job. If you want to redirect the output to a specific user, add or update the MAIL variable in the crontab as shown below.
 
ramesh@dev-db$ crontab -l
MAIL="ramesh"

@yearly /home/ramesh/annual-maintenance
*/10 * * * * /home/ramesh/check-disk-space

[Note: Crontab of the current logged in user with MAIL variable]

If you wanted the mail not to be sent to anywhere, i.e to stop the crontab output to be emailed, add or update the MAIL variable in the crontab as shown below.
 
MAIL=""

13. How to Execute a Linux Cron Jobs Every Second Using Crontab.

You cannot schedule a every-second cronjob. Because in cron the minimum unit you can specify is minute. In a typical scenario, there is no reason for most of us to run any job every second in the system.

14. Specify PATH Variable in the Crontab

All the above examples we specified absolute path of the Linux command or the shell-script that needs to be executed.

For example, instead of specifying /home/ramesh/tape-backup, if you want to just specify tape-backup, then add the path /home/ramesh to the PATH variable in the crontab as shown below.
 
ramesh@dev-db$ crontab -l

PATH=/bin:/sbin:/usr/bin:/usr/sbin:/home/ramesh

@yearly annual-maintenance
*/10 * * * * check-disk-space

[Note: Crontab of the current logged in user with PATH variable]

15. Installing Crontab From a Cron File

Instead of directly editing the crontab file, you can also add all the entries to a cron-file first. Once you have all thoese entries in the file, you can upload or install them to the cron as shown below.
 
ramesh@dev-db$ crontab -l
no crontab for ramesh

$ cat cron-file.txt
@yearly /home/ramesh/annual-maintenance
*/10 * * * * /home/ramesh/check-disk-space

ramesh@dev-db$ crontab cron-file.txt

ramesh@dev-db$ crontab -l
@yearly /home/ramesh/annual-maintenance
*/10 * * * * /home/ramesh/check-disk-space

Note: This will install the cron-file.txt to your crontab, which will also remove your old cron entries. So, please be careful while uploading cron entries from a cron-file.txt.

Sunday, October 13, 2013

10 Useful Features Hidden in VLC

vlc-desktop-window

There’s a good chance you already use the VLC media player. But VLC isn’t just a media player — it’s a complete Swiss Army Knife for digital videos and music, filled with useful and fun features you haven’t found yet.

If you’re just using VLC to play back local media files, you’re only using a tiny fraction of VLC’s capabilities. There’s so much more you can do with VLC, whether you’re using it on Windows, Mac, or Linux.

Convert Media Files

RELATED ARTICLE
How to Shrink Videos to Fit Your Android Phone with VLC
If you want to put a video on your Android phone, you’ll probably need to shrink it down to fit... [Read Article]
VLC can convert media files between the formats it supports. You could use this to make a video smaller for a mobile device, convert media from an unsupported format to one your device supports, or even to extract the audio from a video and save it as a separate file.

To do this, click the Media menu and select Convert / Save. Load the file you want to convert, click the Convert / Save button, and select the type of file you want to convert it to. Use the Edit selected profile button to tweak the video encoding settings.

vlc-convert

Stream Media Over the Network or Internet

RELATED ARTICLE
How to Stream Videos and Music Over the Network Using VLC
VLC includes a fairly easy-to-use streaming feature that can stream music and videos over a local network or the Internet.... [Read Article]
VLC can stream media across the Internet or on your local network. To get started, click the Media menu, select Stream, provide the media file you want to stream and click the Stream button. You’ll be able to set up VLC as a media server so other computers on the network — or even around the world — can connect to your stream and view it.

Of course, if you want to stream over the Internet, you’ll probably need to forward ports on your router.

Record Your Desktop

RELATED ARTICLE
How to Record Your Desktop to a File or Stream It Over the Internet with VLC
VLC is full of powerful features, including the ability to record your desktop. VLC is great for quick captures, although... [Read Article]
VLC can load your desktop as an input device. This means that you can use the Convert / Save feature to save a video of your desktop, effectively turning VLC into screen capture software. You could also use this in concert with the Stream feature to broadcast a live stream of your desktop across the network or Internet with no additional software required.

vlc screencast header

Remotely Control Playback From a Browser

RELATED ARTICLE
How to Activate VLC’s Web Interface, Control VLC From a Browser, & Use Any Smartphone as a Remote
VLC includes a web interface, which you can enable to access your VLC player from a web browser, controlling playback... [Read Article]
VLC has an integrated HTTP server you can enable. Set this up and you can then remotely access your VLC client via a web browser. This would allow you to remotely control a media center PC from a web browser, controlling playback and queuing up audio or video files. You could even use this along with a smartphone to turn your phone into a remote control for VLC. There are mobile apps that function as remote controls for VLC, and these apps use VLC’s web interface to function.

image

Watch YouTube Videos

RELATED ARTICLE
How to Watch YouTube Videos in VLC Media Player
VLC Media player is capable of playing just about anything you can throw at it, but did you know that... [Read Article]
Want to play a YouTube video outside of your web browser? Just browse to a video on YouTube and copy its full URL — this should look something like the following:
https://www.youtube.com/watch?v=###########
Click the Media menu in VLC, select Open Network Stream, and paste the YouTube video’s URL into the box. VLC will load the video from YouTube and play it in a VLC window on your desktop.


When the video is playing, you could click the Tools menu and select Codec Information. You’ll see the full web address of the MP4 video displayed in the Location box, so you can copy-and-paste into a download manager — or just your web browser — to download the YouTube video to your computer.

Subscribe to Podcasts

VLC can be used to stream podcasts, so you don’t need any additional software if you want to listen to podcasts at your PC. Just click the View menu in VLC and select Playlist. Hover over Podcasts in the sidebar, click the + button, and paste the address of a podcast’s feed into the box. You can then stream the podcast’s episodes from within VLC.

vlc-subscribe-and-listen-to-podcast

Play Internet Radio

Before Pandora and Spotify, there were streaming Internet radio stations. There was a time when Internet users primarily streamed these radio stations from within Winamp, but they live on. You can view a searchable directory of radio stations from within VLC — just open the playlist and select Icecast Radio Directory. Perform a search for the kind of music you want to listen to or browse the list of free streaming radio stations.

Of course, VLC can also stream other Internet radio stations that aren’t included in this directory. You can generally find a “listen” link on their websites that will allow you to listen in a desktop player like VLC.

vlc-internet-radio-directory

Apply Video and Audio Effects

RELATED ARTICLE
Rotate a Video 90 degrees with VLC or Windows Live Movie Maker
Have you ever captured video with your cell phone or camcorder only to discover when you play it back on your computer that the video is rotated 90 degrees? Or maybe you shot it that way on purpose because you preferred portrait style to a landscape view? Before you go straining your neck or flipping your monitor on it’s side to watch your video, we’ll show you a few easier methods. [Read Article]
VLC can apply audio effects, video effects, and tweak the way a video’s audio and video line up. Click the Tools menu and select Effects and Filters. From here, you can apply an audio equalizer or video effects, such as cropping, rotating, overlaying, or colorizing a video. From the Synchronization tab, you can tweak the way a video’s audio and video stream line up. This allows you to fix broken videos where the audio and video are out of sync.

vlc-effects

As with other VLC features, these effects can be combined with other features. For example, you could permanently apply effects to a video by enabling these effects before using the Convert / Save feature.

ASCII Playback

RELATED ARTICLE
Stupid Geek Tricks: Watch Movies in Your Linux Terminal Window
In these days of high definition videos everywhere (even YouTube), only the truly geeky would decide to watch their movies in ASCII text in a terminal window. The surprising thing is that some videos are even fairly watchable. [Read Article]
ASCII playback isn’t a very useful feature, but it’s certainly an amusing one. In ASCII playback mode, VLC will display a video as ASCII characters rather than play it normally. It’s extremely impractical, but extremely geeky and worth a test drive if you want to surprise and amuse someone.

Click the Tools option in VLC, select Preferences, and click the Video icon. Click the Output box and select Color ASCII art video output. Save your settings, restart VLC, and start playing a new video. This feature works best with simple videos, such as cartoons with large sections of flat color.

vlc-ascii-art

After you’re done, go back into this window, click the Output box, and select Automatic to make VLC play videos normally.

Use a Video Wallpaper

RELATED ARTICLE
Set a Video as Your Desktop Wallpaper with VLC
Are you tired of static desktop wallpapers and want something a bit more entertaining? Today we’ll take a look at setting a video as wallpaper in VLC media player. [Read Article]
VLC also allows you to set a video as your desktop wallpaper, replacing your desktop background with a video. It’s not very practical and extremely distracting, but hey — it’s something you can’t do with many media players.

To do this, open VLC’s preferences window, click the Video icon, and select DirectX (DirectDraw) video output in the Output box. Restart VLC, load a video, and you’ll be able to click the Video menu and select Set as Wallpaper to turn the video into your desktop wallpaper.


When you’re done, just change VLC’s Output setting back to Automatic and restart it.


VLC is also available for other platforms, giving you excellent compatibility with different media formats on almost any device. In addition to Windows, Mac, and Linux, VLC can run on an Android phone or tablet or an iOS device like an iPhone, iPad, or iPod touch. VLC will also soon be available for Windows 8′s Modern interface and Windows Phone.

7 Skype Tips for Power Users

skype-login

Now that Skype has been merged with Windows Live Messenger, it’s more popular than ever. There’s no way to use Skype with a third-party client, but Skype does offer hidden features that can make it more powerful.
These are a few useful Skype tricks you won’t find unless you go off the beaten path, offering ways to sign into multiple Skype accounts, use IRC-style chat commands, record Skype calls, and even disable some of Skype’s built-in advertising.

Sign Into Multiple Skype Accounts

Unlike some messaging programs, Skype doesn’t allow you to easily log into multiple accounts. Try to launch the Skype shortcut once you’ve already opened Skype and it will just bring your already-open Skype window to the front. But you may have multiple Skype accounts — perhaps you have one for work and one for personal use.
Rather than open Skype as another Windows user account, Skype has a hidden option you can use to open a new Skype instance.
To do this, press Windows Key + R to open the Run dialog. In the Run dialog, enter the following command if you’re using a 32-bit version of Windows:
“C:\Program Files\Skype\Phone\Skype.exe” /secondary
On 64-bit versions of Windows, enter the following command instead:
“C:\Program Files (x86)\Skype\Phone\Skype.exe” /secondary
Skype will open a second Skype window, which you can log into as another Skype account. If you wanted to use this frequently, you could create a new Windows shortcut that opened Skype with the /secondary switch.

sign-into-multiple-skype-accounts[4]

Disable Contact List Advertisements

Skype will always show advertisements in its home pane, but it also shows advertisements at the bottom of your contact list by default. You can click the X button to close these advertisements whenever they appear, but they’ll just keep coming back. But there’s a better way — you can disable them permanently if you know where to look.

To disable the contact-list advertisements, or “promotions,” open Skype’s Options window, navigate to Notifications -> Alerts & messages, and uncheck the Promotions checkbox.

disable-skype-contact-list-promotions

Edit or Delete Sent Messages

This feature also isn’t immediately obvious if you’re used to other chat programs. If you make a mistake when typing a message or send a message you didn’t mean to, you can edit or delete a sent message later.
To do so, just right-click a message you’ve already sent and select Edit Message or Remove Message. When you edit a message, Skype will note that the message was edited — and if you delete a message, Skype will display “This message has been removed.”

Of course, if your recipient already saw the original message you sent, there’s no way to edit it out of their mind.

skype-edit-or-delete-message

Record Skype Calls

Skype doesn’t include a built-in call recording feature, but you may find yourself wanting to record a call at some point. Perhaps you’re interviewing someone remotely and you want to create a record of the interview that you can refer to later, perhaps you’re recording a podcast, or perhaps you’re having a business discussion and want a record of any agreements you make. There are plenty of good reasons you may want to record a call — aside from the obvious creepy ones.

As Skype doesn’t include a built-in call-recording feature, you’ll need to use a third-party application that will do the recording for you. There are several options out there — in the past, MP3 Skype Recorder was recommended to us by a reader and we found that it worked well.


Use Screen Sharing

Skype’s screen-sharing feature allows you to share your desktop with a Skype contact. You can use this feature to quickly troubleshoot someone’s PC without making them install additional remote access software. Or, you can us this feature to give a presentation and or show anything else remotely. You could also choose to share a single window instead of your entire desktop, giving yourself some privacy.

While on a Skype call, just click the + button and select Share screens. You could also just click the + button and select Share screens to initiate screen-sharing while not already on a call.

skype-share-screens
RELATED ARTICLE
The Best Tools to Easily Perform Remote Tech Support
“Help, my computer is broken!” comes the phone call yet again. If you’re stuck playing tech support for family or... [Read Article]
Bear in mind that, unlike traditional remote-access software, there’s no way to give someone else control over your screen. You’d have to walk the other person through any changes you make to their computer if you were acting as remote tech support via Skype screen-sharing.

Master Text-Based Chat Commands

If you’re a geek, there’s a good chance you’ve used IRC before. IRC offers a wide variety of chat features that are available as text-based commands, and Skype offers many comparable features.
In a Skype chat room, you can use the /add command to add a Skype user to the chat, use the /topic command to set a topic for that chat room, use the /setpassword command to set a password for that chat room, use the /setrole command to assign permissions to users in the chat, use the /kick command to kick a user from the chat, or use the /kickban command to kick a user and ban them from rejoining.

These are just a few of the chat commands Skype offers — check the What are chat commands and roles? page on the Skype website for a comprehensive list. You could also just use the /help command from within Skype to access a list of chat commands, although you’ll only see the full list if you’re in a chat room with more than two people.

skype-chat-commands

Easily Send a File to Multiple People

While you’re in a Skype chat with multiple people, you can easily send a file to them all by dragging and dropping the file into the chat room or conference call. Skype will give a copy of the file to everyone, allowing you to quickly share files without the hassle of sending them as an email attachment, sharing them via Dropbox, or even using Skype’s Send File feature to send it to them one at a time.
You could also create a group in your contacts, and then right-click the group and select Send File to send a file to every contact in that group at once. It’s an easy way to distribute files to several people at once.

skype-send-file

Skype may have become popular because it offered dead-simple voice and video calls over the Internet that “Just Worked” without any firewall configuration, but it’s more than a basic program. It offers quite a few power-user features that geeks will appreciate.

Thursday, September 5, 2013

The 6 Best Business Presentation Software Alternatives To PowerPoint

Think PowerPoint presentations, and you probably think of a never-ending series of slides and the urge to doze off.
Sure, Microsoft PowerPoint might be the industry standard for presentations, but it’s got its fair share of haters (case in point: the Anti Powerpoint Party). Fall back on stock templates too often, and your business presentations are going to lack the impact you desire.
If you need to create a snazzy, animated presentation that captures attention, then you need business presentation software that’s designed to do the job. Here are 6 PowerPoint alternatives to consider.

1. Prezi

Prezi is about as different from PowerPoint as you can get. Rather than offering a slide-by-slide presentation, it’s more of a visual and interactive mindmap, wherein you interact with different elements on a virtual canvas. Convert your PowerPoint presentation slides into a dynamic user experience, or create a brand new ‘prezi’ from scratch.
Prezi is an online tool, so it’s available anywhere that you have an internet connection. There’s also the ability to work offline and to set security levels around who can see your animated presentations. Because Prezi is non-linear, it’s easy to jump from editing one part to another, although this can be difficult to get used to at first. Once you’re done, publish it on Prezi.com or embed it on your own website.

2. GoAnimate

In many cases, an informative, animated video presentation is the best way to get your message across. While not strictly business presentation software, GoAnimate provides you with the tools to create a standout animation so you can focus on the narrative. It’s a full suite of applications designed to help users create animated presentations for free.
GoAnimate is a great platform for presenting your idea, with a huge variety of pre-made themes, props and characters tailored for making professional business presentations. Rather than just queuing up images in slides, you can produce a professional-looking video from scratch in minutes – without drawing anything or operating a camera. Just drag and drop from the extensive content library and forget about recording or editing. Then download, share or publish your finished animated presentation to YouTube.

3. Google Docs

Almost everyone has a Google account these days, and therefore access to Google Docs! As a PowerPoint alternative, this may not be as powerful, but it is free.
Presentations are easily customized with text, images, videos, imported slides, and all that good stuff. It’s all done through the cloud, so it’s easy to collaborate on shared documents with other people. If you like, your presentation can be downloaded as a PowerPoint file as well as embedded or shared through a link.

4. Sliderocket

Now we’re talking high end presentation software. Sliderocket is a premium PowerPoint alternative that’s packed with features.
Here’s how it works: import a PowerPoint presentation or start from scratch with the theme library. Embed images, charts, videos, transitions, special effects – all of which can be stored, searched for later and shared with others. Live data from real-time feeds online can also be embedded (slides automatically update with the latest information).
Extra capabilities include version control, privacy control – decide who can view, edit or share your slides – plus metrics to track who is viewing your slideshow, where they viewed it, who they’ve shared it with, which slides they looked at and for how long. Sliderocket presentations are also HTML5 compatible.

5. Zoho Show

Zoho Show’s presentation software is a cloud-based option that supports the import of many file types (.ppt, .pptx, .pps, .ppsx, .odp, .sxi) and retains the look of the original document when viewed online. As a Powerpoint alternative, Zoho’s clean and simple interface is easy to navigate.
Anyone creating business presentations will appreciate the custom flowcharts and diagrams, complete with dynamic shapes and connectors. Enhance your presentations with pictures and videos embedded straight from the web, Picasa and Flickr and add effects or touch-ups in seconds using the image editor. To make things more interesting, there’s a wide gallery of animation and slide transition effects too. Plus Zoho enables universal style changes in a snap through the master slide feature, which rolls out changes to every single slide thereafter.
Version tracking is supported, as is real-time collaboration with other users. You get to choose who has permission to edit or view your presentation.
Ready to show off your final product? Send out a link to your business presentation, publish it to Zoho’s Public Presentations section, or embed it on your website.

6. Slidesnack

Slidesnack is a relatively new and basic option for making slideshows and slidecasts (presentation + voice).
Start by uploading your documents (Powerpoint, Keynote, Word) as PDFs, then design a slideshow from the templates available. You can also record comments for a voiceover. Slidecasts can then be downloaded as video and uploaded to YouTube, Vimeo or any other video sharing service. As for sharing, your presentations can be embedded on your blog or website for all the world to see.

Friday, August 30, 2013

10 VirtualBox Tricks and Advanced Features You Should Know About

image

VirtualBox is packed with features that you may have never used, even if you frequently use it to run virtual machines. VMware keeps many of its best features to its paid versions, but all of VirtualBox’s features are completely free.
Many of the features here require Guest Additions installed in your virtual machine. This is good to do anyway, as installing the Guest Additions package will speed up your virtual machines.

Snapshots

RELATED ARTICLE
How to Save Time by Using Snapshots in VirtualBox
Snapshots are a massive time saver when you are testing settings and configuration for your Geek School testing. Read on... [Read Article]
VirtualBox can create snapshots that save a virtual machine’s state. You can revert to the saved state at any time by restoring a snapshot. Snapshots are similar to leaving a virtual machine in a saved state, but you can have multiple saved states and restore from them at any time.
To create a snapshot, click the Machine menu while the virtual machine is running and select Take snapshot or use the Snapshots panel. You can restore snapshots from this interface later.
Snapshots are particularly useful if you want to do something to a virtual machine and then erase your changes. For example, if you use a virtual machine to test software, you can create a snapshot of a clean Windows system, then install the software and play with it. When you’re done, you can restore the original snapshot and all traces of the software will be erased. You don’t have to reinstall your guest operating system or manually back up and restore a virtual machine’s files.

virtualbox-take-snapshot

Seamless Mode

RELATED ARTICLE
Use VirtualBox’s Seamless Mode or VMware’s Unity Mode to Seamlessly Run Programs From a Virtual Machine
Virtual machines generally run guest operating systems and their programs in a single window. However, both VirtualBox and VMware have... [Read Article]
Seamless mode allows you to break windows out of your guest operating system window and place them on your host operating system’s desktop. For example, if you use VirtualBox to run an important Windows program on your Linux desktop, you can use Seamless mode to have that Windows program be present on your Linux desktop.
To use this feature, install VirtualBox’s Guest Additions package inside the virtual machine, select the View menu, and click Switch to
Seamless Mode.

virtualbox-switch-to-seamless-mode

3D Support

RELATED ARTICLE
How To Enable 3D Acceleration and Use Windows Aero in VirtualBox
VirtualBox’s experimental 3D acceleration allows you to use Windows 7’s Aero interface in a virtual machine. You can also run... [Read Article]
VirtualBox has basic support for 3D graphics. You’ll have to go out of your way to enable this — the appropriate drivers aren’t installed by default when you install Guest Additions and you must manually enable these settings from the virtual machine’s settings window.
The 3D support won’t allow you to play the latest 3D games, but it does allow you to enable Windows Aero desktop effects in the virtual machine and play older 3D games that aren’t too demanding.

virtualbox-enable-3d-acceleration

USB Devices

You can connect USB devices to your computer and expose them to the virtual machine as if they were connected directly. This feature can be used with USB drives and a variety of other devices. As long as USB support is enabled in the virtual machine’s settings window, you can click the Devices tab, point to USB Devices, and select the USB devices you want to connect.

virtualbox-usb-devices

Shared Folders

VirtualBox allows you to set up “shared folders” that both the host operating system and guest operating system can access. To do this, VirtualBox essentially takes a folder on the host operating system and uses network file sharing to make it accessible inside the virtual machine. Configure shared folders from the virtual machine’s settings window and then access or mount them as you’d mount normal network shares.

virtualbox-shared-folders

Shared Clipboard and Drag and Drop

Copy and paste and drag and drop don’t work between the guest and host operating systems by default. However, VirtualBox allows you to share your clipboard between your guest operating system and host operating system, making copy-and-paste work properly. You can also use drag and drop to easily move files back and forth. Both of these features reduce the friction of using software inside a virtual machine, but they’re disabled by default.

virtualbox-clipboard-drag-drop

Cloning Virtual Machines

VirtualBox allows you to clone a virtual machine, creating a copy of it. If you try to copy-paste the files manually, you’ll end up with problems because both virtual machines will use the same identifier number for their virtual disks. When you clone a virtual machine, VirtualBox will ensure they don’t conflict with each other.

clone-virtual-machine

Port Forwarding

RELATED ARTICLE
How to Forward Ports to a Virtual Machine and Use It as a Server
VirtualBox and VMware both create virtual machines with the NAT network type by default. If you want to run server... [Read Article]
Virtual machines are normally isolated from the network. If you’d like to run server software inside a virtual machine, you’ll probably want to set up port forwarding so the server software is reachable from outside of the virtual machine. You’ll find this option in the Network settings pane, under Advanced.
You could also opt to connect the virtual machine directly to the network instead of using NAT, but NAT with port forwarding may be a better way to only allow specific ports through without changing your network settings too much.

port-forwarding-virtualbox

Importing and Exporting VM Appliances

Appliances are virtual machines with preinstalled operating systems. You can create your own appliances or download appliances in OVF format and import them into VirtualBox. This is particularly useful for Linux virtual machines and other systems that can be distributed freely, although you could also create your own appliances and distribute them throughout your organization.

virtualbox-import-or-export-appliances

Remote Display

VirtualBox allows you to enable remote display for a virtual machine, allowing you to run a virtual machine on a headless server or other remote system and access it from another computer. VirtualBox does this with “VRDP,” which is backwards compatible with Microsoft’s RDP protocol. This means you can use the Remote Desktop Connection program in Windows or any other RDP viewer to access your virtual machine remotely without the need for any VirtualBox-specific software.

virtualbox-enable-remote-display

You can also enlarge a virtual machine’s disks in VirtualBox. VirtualBox doesn’t expose this option in its interface, requiring you to use the VBoxManage command instead.

source   :   http://www.howtogeek.com/