Wednesday, December 26, 2012
Add Page Numbers to Documents in Word 2007 & 2010
If you’re creating a large document with several pages you might want to add page numbers to keep them in order. Today we show you how to add page numbers on your documents in Word 2007 & 2010.
Add Page Numbers in 2007
To add page numbers, open your Word document and click the Insert tab on the Ribbon and select Page Number. From here select where you want the page numbers to appear in the document and choose from the gallery of page number formats.
In this example we selected the “Bold Numbers 1” format for the Footer, and after selected they will appear in the document.
After you’ve selected the page number format Headers & Footer Tools open in the Design tab. From here you can change different options such as Different Odd & Even Pages.
If you go to Print Preview, you can see how the page numbers will look when the document is printed out. If it doesn’t look how you like it, you can close out of Print Preview and choose another.
The process is virtually identical in Word 2010 as well. The only difference is when you view it in Print Preview, you’ll have more options offered in Backstage view.
The only difference is when you view it in Print Preview, you’ll have more options offered in Backstage view.
That is really all there is to it. The next time you have a large document with several pages, you’ll be able to insert page numbers to help people keep track of the data.
Customize the Windows 7 Logon Screen
Do you like to customize the Windows interface, and tired of the standard log on screen in Windows 7? Today we take a look at Windows 7 Logon Background Changer which is a free and Open Source app that lets you easily customize the logon screen.
Windows 7 Logon Background Changer
This cool app is free, Open Source, and lets you change the wallpaper on the Windows 7 Logon screen. It doesn’t require installation, and won’t change any of the system files. The download is a small zip file that contains an executable you can run from a flash drive, and also an installer in the Setup folder if you choose to install it.
After launching Background changer, you can browse through the standard Windows backgrounds to get an idea of how it will look.
If you don’t want to use the standard Windows backgrounds, you can add your own folder of images.
After you’ve selected the background you want, click on the Apply button in the upper right hand corner.
Click Yes on the authorization screen.
Click Yes to User Account Control if it comes up.
The wait a bit while the background is applied.
Now you can log off to see how the new background will look when you or another user signs in.
There are some different settings you can select like resetting back to the default pictures folder, preventing other users from changing the background, and adjust shadows.
Note :-
There are several apps out there that will tweak the logon background, but this one from Julien Manici is one of the better ones that I’ve found. It’s easy to use and has a nice amount of features for tweaking the background. If you like to tweak and customize your Windows 7 interface, you’ll definitely want to take a look at this app.
Download Windows 7 Logon Background Changer
Windows 7 Logon Background Changer Homepage
3 Easy Ways to Connect to Windows Shared Folders from Linux
Connecting to file servers is something most people do on a daily basis even without thinking about it. In Linux, it may not be intuitive how to quickly connect to a samba or ftp server without a separate program. Here are a few different ways to connect to a remote file server without needing to touch a terminal.
Using Keyboard Shortcut
You can connect to a server by opening the run application window with the Alt+F2 keyboard shortcut. You will just need to specify the server type by adding the protocol at the beginning of the command. For example smb:// will connect to a samba share; other supported protocols are ssh, ftp, sftp, http, and https.
Note: In the example below my server name is playground and the shared folder is called music.

If your server requires a password to connect, fill out the next window that pops up and select how long you would like it to store your password.

A Nautilus window will automatically open with the server you just connected to, and you should have a shortcut under places on the left side and a shortcut on your desktop.

From GNOME Menu
If you are using Ubuntu, and many other GNOME based distributions, you will have a places menu on your top menu bar. Open that menu and click connect to server.
A new window will open up with a drop down so you can select what type of server you are connecting to.

For a samba/cifs server select Windows share and fill out the required information.
Note: Unlike the run application window, you do not need the slashes to connect here.

Alternatively, you can also get to the connect to server window from Nautilus’ file menu.

With a Shortcut
If you would like instant access to the connect to server window from your GNOME menu bar right click on the menu you would like to add the shortcut to and click add to panel.
In the window that pops up, search for “connect” and connect to server should be one of the results. Highlight the shortcut and click add at the bottom of the window.

Now you will have an additional shortcut on your GNOME bar for easy access.
Monday, December 24, 2012
Methods to Take Screenshot Capture in Ubuntu Linux
Screenshot is an image taken by a computer to capture the visible
items on the monitor or any other output devices. There are several ways
of taking screenshots in Linux. In this article, we will cover few
tools that are used for taking screenshots.
When we want to take a particular window, we can use “Alt+Print Screen”. Alt+PrintScreen will take only the particular window which is currently active.
Launch the screenshot tool as shown below.
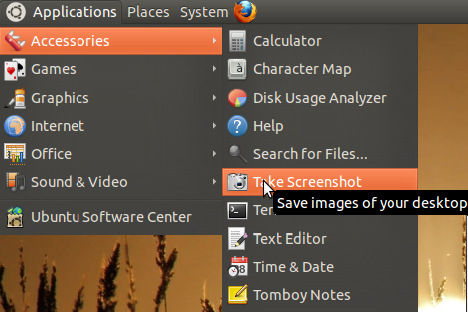
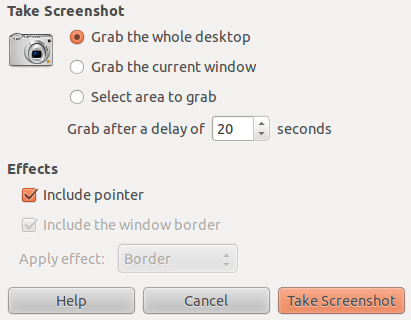
From the command-line, just type the command “gnome-screenshot” to do the same. The command will take a screenshot and provide a dialog to save it.
From the command-line, use the -w option as follows to do the same.
From the command-line, use -d option to do the same. -d 2 is used for delaying the screenshot for 2 seconds. So within the 2 seconds, we can make the window which we want to take screenshot as active.
From the command-line, use the -a option to do the same. Once this command is entered, the mouse pointer will be changed, and you can drag and select which area to take screenshot.
From the command line, use -b/-B options respectively to do the same. This command will include the window border along with the screenshot.
Source : http://www.thegeekstuff.com
1. Use Print Screen
This is the most common method to take screenshots. Pressing the “Print Screen” button will take the screenshot of the “Entire Visible Screen”.When we want to take a particular window, we can use “Alt+Print Screen”. Alt+PrintScreen will take only the particular window which is currently active.
2. Use gnome-screenshot
gnome-screenshot utility is part of the GNOME Desktop Environment, which can also be used to take screenshot. It also has a command line mode (gnome-screenshot)Launch the screenshot tool as shown below.


Capture the Entire Screen:
From the UI, to take a screenshot with entire screen, select “Grab the whole desktop” and click “Take Screenshot”.From the command-line, just type the command “gnome-screenshot” to do the same. The command will take a screenshot and provide a dialog to save it.
$ gnome-screenshot
Capture Only the Current Window:
From the UI, to take the screenshot of the current active window alone, select “Grab the Current Window” and click “Take Screenshot”.From the command-line, use the -w option as follows to do the same.
$ gnome-screenshot -w
Take Screenshot After Some Delay:
From the UI, you can also set a delay before taking the screenshots. Set the “Grab after a delay” to the required number of seconds. This will be really helpful when we need to take screen shots of navigation.From the command-line, use -d option to do the same. -d 2 is used for delaying the screenshot for 2 seconds. So within the 2 seconds, we can make the window which we want to take screenshot as active.
$ gnome-screenshot -w -d 2
Capture a Particular Area:
From the UI, if you want to take a particular rectangle area alone, then select “Grab a Particular area” and click “Take Screenshot”.From the command-line, use the -a option to do the same. Once this command is entered, the mouse pointer will be changed, and you can drag and select which area to take screenshot.
$ gnome-screenshot -a
Take Screenshot Including or Excluding Window Border:
From the UI, you can also include or exclude the window border by selecting/deselecting “Include the Window Border” option.From the command line, use -b/-B options respectively to do the same. This command will include the window border along with the screenshot.
$ gnome-screenshot -w -b
The following command will exclude the window border from the screenshot.$ gnome-screenshot -w -B
3. Use ImageMagic’s Import Command
ImageMagick is an open source software suite for displaying, converting, and editing raster image files. It comes with various command line tools, and one of that is “import”. Now we will see, how we can use import to take screenshots. You can install it by using apt-get on debian/ubuntu as follows:# apt-get install imagemagick
Capture Entire Screen using -window root option
Use the “-window root” option to take screenshot of the complete screen. The screenshot will be saved in the file name provided in the command line.$ import -window root Pictures/Image5.png
ImageMagick supports more that 100 file types. You can use any one of them to store the output.Capture a Particular Window/Area:
Type the following command, it will change the mouse pointer to “Cross” symbol. Select the window which you would like to take screenshot or click and drag to take screenshot of particular area.$ import calc.png
Include the frame using -frame option:
You can also include the “frame” of the window using the -frame option.$ import -frame Image6.png
Take Screenshot and Resize using -resize option:
You can also take screenshot and resize the screenshot using the -resize option. Pause option is used to make a delay before taking the screenshots.$ import -window root -resize 640 -pause 4 Pictures/Image7.png
Please refer “man import” for more number of options supported by import command.4. Use GIMP
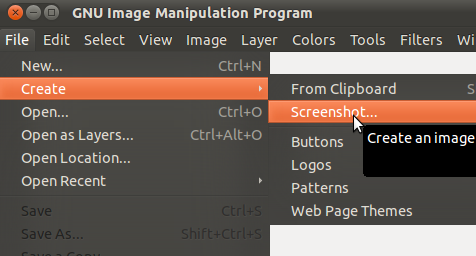
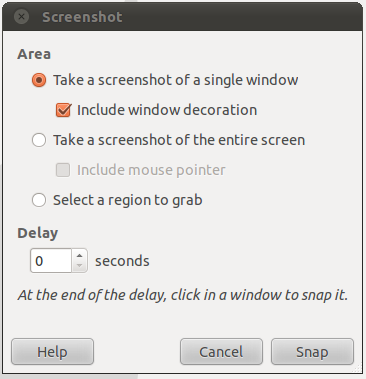
You can also take screenshot from gimp. Launch gimp, and click “File->Create->Screenshot”. A new dialog window will open with options similar to gnome-screenshot.

Source : http://www.thegeekstuff.com
Saturday, December 22, 2012
SQLite3 SQL Commands Explained with Examples
SQLite3 is very lightweight SQL database which focuses on simplicity
more than anything else. This is a self-contained serverless database
engine, which is very simple to install and use.
While most of the commands in the SQLite are similar to SQL commands
of other datbases like MySQL and ORACLE, there are some SQLite SQL
commands that are different.
This article explains all the basic SQL commands that you need to know to use the SQLite database effectively.
If you don’t have sqlite installed, execute “yum install sqlite” to install it. You can also install SQLite database from source to get the latest version.
If you don’t have sqlite installed, execute “yum install sqlite” to install it. You can also install SQLite database from source to get the latest version.
1. Create a SQLite Database (and a Table)
First, let us understand how create a SQLite database with couple of tables, populate some data, and view those records.
The following example creates a database called employee.db. This
also creates an employee table with 3 columns (id, name and title), and a
department table in the company.db database. We’ve purposefully missed
the deptid column in the employee table. We’ll see how to add that
later.
# sqlite3 company.db
sqlite> create table employee(empid integer,name varchar(20),title varchar(10));
sqlite> create table department(deptid integer,name varchar(20),location varchar(10));
sqlite> .quit
Note: To exit from the SQLite commandline “sqlite>” prompt, type “.quit” as shown above.
A SQLite database is nothing but a file that gets created under your current directory as shown below.
# ls -l company.db
-rw-r--r--. 1 root root 3072 Sep 19 11:21 company.db
2. Insert Records
The following example populates both employee and department table with some sample records.
You can execute all the insert statements from the sqlite command
line, or you can add those commands into a file and execute the file as
shown below.
First, create a insert-data.sql file as shown below.
# vi insert-data.sql
insert into employee values(101,'John Smith','CEO');
insert into employee values(102,'Raj Reddy','Sysadmin');
insert into employee values(103,'Jason Bourne','Developer');
insert into employee values(104,'Jane Smith','Sale Manager');
insert into employee values(105,'Rita Patel','DBA');

insert into department values(1,'Sales','Los Angeles');
insert into department values(2,'Technology','San Jose');
insert into department values(3,'Marketing','Los Angeles');
The following will execute all the commands from the insert-data.sql in the company.db database
# sqlite3 company.db < insert-data.sql
3. View Records
Once you’ve inserted the records, view it using select command as shown below.
# sqlite3 company.db
sqlite> select * from employee;
101|John Smith|CEO
102|Raj Reddy|Sysadmin
103|Jason Bourne|Developer
104|Jane Smith|Sale Manager
105|Rita Patel|DBA

sqlite> select * from department;
1|Sales|Los Angeles
2|Technology|San Jose
3|Marketing|Los Angeles
4. Rename a Table
The following example renames department table to dept using the alter table command.
sqlite> alter table department rename to dept;
5. Add a Column to an Existing Table
The following examples adds deptid column to the existing employee table;
sqlite> alter table employee add column deptid integer;
Update the department id for the employees using update command as shown below.
update employee set deptid=3 where empid=101;
update employee set deptid=2 where empid=102;
update employee set deptid=2 where empid=103;
update employee set deptid=1 where empid=104;
update employee set deptid=2 where empid=105;
Verify that the deptid is updated properly in the employee table.
sqlite> select * from employee;
101|John Smith|CEO|3
102|Raj Reddy|Sysadmin|2
103|Jason Bourne|Developer|2
104|Jane Smith|Sale Manager|1
105|Rita Patel|DBA|2
6. View all Tables in a Database
Execute the following command to view all the tables in the current
database. The folowing example shows that there are two tables in the
current database.
sqlite> .tables
dept      employee
7. Create an Index
The following example creates an unique index called empidx on the empid field of employee table.
sqlite> create unique index empidx on employee(empid);
Once an unique index is created, if you try to add another record
with an empid that already exists, you’ll get an error as shown below.
sqlite> insert into employee values (101,'James Bond','Secret Agent',1);
Error: constraint failed
8. Create a Trigger
For this example, first add a date column called “updatedon” on employee table.
sqlite> alter table employee add column updatedon date;
Next, create a file that has the trigger definition. The following
trigger will update the “updatedon” date column with the current
timestamp whenever you perform an update on this table.
# vi employee_update_trg.sql
create trigger employee_update_trg after update on employee
begin
  update employee set updatedon = datetime('NOW') where rowid = new.rowid;
end;
Create the trigger on the company.db database as shown below.
# sqlite3 company.db < employee_update_trg.sql
Now anytime you update any record in the employee table, the
“updatedon” date column will be updated with the current timestamp as
shown below. The following example updates the “updatedon” timestamp for
empid 104 through trigger.
# sqlite3 company.db
sqlite> update employee set title='Sales Manager' where empid=104;

sqlite> select * from employee;
101|John Smith|CEO|3|
102|Raj Reddy|Sysadmin|2|
103|Jason Bourne|Developer|2|
104|Jane Smith|Sales Manager|1|2012-09-15 18:29:28
105|Rita Patel|DBA|2|
9. Create a View
The following example creates a view called “empdept”, which combines fields from both employee and dept table.
sqlite> create view empdept as select empid, e.name, title, d.name,
location from employee e, dept d where e.deptid = d.deptid;
Now you can execute select command on this view just like a regular table.
sqlite> select * from empdept;
101|John Smith|CEO|Marketing|Los Angeles
102|Raj Reddy|Sysadmin|Technology|San Jose
103|Jason Bourne|Developer|Technology|San Jose
104|Jane Smith|Sales Manager|Sales|Los Angeles
105|Rita Patel|DBA|Technology|San Jose
After creating a view, if you execute .tables, you’ll also see the view name along with the tables.
sqlite> .tables
dept      empdept   employee
10. SQLite Savepoint, Rollback, Commit
Currently dept table has the following 3 records.
sqlite> select * from dept;
1|Sales|Los Angeles
2|Technology|San Jose
3|Marketing|Los Angeles
Now, create a savepoint called “major”, and perform some transactions
on the dept table. As you see below, we’ve added two records, deleted
one record, after creating a savepoint called “major”.
sqlite> savepoint major;
sqlite> insert into dept values(4,'HR','Los Angeles');
sqlite> insert into dept values(5,'Finance','San Jose');
sqlite> delete from dept where deptid=1;
sqlite> select * from dept;
2|Technology|San Jose
3|Marketing|Los Angeles
4|HR|Los Angeles
5|Finance|San Jose
Now for some reason, if we don’t want the above transactions, we can
rollback the changes to a particular savepoint. In this example, we are
rolling back all the changes we’ve made after the “major” savepoint.
sqlite> rollback to savepoint major;
sqlite> select * from dept;
1|Sales|Los Angeles
2|Technology|San Jose
3|Marketing|Los Angeles
If you don’t want your savepoints anymore, you can erase it using release command.
sqlite> release savepoint major;
11. Additional Date Functions
By default, the date columns values displayed in UTC time. To display
in the local time, use the datetime command on the date column as shown
below.
sqlite> select empid,datetime(updatedon,'localtime') from employee;
104|2012-09-15 11:29:28
You can also use strftime to display the date column in various output.
sqlite> select empid,strftime('%d-%m-%Y %w %W',updatedon) from employee;
The following are the possible modifers you can use in the strftime function.
- %d day of month: 00
- %f fractional seconds: SS.SSS
- %H hour: 00-24
- %j day of year: 001-366
- %J Julian day number
- %m month: 01-12
- %M minute: 00-59
- %s seconds since 1970-01-01
- %S seconds: 00-59
- %w day of week 0-6 with Sunday==0
- %W week of year: 00-53
- %Y year: 0000-9999
- %% %
12. Dropping Objects
You can drop all the above created objects using the appropriate drop command as shown below.
Since we are dropping objects for testing purpose, copy the company.db to a test.db and try these commands on the test.db
# cp company.db test.db

# sqlite3 test.db
sqlite> .tables
dept      empdept   employee

sqlite> drop index empidx;
sqlite> drop trigger employee_update_trg;
sqlite> drop view empdept;
sqlite> drop table employee;
sqlite> drop table dept;
All the tables and views from the test.db are now deleted.
sqlite> .tables
sqlite>
Note: When you drop a table all the indexes and triggers for that table are also dropped.
13. Operators
The following are the possible operators you can use in SQL statements.
- ||
- * / %
- + -
- << >> & |
- < >=
- = == != <> IS IS NOT IN LIKE GLOB MATCH REGEXP
- AND OR
For example:
sqlite> select * from employee where empid >= 102 and empid select * from dept
where location like 'Los%';
1|Sales|Los Angeles
3|Marketing|Los Angeles
14. Explain Query Plan
Execute “explain query plan”, to get information about the table that
is getting used in a query or view. This is very helpful when you are
debugging a complex query with multiple joins on several tables.
sqlite> explain query plan select * from empdept;
0|0|TABLE employee AS e
1|1|TABLE dept AS d
For a detailed trace, just execute “explain” followed by the query to
get more performance data on the query. This is helpful for debugging
purpose when the query is slow.
sqlite> explain select empid,strftime('%d-%m-%Y %w %W',updatedon) from employee;
0|Trace|0|0|0||00|
1|Goto|0|12|0||00|
2|OpenRead|0|2|0|4|00|
3|Rewind|0|10|0||00|
4|Column|0|0|1||00|
5|String8|0|3|0|%d-%m-%Y %w %W|00|
6|Column|0|3|4||00|
7|Function|1|3|2|strftime(-1)|02|
8|ResultRow|1|2|0||00|
9|Next|0|4|0||01|
10|Close|0|0|0||00|
11|Halt|0|0|0||00|
12|Transaction|0|0|0||00|
13|VerifyCookie|0|19|0||00|
14|TableLock|0|2|0|employee|00|
15|Goto|0|2|0||00|
15. Attach and Detach Database
When you have multiple database, you can use attach command to execute queries across database.
For example, if you have two database that has the same table name
with different data, you can create a union query across the database to
view the combined records as explained below.
In this example, we have two company database (company1.db and
company2.db). From the sqlite prompt, attach both these database by
giving alias as c1 and c2 as shown below.
# sqlite3
sqlite> attach database 'company1.db' as c1;
sqlite> attach database 'company2.db' as c2;
Execute “.database” command which will display all the attached databases.
sqlite> .database
seq  name             file
---  ---------------  ------------------
0    main
2    c1               /root/company1.db
3    c2               /root/company2.db
Now, you can execute a union query across these databases to combine the results.
sqlite> select empid, name, title from c1.employee union select empid, name,
title from c2.employee;
101|John Smith|CEO
102|Raj Reddy|Sysadmin
103|Jason Bourne|Developer
104|Jane Smith|Sales Manager
105|Rita Patel|DBA
201|James Bond|Secret Agent
202|Spider Man|Action Hero
After attaching a database, from the current sqlite session, if you want to detach it, use detach command as shown below.
sqlite> detach c1;

sqlite> .database
seq  name             file
---  ---------------  -----------------
0    main
2    c2               /root/company2.db
Source : http://www.thegeekstuff.com/2012/09/sqlite-command-examples/
Saturday, August 11, 2012
Installation and Configuration in linux with secure my local LAN network websites or personal websites

We can secure our local LAN network websites by using Self signed SSL.
In this post i am going to explain how to install and configure self signed SSL. Which will secure your personal websites or Internal(LAN) websites
Step 1: Installation of required packages
# yum install mod_ssl openssl
Step 2: Create Private, CSR and Selfsigned key
# mkdir ~/SSL
# cd ~/SSL
# openssl genrsa -out ca.key 1024
# openssl req -new -key ca.key -out ca.csr
# openssl x509 -req -days 365 -in ca.csr -signkey ca.key -out ca.crt

Step 3: Copy the files to correct path
# cp ca.crt /etc/pki/tls/certs
# cp ca.key /etc/pki/tls/private/ca.key
# cp ca.csr /etc/pki/tls/private/ca.csr

Step 4: Edit the SSL Configuration file make the required changes and restart httpd service
# vi /etc/httpd/conf.d/ssl.conf
Edit the line 112 and make sure that SSLCertificate file is pointed to path /etc/pki/tls/certs/ca.crt

Edit the line 119 and make sure that SSLCertificateKeyFile file is pointed to path /etc/pki/tls/private/ca.key

Restart httpd service to make edited SSL configuration work
# cat > /var/www/html/index.html
Yes SSL Works

Step 5: Verify SSL is working by checking through Browser


Thursday, August 2, 2012
Crontab Log: How to Log the Output of My Cron Script
Question: I created a backup.sh shell script and
added it to my crontab to execute it daily. How do I verify whether the
backup cron script job ran successfully? Also, I have several echo
statements inside my backup.sh shell script. How do I save the output of
my script to a log file when it is executed as a cron job?
Answer: Let us say that you’ve added the backup.sh to your crontab as shown below to execute it at midnight every day.
Answer: Let us say that you’ve added the backup.sh to your crontab as shown below to execute it at midnight every day.
$ crontab -e
59 23 * * * /home/john/bin/backup.sh
To verify whether the this job got executed successfully or not, check the /var/log/cron file, which contains information about all the cron jobs that gets executed in your system. As you see from the following output, john’s cron job got executed succesfully.
$ tail /var/log/cron
Oct  8 22:00:00 dev-db crond[18340]: (root) CMD (/bin/sh /home/root/bin/system_check &)
Oct  8 23:00:00 dev-db crond[20348]: (oracle) CMD (/bin/sh /home/oracle/bin/cleanup.sh &)
Oct  8 23:59:00 dev-db crond[20399]: (john) CMD (/bin/sh /home/john/bin/backup.sh &)
Cron log contains the following information:
- Timestamp – The date and time when the cron job was executed
- Hostname – The hostname of the server (For example, dev-db)
- The cron deamon name and the PID. For example, crond[20399]
- Username – The username under which this cron job got executed. For example, john.
- CMD – Anything following this is the real command that got executed at that time.
$ crontab -e
59 23 * * * /home/john/bin/backup.sh > /home/john/logs/backup.log 2>&1
In the above:
- > /home/john/logs/backup.log indicates that the standard output of the backup.sh script will be redirected to the backup.log file.
- 2>&1 indicates that the standard error (2>) is redirected to the same file descriptor that is pointed by standard output (&1).
- So, both standard output and error will be redirected to /home/john/logs/backup.log
Wireshark Display Filter Examples (Filter by Port, IP, Protocol)
While debugging a particular problem, sometimes you may have to
analyze the protocol traffic going out and coming into your machine.
Wireshark is one of the best tool used for this purpose. In this article
we will learn how to use Wireshark network protocol analyzer display
filter.
1. Download and Install Wireshark Download wireshark from here.
After downloading the executable, just click on it to install Wireshark.
2. Select an Interface and Start the Capture
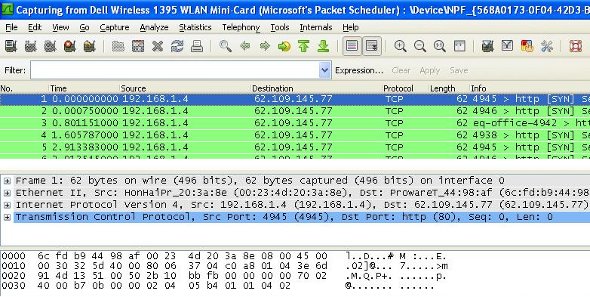
Once you have opened the wireshark, you have to first select a particular network interface of your machine. In most of the cases the machine is connected to only one network interface but in case there are multiple, then select the interface on which you want to monitor the traffic.
From the menu, click on ‘Capture –> Interfaces’, which will display the following screen:

3. Source IP Filter
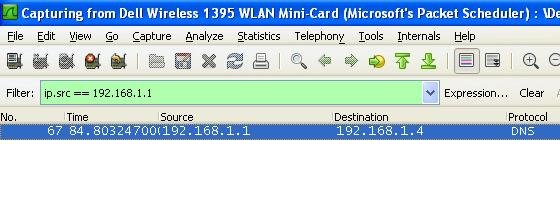
A source filter can be applied to restrict the packet view in wireshark to only those packets that have source IP as mentioned in the filter. The filter applied in the example below is:
ip.src == 192.168.1.1
4. Destination IP Filter
A destination filter can be applied to restrict the packet view in wireshark to only those packets that have destination IP as mentioned in the filter. For example:
ip.dst == 192.168.1.1
5. Filter by Protocol
Its very easy to apply filter for a particular protocol. Just write the name of that protocol in the filter tab and hit enter. In the example below we tried to filter the results for http protocol using this filter:
http
6. Using OR Condition in Filter
This filter helps filtering the packets that match either one or the other condition.
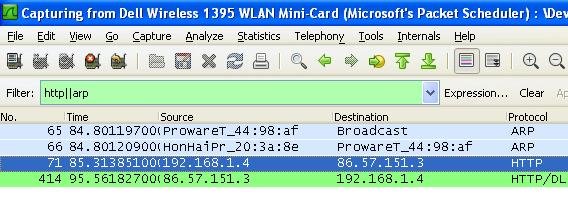
Suppose, there may arise a requirement to see packets that either have protocol ‘http’ or ‘arp’. In that case one cannot apply separate filters. So there exists the ‘||’ filter expression that ORs two conditions to display packets matching any or both the conditions. In the example below, we tried to filter the http or arp packets using this filter:
http||arp
7. Applying AND Condition in Filter
This filter helps filtering packet that match exactly with multiple conditions.
Suppose there is a requirement to filter only those packets that are HTTP packets and have source ip as ’192.168.1.4′. Use this filter:
http&&ip.src==192.168.1.4
8. Filter by Port Number
This can be done by using the filter ‘tcp.port eq [port-no]‘. For example:
tcp.port eq 80
9. Match Packets Containing a Particular Sequence
The filter syntax used in this is : ‘[prot] contains [byte sequence]‘.
For example:
tcp contains 01:01:04
10. Reject Packets Based on Source or Destination
Filter here is ‘ip.src != [src_addr]‘ or ‘ip.dst != [dst_add]‘.
For example:
ip.dst != 192.168.1.1
1. Download and Install Wireshark Download wireshark from here.
After downloading the executable, just click on it to install Wireshark.
2. Select an Interface and Start the Capture
Once you have opened the wireshark, you have to first select a particular network interface of your machine. In most of the cases the machine is connected to only one network interface but in case there are multiple, then select the interface on which you want to monitor the traffic.
From the menu, click on ‘Capture –> Interfaces’, which will display the following screen:


3. Source IP Filter
A source filter can be applied to restrict the packet view in wireshark to only those packets that have source IP as mentioned in the filter. The filter applied in the example below is:
ip.src == 192.168.1.1

4. Destination IP Filter
A destination filter can be applied to restrict the packet view in wireshark to only those packets that have destination IP as mentioned in the filter. For example:
ip.dst == 192.168.1.1
5. Filter by Protocol
Its very easy to apply filter for a particular protocol. Just write the name of that protocol in the filter tab and hit enter. In the example below we tried to filter the results for http protocol using this filter:
http
6. Using OR Condition in Filter
This filter helps filtering the packets that match either one or the other condition.
Suppose, there may arise a requirement to see packets that either have protocol ‘http’ or ‘arp’. In that case one cannot apply separate filters. So there exists the ‘||’ filter expression that ORs two conditions to display packets matching any or both the conditions. In the example below, we tried to filter the http or arp packets using this filter:
http||arp

7. Applying AND Condition in Filter
This filter helps filtering packet that match exactly with multiple conditions.
Suppose there is a requirement to filter only those packets that are HTTP packets and have source ip as ’192.168.1.4′. Use this filter:
http&&ip.src==192.168.1.4
8. Filter by Port Number
This can be done by using the filter ‘tcp.port eq [port-no]‘. For example:
tcp.port eq 80
9. Match Packets Containing a Particular Sequence
The filter syntax used in this is : ‘[prot] contains [byte sequence]‘.
For example:
tcp contains 01:01:04
10. Reject Packets Based on Source or Destination
Filter here is ‘ip.src != [src_addr]‘ or ‘ip.dst != [dst_add]‘.
For example:
ip.dst != 192.168.1.1
Monday, June 11, 2012
Turbocharge PuTTY with 12 Powerful Add-Ons
This article is part of on-going Software For Geeks
series. PuTTY is hands-down the best, free, and lightweight SSH client
for Windows. I have provided list of 12 powerful PuTTY add-ons with
screenshots, that will solve few shortcomings of the original PuTTY. Play around with these add-ons and choose the one that suites your need.
1. PuTTY Connection Manager
PuTTYCM gives a nice feature to arrange several PuTTY sessions in tabs . While starting PuTTYCM for the first time, you should specify the location of the original PuTTY. This requires .NET 2.0 to be installed on the windows system. Following screen-shot displays three putty sessions in tabs within the same window.Note: If the PuTTY Connection Manager opens the original PuTTY in a separate window, instead of opening as a TAB, please go to Tools -> Options -> Select the check-box “Enable additional timing for PuTTY capture (ms)” -> set the value to 300 ms. This will open the PuTTY window inside the TAB as shown below.
Note: Refer to the PuTTY Connection Manager Tutorial for more details on the PuTTY CM features.
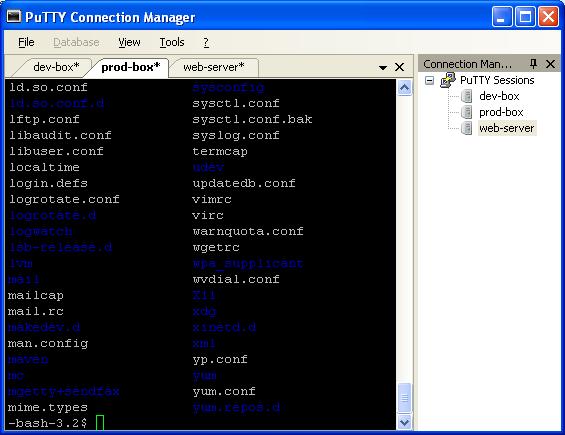
Fig – PuTTY Connection Manager with multiple Tabs
2. PuTTYcyg
Cygwin users will absolutely love PuTTYcyg. This lets you use PuTTY as a local cygwin terminal. If you use cygwin on your windows, I’m sure you’ll hate the default MS-DOS looking cygwin window. Using PuTTYcyg, you can run cygwin inside PuTTY. I love this add-on and use it for my cygwin on Windows.On PuTTYcyg, click on cygterm radio button in the Connection type. Enter – (hyphen) in the “Command (use – for login shell“, to connect to the cygwin on the windows laptop using PuTTY as shown below.
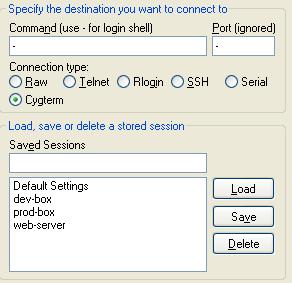
Fig – PuTTYcyg with Cygterm option
3. PuTTYtray
Using PuTTYtray, you can minimize the PuTTY window to the system tray on windows. By default, original PuTTY stores the session information in the registry. This is painful, when you want to transfer PuTTY sessions from one laptop to another. In PuTTYtray, there is an additional radio button “Sessions from file” as shown below, that will let you store session information in a file.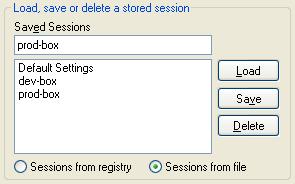
Fig – PuTTYtray with “Session from file” option
4. PuttyTabs
PuttyTabs provides a floating bar, that will display the open PuTTY sessions in TABs. Clicking on one of the tabs will bring the respective PuTTY session to the foreground. While starting PuTTYTabs for the first time, you should specify location of the original PuTTY. It reads the windows registry to get all the available PuTTY sessions. This also requires .NET 2.0 to be installed on the windows system. Following screen-shot displays three putty sessions arranged in tab.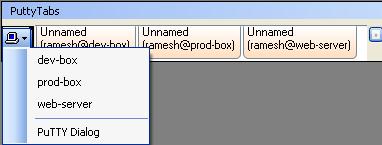
Fig – PuTTYTabs with multiple Tabs
5. Quest PuTTY
Quest Software modified the PuTTY to add Active Directory (GSSAPI Kerberos) single sign-on feature. Quest PuTTY uses Microsoft’s Security Service Provider Interface (SSPI), which is Microsoft’s version of the GSSAPI, with which it is wire compatible. This version of PuTTY adds a new menu-item called GSSAPI, under Connection -> SSH, as shown below.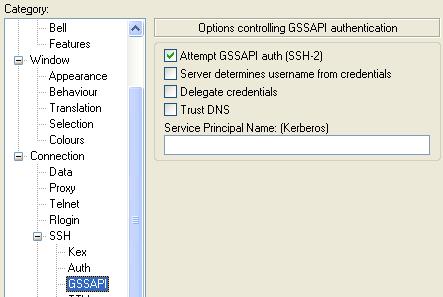
Fig – Quest PuTTY with GSSAPI option
6. Modified PuTTY
This modified PuTTY stores the PuTTY sessions in folder instead of storing it in the registry. If you already have sessions stored in the registry, it will display those also. The sessions stored in registry will be marked as [registry] as shown below. When you create a session using this PuTTY, this creates a sub-folder called session in the same folder where putty.exe is located, to store all the sessions in the file.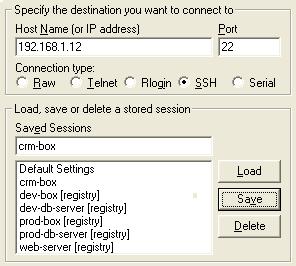
Fig – Modified Putty displaying both registry and file sessions
7. PocketPuTTY
PocketPuTTY runs on Windows Mobile 2003/5.0 operating system. After I got my blackberry, I have dumped my Dell Axim that was running on Windows Mobile. So, I have not tried PocketPuTTY myself. If you’ve used PocketPuTTY or other mobile version of PuTTY, please leave your feedback.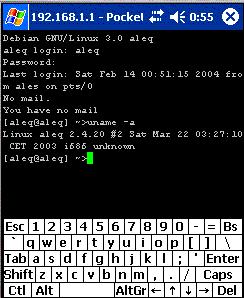
Fig – PocketPuTTY for Windows Mobile
Note: If you are using blackberry phone, refer to Blackberry PuTTY Tutorial for installing and configuring PuTTY on blackberry.
8. portaPuTTY
portaPuTTY is a modified version of the PuTTY that stores the session information in a file by default, instead of storing it in the windows registry. The session files are stored under .putty/sessions folder. The .putty folder is created under the same directory where the putty.exe is located.9. PuTTY Portable
PuTTY Portable is part of PortableApps suite. Use this to launch PuTTY from the USB drive and carry the sessions along with you.10. PuTTY Launchy Plugin
If you are using Launchy, the open source keystroke launcher for windows, you can use Putty Launchy Plugin, to launch putty sessions from Launchy very easily. i.e you can type “ssh” or “putty” followed by tab or space to list all of your PuTTY sessions. Once you select a particular session, Launchy will automatically launch that particular PuTTY session.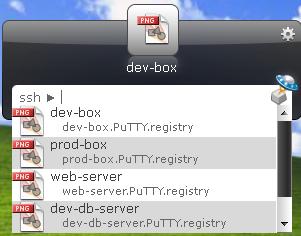
Fig – PuTTY Launchy Plugin. Type ssh followed by tab.
11. PuTTY Session Manager
PuTTY Session Manager will let you organize the PuTTY sessions into folders and assign hotkeys. This requires Microsoft .NET 2.0. Right click on the PSM icon in the system track and select “Session Hotkeys” to assign hot-keys for PuTTY session as shown below.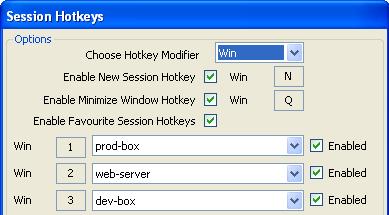
Fig – PuTTY Session Manager with session hot-key
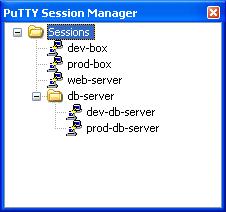
Fig – PuTTY Session Manager with sessions inside sub-folder
12. PuTTY Command Sender
PuTTYCS is very helpful little tool that can boost your productivity by eliminating repetitive tasks performed on different servers. Using PuTTYCS, you can send a unix command to multiple PuTTY windows at the same time. You can use this to backup files, view log files, start and stop processes, copying file etc., on multiple servers, just by executing the command once, as shown below.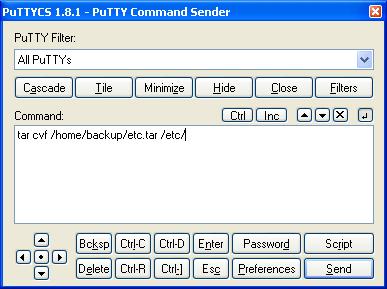
Fig – PuTTYCS sends unix command to multiple PuTTY session
Subscribe to:
Posts (Atom)


