Friday, January 11, 2013

How To Install Android-x86 4.0 Using QEMU On Ubuntu 11.10/12.04

In this guide we will see how to install Android-x86 4.0 (based on ICS) or any older version of Android-x86 under Ubuntu using the QEMU processor emulator. You can find all Android releases here, but in this tutorial we will see how to install the Android-x86 4.0 release available for ASUS laptops.


The installation will be in the home directory of Ubuntu, specifically in the android-x86 folder, you can set any other folder name, but make sure you set it correctly in the commands given below.

Getting Started


Download the Android-x86 4.0 iso file to your home directory (inside the "android-x86" folder) with the following commands:

mkdir ~/android-x86/ && cd ~/android-x86/


wget -O android-x86-4.0.iso http://goo.gl/zDvR6


Install now QEMU with the following command:


sudo apt-get install qemu-kvm


Let's now create a virtual machine called
android-4.0.img, you can rename it to whatever you want. The size for this virtual machine is 1GB, you can set it to any other value depending on the free space you have.
Create it now with this command:

qemu-img create ~/android-x86/android-4.0.img 1G


To start the installation, run these commands:


cd ~/android-x86/


kvm -m 512 -cdrom android-x86-4.0.iso -hda android-4.0.img -boot d


 Note: the -m 512 parameter is used to set the memory size for the virtual machine, you can adjust it to whatever you want.

In the fisrt screen, select "
Installation - Install Android-x86 to harddisk" and press Enter:


In the next screen, select "Create/Modify partitions" and press Enter:


In the "cfdisk" screen, select "New" and press Enter:


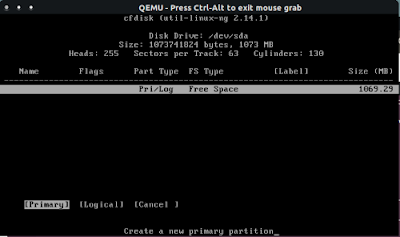
Keep the "Primary" option selected and press Enter:


You will be prompted now to enter disk size, press simply Enter to use all available disk space:


Select the "Bootable" option and press Enter:


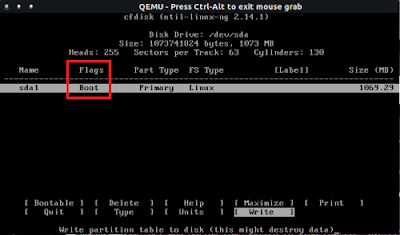
The disk  must be marked as bootable under the "Flags" label, then select "Write":


Type "yes" to confirm. After the operation is complete, quit the current screen:


The disk already created will now show up in the partition selection screen, select it and press Enter:


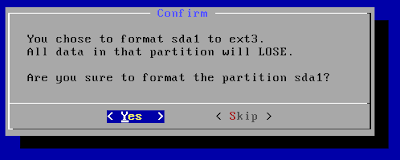
Select now the "ext3" filesystem and press Enter, then confirm your action:


If you receive this error:

cannot mount /dev/sdaX


Then select the "
ntfs" file system instead and repeat the operation. You will be then prompted whether to install or not the GRUB boot loader, select "Yes" and press Enter:


The next screen is optional, which is needed for debugging and may take much disk space. So, select "No" and press Enter:


 When the installation is successful, you will get this screen:


Select "Reboot" and press enter. Wait now while Android-x86 4.0 is starting up:


You can start later the Android OS with this command from the terminal:


kvm -m 512 -hda ~/android-x86/android-4.0.img


Note: Tested under Ubuntu 11.10 (Oneiric Ocelot) and Ubuntu 12.04 (Precise Pangolin) and may work in older versions of Ubuntu (11.04/10.10, etc.).


Source :  http://www.upubuntu.com/2012/03/how-to-install-android-x86-40-using.html

How To Install Ubuntu 12.10 Using VirtualBox


Thursday, January 10, 2013

How To Install The GTK3 Mac OS X Lion Theme On Ubuntu 11.10/12.04


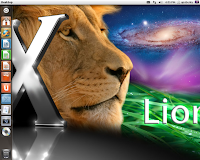
In this tutorial we are going to help you install the GTK3 Mac OS X Lion theme for Ubuntu 11.10 Oneiric Ocelot or Ubuntu 12.04 Precise Pangolin. This will make Ubuntu look like the new Mac OS X Lion OS. This theme is created by MBOSSG at deviantART.

A- Mac OS X Lion Theme Installation

1. Installing Cursors

Open the terminal and run these commands:

wget http://dl.dropbox.com/u/47950494/Mac-Lion-Cursors.tar.gz

sudo tar -xzvf Mac-Lion-Cursors.tar.gz -C /usr/share/icons

2. Downloading The Theme

[Note]: If you have already a ".themes" folder at your home directory, then skip the fisrt command.

Run these commands:

mkdir ~/.themes

wget http://dl.dropbox.com/u/47950494/Mac-Lion-Theme.tar.gz

tar -xzvf Mac-Lion-Theme.tar.gz -C ~/.themes

3. Installing Icons:

[Note]: If you have already an ".icons" folder at your home directory, then skip the fisrt command.

Run these commands:

mkdir ~/.icons

wget http://dl.dropbox.com/u/47950494/Mac-Lion-Icons.tar.gz

tar -xzvf Mac-Lion-Icons.tar.gz -C ~/.icons


B- Enabling The MAC OS X Lion Theme

Method 1

Install first GNOME Tweak Tool with this command:

sudo apt-get install gnome-tweak-tool


Launch GNOME Tweak Tool and in the Theme tab, enable these options then reboot:

Cursor theme > Mac-Lion-Cursors
Icon theme > Mac-Lion-Icons
GTK+ theme > Mac-Lion-Theme
Window theme > Mac-Lion-Theme


Method 2:

Or run simply these commands from the terminal:

gsettings set org.gnome.desktop.interface gtk-theme 'Mac-Lion-Theme'

gsettings set org.gnome.desktop.interface icon-theme 'Mac-Lion-Icons'

gconftool-2 --set --type string /apps/metacity/general/theme 'Mac-Lion-Theme'


Screenshots:


Source :  http://www.upubuntu.com/2011/11/how-to-install-gtk3-mac-os-x-lion-theme.html

How to Buy a laptop – Laptop buying guide

Obviously computers are the ruling machine in this century, may be human have to beg in front of computers in near future, who knows but we should live present, no need to worry about future. A recent tech survey shows now people buying laptops more than desktops. The reason is easily predictable, of course laptop is portable, easy to carry and most wanted feature is laptop can executable from wherever we go.
Then what? How to buy a laptop for you? Over cost doesn’t mean a good product. So buying laptop is a little tough event, you may not redo once you wrongly did. So let me teach you how to buy a laptop. Which company you want to go? Actually company is not a matter but you should take a decision about do you need a laptop for official work of home use? I am asking this because of probably home useable laptops no need any high configuration unless if you are a gamer.


Screen Size: Screen size is the first point you should keep in your mind while choosing a laptop. 14 inch and 15.6 inch are the standard and well known screen size at present, 15.6 inch screen may give wonderful visual on video playbook and gaming time, but you may know that 14 inch very easy to carry and battery back will belong more than 15.6 inch devices. So you can chose depend on your need. But do not forget to check the resolution, you laptop should has at least 1366×768 pixels resolution and higher, more than 1366×768 is your luck.


Processor: You should give more attention on choosing on processor, processor is the main factor that determine your laptop speed, please go with more than you need, do not go with bottle neck configuration. Open your eyes wide while the computer techie says about processor on the laptop, you cannot upgrade in future easy. Computer engineers say processor is the brain of computer. What should you know how to chose your laptop? How much core? What is the core speed? RAM supports? Dual core processor is enough to do decent multi tasking purposes but quad core with eight threaded processor can handle everything (caution: it may lead you to more expensive).


AMD or Intel, Always company is not a factor on quality, both are well known and both have special individual qualities itself. So you have to choose by your own need. Most people hopes Intel doing well, of course it is correct, but AMD also launched a lot of quality processors for affordable cost. AMD or Intel, you won’t regret if you did a well job on choosing your processor by your need.

RAM: Another factor that effects on speed of your laptop, do not buy a laptop less than 2GB RAM, better to buy with at least 4GB RAM it helps if you need to install 64 bit version operating system. RAM helps to run your laptop without lag.


Connectivity ports: It may sense weird to you, but you should give attention on ports, think about you have a high definition resolution without HDMI port, HDMI ports helps to video out to external HD televisions or monitors. More USB ports you have is change to connect more electronic devices like mouse, keyboard, dongle. Cooling pad, Camera, phone and much more. WiFi and Bluetooth come normally on all laptops at present.

Battery: Body cannot live without soul that adopt even on computer. So better to go with high battery backup laptops, especially it will help more on your travelling session. 6 cell battery gives at least 4 hours backups on normal 14 inch laptops, buy 8 cell batteries if your budget allows.

Others: I missed something like Hard disk, optical drives, and design of computer but not important more than I listed. Select a laptop which will fit well on you. Cheers.

Wednesday, December 26, 2012

Add Page Numbers to Documents in Word 2007 & 2010


If you’re creating a large document with several pages you might want to add page numbers to keep them in order. Today we show you how to add page numbers on your documents in Word 2007 & 2010.

Add Page Numbers in 2007

To add page numbers, open your Word document and click the Insert tab on the Ribbon and select Page Number. From here select where you want the page numbers to appear in the document and choose from the gallery of page number formats.


 In this example we selected the “Bold Numbers 1” format for the Footer, and after selected they will appear in the document.


After you’ve selected the page number format Headers & Footer Tools open in the Design tab. From here you can change different options such as Different Odd & Even Pages.


If you go to Print Preview, you can see how the page numbers will look when the document is printed out. If it doesn’t look how you like it, you can close out of Print Preview and choose another.


The process is virtually identical in Word 2010 as well. The only difference is when you view it in Print Preview, you’ll have more options offered in Backstage view.


 The only difference is when you view it in Print Preview, you’ll have more options offered in Backstage view.


That is really all there is to it. The next time you have a large document with several pages, you’ll be able to insert page numbers to help people keep track of the data.

Customize the Windows 7 Logon Screen

Do you like to customize the Windows interface, and tired of the standard log on screen in Windows 7? Today we take a look at Windows 7 Logon Background Changer which is a free and Open Source app that lets you easily customize the logon screen.

Windows 7 Logon Background Changer

This cool app is free, Open Source, and lets you change the wallpaper on the Windows 7 Logon screen. It doesn’t require installation, and won’t change any of the system files. The download is a small zip file that contains an executable you can run from a flash drive, and also an installer in the Setup folder if you choose to install it.


After launching Background changer, you can browse through the standard Windows backgrounds to get an idea of how it will look.


 If you don’t want to use the standard Windows backgrounds, you can add your own folder of images.


After you’ve selected the background you want, click on the Apply button in the upper right hand corner.


Click Yes on the authorization screen.


Click Yes to User Account Control if it comes up.


The wait a bit while the background is applied.


Now you can log off to see how the new background will look when you or another user signs in.


There are some different settings you can select like resetting back to the default pictures folder, preventing other users from changing the background, and adjust shadows.


Note :-

There are several apps out there that will tweak the logon background, but this one from Julien Manici is one of the better ones that I’ve found. It’s easy to use and has a nice amount of features for tweaking the background. If you like to tweak and customize your Windows 7 interface, you’ll definitely want to take a look at this app.

Download Windows 7 Logon Background Changer

Windows 7 Logon Background Changer Homepage