Sunday, June 9, 2013

Linux Users Have a Choice: 8 Linux Desktop Environments

ubuntu-derivatives

There’s no one true desktop environment for Linux. Unlike competing operating systems like Windows, Linux users have a choice of many different desktop environments, all with their own styles and strengths.
You can install one of these desktop environments after installing your Linux distribution and switch between desktop environments from the login screen. You can also choose to install a Linux distribution that comes with the desktop environment. For example, you can get Ubuntu in many different flavors.

Unity

Unity is Ubuntu’s own default desktop environment. If you’ve installed Ubuntu using the standard installer, you’re probably using the Unity desktop right now.
Unity is Ubuntu’s vision of what a Linux desktop should be. In fact, for most users, Unity is probably synonymous with Ubuntu. From its searchable Dash (which also searches online sources) to its application dock that functions similarly to Windows 7′s taskbar, Unity has its own identity as a desktop. However, Unity also includes a variety of programs from the GNOME desktop. Prior to Unity, Ubuntu used GNOME — many of these GNOME programs, like the Nautilus file manager, are still used on Unity today.


GNOME

GNOME was once the most popular Linux desktop environment. The GNOME 2.x series was used by default on Ubuntu, Fedora, Debian, and most other big Linux distributions. It was a simple, fairly lightweight desktop environment. After the transition to the new GNOME 3 with its GNOME Shell interface, Ubuntu and other distributions began moving away from GNOME. GNOME 3 was arguably too simple and stripped-down in terms of options and features — for example, it doesn’t even include a taskbar by default.
However, GNOME 3 now supports extensions that can add many missing desktop features, including a taskbar. GNOME 3 is a slick desktop that takes advantage of the graphical effects available on multiple computers, and some people do prefer its vision of the Linux desktop. It works similarly to Unity in some ways, with a full-screen application launcher.


KDE

At one point, KDE and GNOME were the two most popular Linux desktop environments. KDE has always been more complex than GNOME, packing in many more configuration options and features. It’s a bit more Windows-like than the other desktop environments here, coming with a single taskbar on the bottom of the screen that includes a menu, quick launch-type icons, a taskbar, a notification area, and a clock — the typical layout of a Windows taskbar before Windows 7.

KDE is a solid desktop environment that’s well-suited to someone who wants a lot of configuration options. KDE 4′s desktop comes with a variety of widgets, so the desktop itself can be extensively customized, too. KDE is based on the QT toolkit, whereas GNOME and Unity are based on the GTK toolkit. This means that KDE uses different programs than these other desktops — file manager, image viewer, and so on — they’re all different programs than you’d use on a GNOME or Unity desktop.


Xfce

Xfce is a more lightweight desktop environment. It was once very similar to GNOME, but with GNOME 3 striking out in a different direction, Xfce now has its own identity as a more traditional Linux desktop environment that’s quite similar to GNOME 2.

This option is ideal if you want a more traditional desktop environment without full-screen application launchers, overdone graphical effects, and desktop widgets. It’s also more lightweight than the other options here, making it ideal for older computers or ones without stable 3D graphics drivers that can’t handle the effects in Unity and GNOME.

While Xfce also uses the GTK toolkit, it includes many of its own programs, such as a lightweight file manager, text editor, and image viewer. You won’t find all the typical programs you would find in Unity and GNOME, although some common ones are present.


Cinnamon

Cinnamon was developed for Linux Mint. Cinnamon is based on GNOME 3, so it uses up-to-date libraries and other software — but it takes that software and tries to create a more traditional-looking desktop with it.
This modern desktop environment offers nice graphical effects and a rethought application menu. However, it doesn’t throw away the past and includes a taskbar, application menu that doesn’t take up the full screen, and so on. Linux Mint pushes Cinnamon as one of its preferred desktop environments, but you can also install and use it on Ubuntu.

As it’s based on GNOME, Cinnamon uses many GNOME utilities but also includes some of its own configuration tools.


MATE

MATE is a fork of the original GNOME 2 that aims to preserve GNOME 2, continually updating it so it will continue to work on modern Linux distributions. MATE has also seen some new features, but the main purpose of MATE is to give people who desperately miss GNOME 2 the opportunity to install it on new Linux distributions. It’s officially supported along with Cinnamon in Linux Mint, where it’s given a prominent place as a default choice.

This desktop environment is ideal for people who really miss GNOME 2. In some ways, a desktop environment like Cinnamon is probably better positioned for the future as it’s based on newer software like GTK 3, while MINT is stuck with the older GTK 2.


LXDE

If you didn’t think Xfce was lightweight enough, try LXDE. LXDE is focused on being as lightweight as possible and is especially designed for older computers, netbooks, and other systems with low hardware resources. While it’s a lightweight desktop, it includes all the standard desktop features — some lightweight desktops omit the taskbar entirely, but LXDE doesn’t.

Like Xfce, LXDE bundles its own lightweight file manager, text editor, image viewer, terminal program, and other utilities.


Xmonad and More

This isn’t a complete list — not by a long shot. There are many more niche desktop environments and window managers you could use, including Xmonad, a tiling window manager. Tiling window managers attempt to make your life easier by automatically arranging windows in tiles on your screen, saving you the trouble of dragging them around and allowing you to quickly rearrange them with keyboard shortcuts. It’s a good example of just how different from each other Linux desktop environments can be.

Monday, June 3, 2013

What is DHCP and How DHCP Works?

Computer networks can be of any form like a LAN, WAN etc. If you are connected to a local LAN or an internet connection, the IP addresses form the basis of communication over computer networks. An IP address is the identity of a host or a computer device while connected to any network.
In most of the cases when you connect your computer to a LAN or internet, you’ll notice that the IP address and other information like subnet mask etc are assigned to your computer automatically. Have you ever thought about how this happens? Well, in this article we will understand the concept of DHCP that forms the basis of this functionality.

What is DHCP?

DHCP stands for Dynamic Host Configuration Protocol.
As the name suggests, DHCP is used to control the network configuration of a host through a remote server. DHCP functionality comes installed as a default feature in most of the contemporary operating systems. DHCP is an excellent alternative to the time-consuming manual configuration of network settings on a host or a network device.
DHCP works on a client-server model. Being a protocol, it has it’s own set of messages that are exchanged between client and server. Here is the header information of DHCP :

FIELD OCTETS DESCRIPTION
op 1 Type of message
htype 1 type of hardware address
hlen 1 length of hardware address
hops 1 used in case of relay agents. Clients sets them to 0.
xid 4 Transaction ID used by the client and server for a session.
secs 2 Time elapsed (in seconds) since the client requested the process
flags 2 Flags
ciaddr 4 Client IP address.
yiaddr 4 The IP address assigned by server to the client
siaddr 4 Server IP address.
giaddr 4 IP address of the relay agent.
chaddr 16 Hardware address of the client.
sname 64 Host name of the server.
file 128 Boot file name.
options var Additional options

Understanding DHCP helps in debugging many network related problems. Read our articles on wireshark and Journey of a packet on network to enhance your understanding on network and network debugging tools.
In the next section, we will cover the working of this protocol.

How DHCP Works?

Before learning the process through which DHCP achieves it’s goal, we first have to understand the different messages that are used in the process.

1. DHCPDISCOVER

It is a DHCP message that marks the beginning of a DHCP interaction between client and server. This message is sent by a client (host or device connected to a network) that is connected to a local subnet. It’s a broadcast message that uses 255.255.255.255 as destination IP address while the source IP address is 0.0.0.0

2. DHCPOFFER

It is DHCP message that is sent in response to DHCPDISCOVER by a DHCP server to DHCP client. This message contains the network configuration settings for the client that sent the DHCPDISCOVER message.

3. DHCPREQUEST

This DHCP message is sent in response to DHCPOFFER indicating that the client has accepted the network configuration sent in DHCPOFFER message from the server.

4. DHCPACK

This message is sent by the DHCP server in response to DHCPREQUEST recieved from the client. This message marks the end of the process that started with DHCPDISCOVER. The DHCPACK message is nothing but an acknowledgement by the DHCP server that authorizes the DHCP client to start using the network configuration it received from the DHCP server earlier.

5. DHCPNAK

This message is the exact opposite to DHCPACK described above. This message is sent by the DHCP server when it is not able to satisfy the DHCPREQUEST message from the client.

6. DHCPDECLINE

This message is sent from the DHCP client to the server in case the client finds that the IP address assigned by DHCP server is already in use.

7. DHCPINFORM

This message is sent from the DHCP client in case the IP address is statically configured on the client and only other network settings or configurations are desired to be dynamically acquired from DHCP server.

8. DHCPRELEASE

This message is sent by the DHCP client in case it wants to terminate the lease of network address it has be provided by DHCP server.


Now as we know about the various DHCP messages, it’s time to go through the the complete DHCP process to give a better Idea of how DHCP works. Note that the steps mentioned below assume that DHCP functionality is enabled by default on the client side.
Here are the steps :
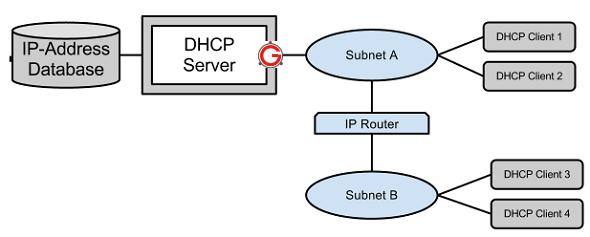
  • Step 1: When the client computer (or device) boots up or is connected to a network, a DHCPDISCOVER message is sent from the client to the server. As there is no network configuration information on the client so the message is sent with 0.0.0.0 as source address and 255.255.255.255 as destination address. If the DHCP server is on local subnet then it directly receives the message or in case it is on different subnet then a relay agent connected on client’s  subnet is used to pass on the request to DHCP server. The transport protocol used for this message is UDP and the port number used is 67. The client enters the initializing stage during this step.
  • Step 2: When the DHCP server receives the DHCPDISCOVER request message then it replies with a DHCPOFFER message. As already explained, this message contains all the network configuration settings required by the client. For example, the yaddr field of the message will contain the IP address to be assigned to client. Similarly the the subnet mask and gateway information is filled in the options field. Also, the server fills in the client MAC address in the chaddr field. This message is sent as a broadcast (255.255.255.255) message for the client to receive it directly or if DHCP server is in different subnet then this message is sent to the relay agent that takes care of whether the message is to be passed as unicast or broadcast. In this case also, UDP protocol is used at the transport layer with destination port as 68. The client enters selecting stage during this step
  • Step 3: The client forms a DHCPREQUEST message in reply to DHCPOFFER message and sends it to the server indicating it wants to accept the network configuration sent in the DHCPOFFER message. If there were multiple DHCP servers that received DHCPDISCOVER then client could receive multiple DHCPOFFER messages. But, the client replies to only one of the messages by populating the server identification field with the IP address of a particular DHCP server. All the messages from other DHCP servers are implicitly declined. The DHCPREQUEST message will still contain the source address as 0.0.0.0 as the client is still not allowed to use the IP address passed to it through DHCPOFFER message. The client enters requesting stage during this step.
  • Step 4: Once the server receives DHCPREQUEST from the client, it sends the DHCPACK message indicating that now the client is allowed to use the IP address assigned to it. The client enters the bound state during this step.

The Concept of Lease

With all the necessary information on how DHCP works, one should also know that the IP  address assigned by DHCP server to DHCP client is on a lease. After the lease expires the DHCP server is free to assign the same IP address to any other host or device requesting for the same. For example, keeping lease time 8-10 hours is helpful in case of PC’s that are shut down at the end of the day.  So, lease has to be renewed from time to time. The DHCP client tries to renew the lease after half of the lease time has expired. This is done by the exchange of DHCPREQUEST and DHCPACK messages. While doing all this, the client enters the renewing stage.

Friday, May 31, 2013

How Email Works? Email Basic Concepts

From an email client, you’ll typically compose a message, attach any necessary files, and send it to the recipient. But, have you wondered what happens behind the scenes? How the email is sent from your outbox to the recipients inbox? In this article, we will explain the basis of email. For those who already know this stuff, this might be a quick refresher.

What is an Email?

Till 1971, people were able to send messages to other people working on same system only. In 1971, the first e-mail message was sent by Ray Tomlinson. Though that was a very simple message based communication but it formed the basis of how advanced e-mails have become today.
The main components of an e-mail system that facilitate sending and receiving of e-mails on Internet are :
  • An e-mail client
  • An e-mail server (SMTP server)
  • POP and IMAP servers.
Lets study these and then finally try to connect the dots to understand the complete system.

An Email Client

If you use e-mails for online communication the you would definitely be using  an e-mail client. An e-mail client provides you with the following capabilities :
  • Provides a list of messages that people have sent to you. Each entry in the list contains the name of sender, a subject, a few words from the message body and the time/date on which it was received.
  • Provides the ability to read a complete message, reply to it or forward it to other people.
  • Provides the ability to compose a new message and send it to the desired recipients.
  • Delete a message.
The e-mail clients could be standalone (like Microsoft Outlook, Pegasus etc) or could be web based (like gmail, yahoo etc). There could be many advanced abilities that e-mail clients may provide but whatever the type of e-mail client be, the core abilities described above are provided by all type of clients.

An Email Server

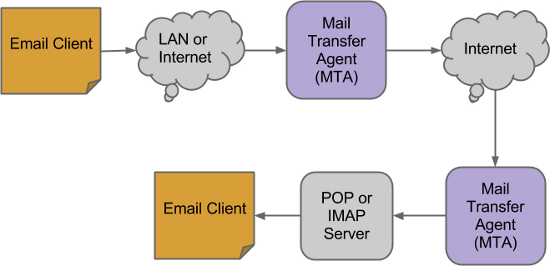
Whenever you send a message from your e-mail client, it goes to an e-mail server. The e-mail server manages the messages received by it. It forwards the message to a POP or IMAP service if the message is to be sent to a recipient on the same subnet else it follows the standard procedure to send the message over Internet to the destined person.
An e-mail server comes into the picture twice if e-mail is sent over Internet to a remote destination. First it’s the sender’s e-mail server that sends the e-mail over the Internet and second is the receiver’s e-mail server that receives the e-mail and makes sure that it is delivered to the recipient’s system. On the other hand, an E-mail server comes into picture only once when the recipient is on the same subnet.

SMTP servers are widely used as e-mail servers all over the internet. An SMTP server is also known as Mail Transfer Agent (MTA).

You also may want to read Journey of a Data Packet in Internet, which explains how packets traverse on Internet.

POP and IMAP Servers

As already explained, these servers come into the picture when a message is received by SMTP server and it needs to be forwarded to the actual recipient. Let’s discuss both these servers one by one :

POP
POP stands for Post Office Protocol. A POP (or POP3) server in it’s simplest form stores the messages for a particular user in a text file. The file for a particular user is appended with information each time an e-mail is received by a POP server.  If your e-mail client is configured to use a POP3 protocol then whenever you try to fetch e-mails through your e-mail client then a request is sent to your POP server for the same.
A POP server requires the log-in credentials of a user that are sent through e-mail client. Once a user is authenticated, the POP server provides access to user’s e-mails.  As with any client server architecture, the e-mail client interacts with the POP server through a predefined set of commands.
Here is a list of common commands used to interact with POP server :
  • USER  – For User-ID
  • PASS   – For Password
  • LIST   – Provide message list
  • DELE – To delete a message
  • QUIT  – To end the interaction
Please note that the e-mail client connects to port 110 on the server where POP service is running. After connecting the e-mail client issues the commands (as described above) to the POP server to authenticate, fetch e-mail, list e-mails etc.
One small problem with POP servers is that once an e-mail client fetches the e-mails from this server on client machine, it gets difficult to access the same e-mails from any other device or system as they get downloaded on client machine and are removed from the server.  Though there exists and option ‘Keep a copy on server’ through which e-mail clients can tell the server not to delete the e-mails. But, this leads to multiple copies of your mailbox on clients as well as on server and so it makes the management of e-mails difficult.

IMAP
IMAP stands for Internet message access protocol. This protocol is also used to access e-mails but it is far more capable than POP. One of the most prominent feature an IMAP server provides is the central access to e-mails. Unlike POP server, an IMAP server keeps the e-mails on the server itself and so you can access e-mails from any machine or device.
This server also provides easy management of e-mails like searching, categorizing the e-mails and placing them into various sub-folders etc. The only problem that one could imagine with IMAP server is that you always need an Internet connection so that the e-mail client is able to fetch e-mails from the IMAP server. But today, almost all of the e-mail clients have the capability to cache the e-mails so that you can even view them when you are offline.
To interact with IMAP server, the e-mail client connects to server machine on port 143. As with POP, IMAP server also understands a set of commands which the e-mail client uses to connect with the server.

Connecting the Dots

With the understanding of all the major components used in e-mail system, lets connect the dots and understand how the whole e-mail system works:

  • An e-mail client like Gmail, yahoo, outlook etc is used to create or reply to an e-mail.
  • Once the e-mail is drafted successfully, it is sent using the e-mail client.
  • This e-mail first goes to the SMTP server (also known as MTA (Mail transfer agent) ) to which the e-mail client is connected.
  • The e-mail server looks out for the recipients address. The address is of the form <name>@domain.com
  • The e-mail server first uses the DNS technique to resolve the domain name into a valid IP address.
  • Next it sends the e-mail to to this IP address over the Internet.
  • Now the e-mail traverses over the Internet in a series of IP packets and reaches the destination SMTP server or the MTA.
  • This server collects all the e-mails and places them to appropriate location so that these are accessible to your e-mail clients through POP or IMAP services.
There you have it. That is how e-mail system works.


source :http://www.thegeekstuff.com/2013/05/how-email-works/

Saturday, March 9, 2013

How to Easily Back Up and Migrate Your Browser Bookmarks

chrome firefox bookmarks

Most of our browser data isn’t too important – cookies expire and histories are cleared. However, bookmarks are different, which is why browsers allow you to import and export your bookmarks – ideal for creating backups and migrating between browsers.
All browsers can export your bookmarks to an HTML file. All browsers can also import these HTML files, so you can use this trick to move browsers between Chrome, Firefox, Internet Explorer, Opera, and any other browser.

Google Chrome

Click the Chrome menu icon at the top-right corner of your browser window, point to Bookmarks, and select Bookmark manager. (You can also quickly open the Bookmark manager by pressing Ctrl+Shift+O.)


Click the Organize menu and select Export bookmarks to HTML file. (To import your bookmarks later, select the Import bookmarks from HTML file option.)


Chrome will give the HTML file a name containing the current date.

Mozilla Firefox

Click the Firefox menu, point to Bookmarks, and select Show All Bookmarks. (You can also press Ctrl+Shift+B to quickly open the bookmarks library window.)


Click the Import and Backup menu and select Export Bookmarks to HTML. (The Backup option will create a .json file, which other browsers can’t open.) Use the Import Bookmarks from HTML option here to import bookmarks in the future.


Firefox will give the backup file a name of “bookmarks.html” by default. You may want to change the file name and add more information, such as the date.

Internet Explorer

Click the star-shaped favorites icon, click the little arrow to the right of Add to favorites, and select Import and Export.


Select the Export to a file option and click Next.


Check the Favorites checkbox and click Next.


Select the favorites you want to export – to export all your favorites, select the favorites folder at the top. (It’s selected by default.)


Provide a name for the file. It’s named bookmark.htm by default, but you may want to name it something like bookmarks_date.html. Click Export and IE will create a backup file.


Opera

Click the Opera menu, point to Bookmarks, and select Manage Bookmarks. (You can also press Ctrl+Shit+B instead.)


Click the File menu and select Export as HTML. (The Export Opera Bookmarks option exports the bookmarks as a .adr file, which other browsers can’t open.)


Enter a name such as bookmarks_date.html, replacing date with the current date. Store the file some place safe if you are using it as a backup. While browsers have cloud-syncing solutions that synchronize your favorites between a computers, most browsers don’t have a “roll back” option. If you accidentally delete bookmarks on one computer or the sync service makes a mistake, you could lose your bookmarks. A backup HTML file will allow you to get them back.

Source    : http://www.howtogeek.com

How to Get Microsoft Word’s Auto-Complete and Spelling Correction Features Across All Windows Apps

00_lead_image_phraseexpress_orig

Do you sometimes wish that you could use Microsoft Word’s more useful features, such as auto-complete, automatic spelling correction, and Autotext, in other programs in Windows?

PhraseExpress is a free program that allows you to do just that.
PhraseExpress allows you to organize text snippets into customizable categories for quick access and to use shortened phrases to insert these full text snippets. If you type the same phrases over and over, this reduces typing time and minimizes spelling mistakes. PhraseExpress will also start to learn what you type and offer to auto-complete frequently used phrases.

More than 8,200 common spelling corrections in six languages can be freely downloaded and automatically correct misspellings as you type. PhraseExpress can also learn from your own spelling mistakes.

To install PhraseExpress, double-click the .exe file you downloaded (see the link at the end of this article), if you downloaded the file using the CNet link. If you downloaded PhraseExpress using the alternative download link, extract the .zip file first and then run the .exe file.

Follow the instructions in the Setup Wizard. When the Select Additional Tasks screen displays, make sure there is NO check mark in the Do you want to use PhraseExpress in a network check box. If this is selected, you will be installing the trial version, rather than the version that is free for personal use.


Once you have installed PhraseExpress and run it, an icon is added to the system tray and the following balloon hint displays. Click on the balloon to open the main PhraseExpress window.


You can also right-click on the PhraseExpress system tray icon and select Edit phrases from the popup menu to access the main window.


NOTE: Before using PhraseExpress, you need to enable it. To do this, left-click on the system tray icon and select Direct access to settings and then select Enable PhraseExpress.


To add a custom phrase to the list, click New Phrase. On the right side of the window, enter a description for the phrase in the Description edit box. As an example, we added the phrase How-To Geek, so we entered “HTG” as our description.
In the Phrase content box, enter the full text you want inserted when you type a shortened phrase in any Windows program.

If you want to be able to insert the text using a hotkey, select the desired keys in the Hotkey section.
To enter a full phrase using an abbreviation, enter text in the Autotext edit box, and select an option indicating when to execute the command. For example, when we enter “htg” in any Windows program and press Space, Enter, or any punctuation mark (default delimiters), “How-To Geek” will replace “htg”.

You can also restrict PhraseExpress to work only in a specific program by checking the Execute only in specific program and selecting a program from the dialog box that displays.


When you have finished entering your custom phrase, it’s displayed in the list on the left with the hotkey, if one was applied.


When you want to quickly type a phrase you defined in PhraseExpress, enter the Autotext or press the hotkey you defined for the phrase.


A balloon hint displays on the system tray icon telling you how to finalize the replacement of the phrase.


When we typed a space after “htg”, the phrase “How-To Geek” was inserted into the program.


You can organize your custom phrases into folders. To do this, click New Folder.


Enter a name for the folder in the Description edit box on the right side of the screen.


To move a custom phrase into the new folder, drag and drop the phrase in the list on the left to the new folder.


The phrase is moved to the new folder.


PhraseExpress comes with a list of AutoCorrect words and phrases that will be automatically corrected when the specified incorrect word or phrase is typed. For example, if you type “abondon”, PhraseExpress will correct it to “abandon”.


You can add your own words and phrases to the AutoCorrect list by clicking New Phrase while the AutoCorrect_English list is selected. Enter a description for the word or phrase in the Description edit box and enter the correct spelling of that word in the Phrase content box. Enter possible misspellings in the Autotext edit box, each separated by a vertical bar.


PhraseExpress can also be run as a portable program. To do this, download the portable version from the webpage using the link at the end of this article. Extract the files and create a new shortcut to the phraseexpress.exe file. If you’re going to run PhraseExpress from a USB flash drive, you can save the shortcut in the same directory as the program, allowing you to copy the program folder to any drive and run it without installing it.


Right-click on the shortcut and select Properties from the popup menu.


Add a space and “-portable” to the end of the Target command, after phraseexpress.exe, and click OK.


When you run PhraseExpress using the new shortcut, the following warning displays, reminding you to exit PhraseExpress before you remove the USB flash drive.


The PhraseExpress website warns about a conflict with the MS Word AutoCorrect function:
“The PhraseExpress Autotext feature will interfere with the MS Office AutoCorrect function as both programs are triggered by your text input. You will recognize that abbreviations are expanded twice. We strongly recommend that you import the MS Word AutoCorrect entries into PhraseExpress and disable the function in MS Word (see Microsoft help).”
Download PhraseExpress from http://www.phraseexpress.com/download.php.

 Source         : http://www.howtogeek.com/

47 Keyboard Shortcuts That Work in All Web Browsers

browser keyboard shortcuts header

Each major web browser shares a large number of keyboard shortcuts in common. Whether you’re using Mozilla Firefox, Google Chrome, Internet Explorer, Apple Safari, or Opera – these keyboard shortcuts will work in your browser.
Each browser also has some of its own, browser-specific shortcuts, but learning the ones they have in common will serve you well as you switch between different browsers and computers. This list includes a few mouse actions, too.

Tabs

Ctrl+1-8 – Switch to the specified tab, counting from the left.
Ctrl+9 – Switch to the last tab.


Ctrl+Tab – Switch to the next tab – in other words, the tab on the right. (Ctrl+Page Up also works, but not in Internet Explorer.)
Ctrl+Shift+Tab – Switch to the previous tab – in other words, the tab on the left. (Ctrl+Page Down also works, but not in Internet Explorer.)
Ctrl+W, Ctrl+F4 – Close the current tab.
Ctrl+Shift+T – Reopen the last closed tab.


Ctrl+T – Open a new tab.
Ctrl+N – Open a new browser window.
Alt+F4 – Close the current window. (Works in all applications.)

Mouse Actions for Tabs

Middle Click a Tab – Close the tab.
Ctrl+Left Click, Middle Click – Open a link in a background tab.
Shift+Left Click – Open a link in a new browser window.
Ctrl+Shift+Left Click – Open a link in a foreground tab.

Navigation

Alt+Left Arrow, Backspace – Back.
Alt+Right Arrow, Shift+Backspace – Forward.
F5 – Reload.
Ctrl+F5 – Reload and skip the cache, re-downloading the entire website.
Escape – Stop.
Alt+Home – Open homepage.


Zooming

Ctrl and +, Ctrl+Mousewheel Up – Zoom in.
Ctrl and -, Ctrl+Mousewheel Down — Zoom out.
Ctrl+0 – Default zoom level.
F11 – Full-screen mode.


Scrolling

Space, Page Down – Scroll down a frame.
Shift+Space, Page Up – Scroll up a frame.
Home – Top of page.
End – Bottom of page.
Middle Click – Scroll with the mouse. (Windows only)


Address Bar

Ctrl+L, Alt+D, F6 – Focus the address bar so you can begin typing.
Ctrl+Enter – Prefix www. and append .com to the text in the address bar, and then load the website. For example, type howtogeek into the address bar and press Ctrl+Enter to open www.howtogeek.com.
Alt+Enter – Open the location in the address bar in a new tab.

Search

Ctrl+K, Ctrl+E – Focus the browser’s built-in search box or focus the address bar if the browser doesn’t have a dedicated search box. (Ctrl+K doesn’t work in IE, Ctrl+E does.)
Alt+Enter – Perform a search from the search box in a new tab.
Ctrl+F, F3 – Open the in-page search box to search on the current page.
Ctrl+G, F3 – Find the next match of the searched text on the page.
Ctrl+Shift+G, Shift+F3 – Find the previous match of the searched text on the page.


History & Bookmarks

Ctrl+H – Open the browsing history.
Ctrl+J – Open the download history.
Ctrl+D – Bookmark the current website.
Ctrl+Shift+Del – Open the Clear Browsing History window.


Other Functions

Ctrl+P – Print the current page.
Ctrl+S – Save the current page to your computer.
Ctrl+O – Open a file from your computer.
Ctrl+U – Open the current page’s source code. (Not in IE.)
F12 – Open Developer Tools. (Requires Firebug extension for Firefox.)


Source    :  http://www.howtogeek.com/