Sunday, May 24, 2015

TeamViewer 9 Released – Install on RHEL/CentOS/Fedora and Debian/Ubuntu

This guide shows how to install Teamviewer 9 on Linux (RedHat, CentOS, Fedora and Debian, Ubuntu, Linux Mint, Xubuntu) systems. Teamviewer is a one of the most popular application for remote assistant, Desktop sharing or transferring files between computers, web conferencing and online meetings etc. Teamviewer is a proprietary application. However, it’s a freeware for personal use. Teamviewer is available for Windows, Linux, Mac OS, Android and iPhone.

Teamviewer uses WINE application which is integrated within it. We don’t have to install WINE application separately. Teamviewer is not a native Linux application.

Recently, the latest stable version of TeamViewer 9 released with new features and many improvements. Following are some of the new features are added in TeamViewer 9 which are highlighted below:

Features for Windows, Linux and Mac

  1. Open multiple connections in different tabs
  2. Support for Wake-on-LAN
  3. Added two factor authentication for TeamViewer accounts
  4. Support for Windows 8.1 and Mac OS X Mavericks
  5. Save custom modules such as QuickSupport, QuickJoin, etc.
  6. API Integration
  7. Stronger security of the Teamviewer account
  8. Quick connection via desktop shortcut
  9. Visual notification
  10. Copy and paste files and text between computers
  11. Initiating file transfers to computers
  12. Quick connection via desktop shortcut
  13. Faster video transfers

How do I Install Teamviewer 9 on RedHat, CentOS, Fedora

You may download package for rpm based Linux distributions at teamviewer_linux.rpm.
Let us start installation. Go to the directory from where you have downloaded package and execute following yum command to install it. It will install missing dependencies.

# wget http://www.teamviewer.com/download/teamviewer_linux.rpm
# yum install teamviewer_linux.rpm

If you get missing public key error, you can download public key and import it using the following command.

# wget http://www.teamviewer.com/link/?url=354858
# rpm --import TeamViewer_Linux_PubKey.asc

After importing the public key, please run the “yum install” command again to install the Teamviewer rpm.

To start Teamviewer application, run the following command from the terminal.
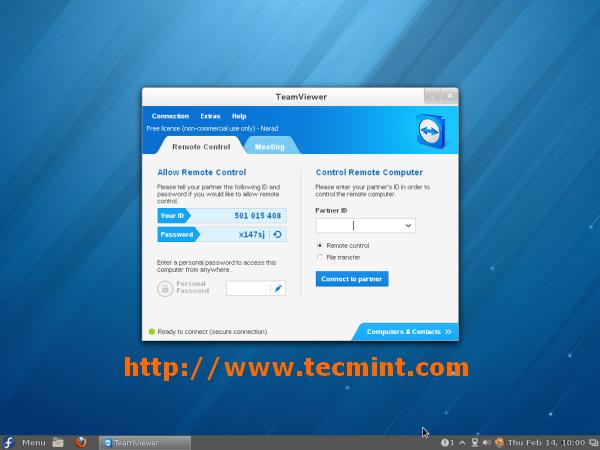
# teamviewer

Teamviewer application running on my Fedora 18 system.

Running TeamViewer in Fedora 18

Running TeamViewer in Fedora 18

How do I Install Teamviewer 9 on Ubuntu, Linux Mint, Xubuntu

You may download teamviewer package for 32-bit or 64-bit systems at teamviewer linux .deb packages. or you can download the package using wget command as shown below.

## 32 Bit System ##
$ sudo wget http://www.teamviewer.com/download/teamviewer_linux.deb

## 64 Bit System ##
$ sudo wget http://www.teamviewer.com/download/teamviewer_linux_x64.deb

Once you’ve downloaded the package, go to the directory where you’ve downloaded Teamviewer package and run the following command to install it.

## 32 Bit System ##
$ sudo dpkg -i teamviewer_linux.deb

## 64 Bit System ##
$ sudo dpkg -i teamviewer_linux_x64.deb

If you get missing dependencies error, please use the following command to install those dependencies.

sudo apt-get install -f

Once installation is done. To start Teamviewer package on Ubuntu Linux, go to Dash Home and type teamviewer and click on teamviewer icon to run application.
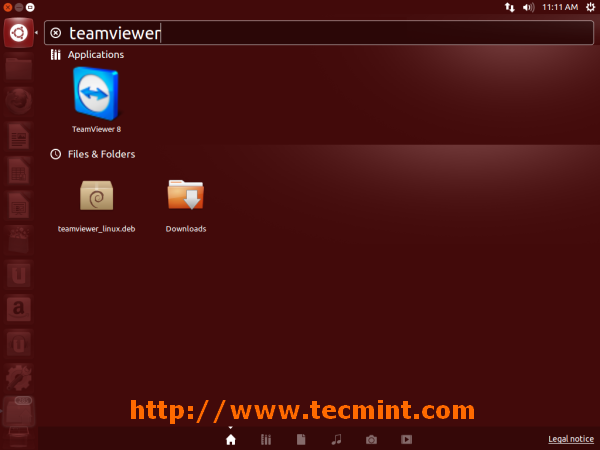
Running TeamViewer in Ubuntu  13.10

Running TeamViewer in Ubuntu 13.10
Teamviewer application running on my Ubuntu 13.10 system.
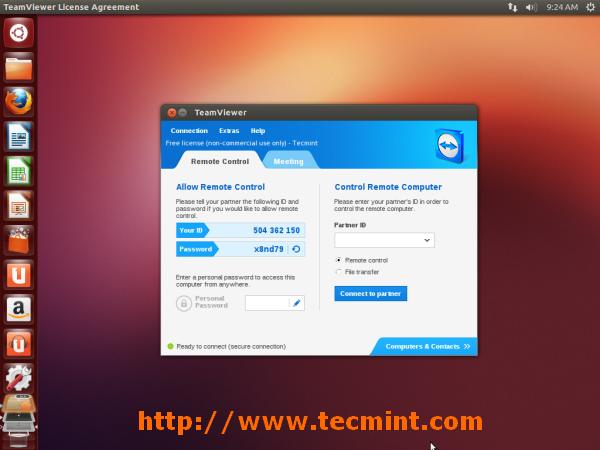
Install TeamView in Ubuntu

TeamViewer 9 Under Ubuntu 13.10

To start on Linux Mint, Go to Menu >> Internet >> Teamviewer and click on Accept License 

Agreement to run application.

Teamviewer application running on my Linux Mint 15.
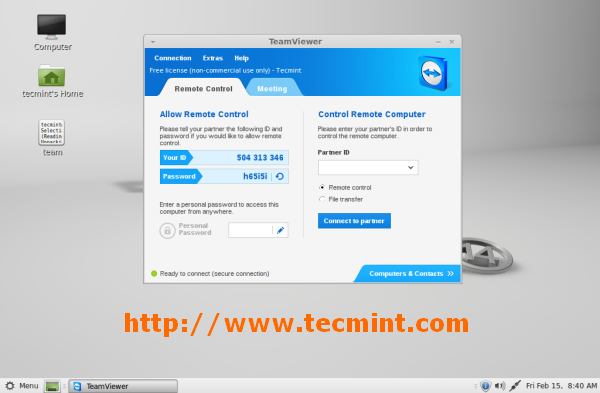
Install TeamViewer in Linux Mint

Running TeamViewer in Linux Mint 15

Source : http://www.tecmint.com
Saturday, May 23, 2015

How to Enable Telnet on Windows 7/8

Telnet is an application protocol used for two-way communication using terminal connection. This article will help you to enable telnet client and server on Windows 7 & 8 operating system.
  • 1. Firstly open command prompt and type telnet command to make sure that it’s already installed or not on your system.
enable telnet on windows 1

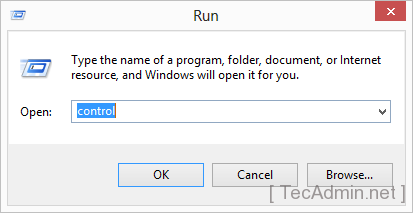
2. Open control panel on your system by type “control” on run window. You can also open control panel using windows navigation.

enable telnet on windows 2

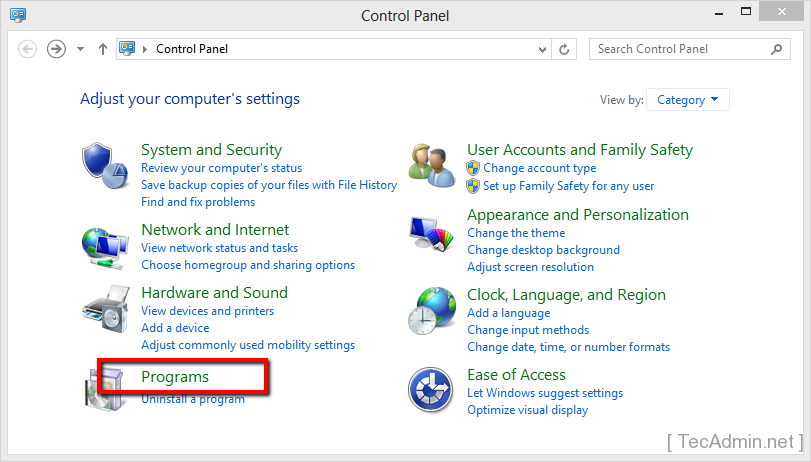
  • 3. Now click on programs link in control panel as per below screen shot.

enable telnet on windows 3

4. Now click on “Turn Windows feature on or off” under Programs and Features options.

enable telnet on windows 4
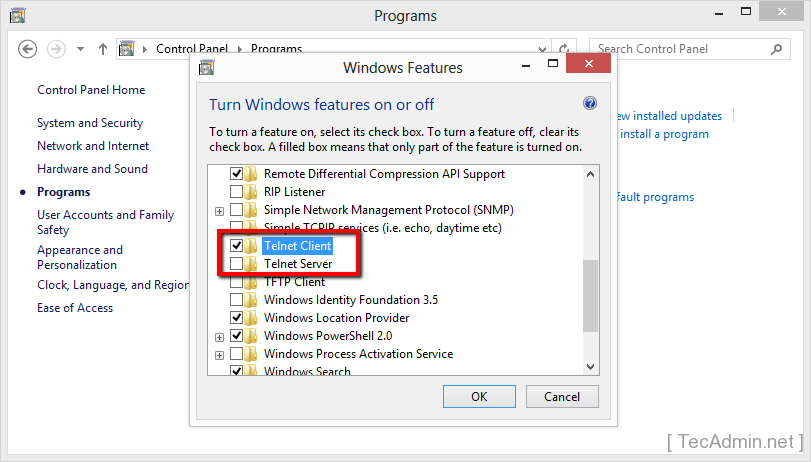
5. Now you will get Windows Features dialog box. Select Telnet Client check box as showing in below image. You can also select Telnet Server to enable telnet server on your Windows system.

enable telnet on windows 5

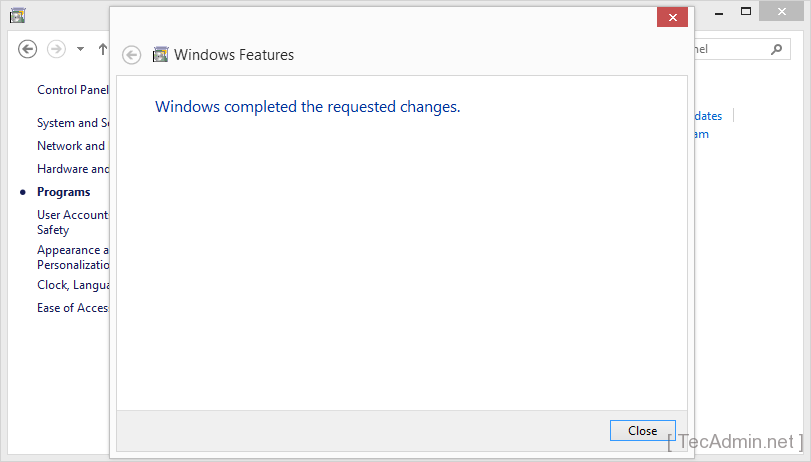
Now click OK. Installation processes will take few time and you will get result like below on successful installation.

enable telnet on windows 6

6. As the telnet client has been installed on Windows system. Lets again type “telnet” in command prompt and hit enter, You will get result like following.

enable telnet on windows 7
Source : http://tecadmin.net/

Sunday, May 10, 2015

How to Install Ubuntu 15.04 on VirtualBox

Ubuntu is a most popular Linux-based operating system. Recently Ubuntu releases its newest version 15.04 (Vivid Vervet). VirtualBox is also a popular software for creating virtual machine available for Windows and Linux environment.

Download Ubuntu ISO:

Visit following urls to dowload latest version of Ubuntu ISO.
Ubuntu Desktop: http://www.ubuntu.com/download/desktop
Ubuntu Server: http://www.ubuntu.com/download/server

Download and Install VirtualBox

We are assuming you have pre-installed VirtualBox on your system. If you don’t have already installed it, Visit below link and install latest version of VirtualBox on your system.
https://www.virtualbox.org/wiki/Downloads

Steps to Install Ubuntu On VirtualBox

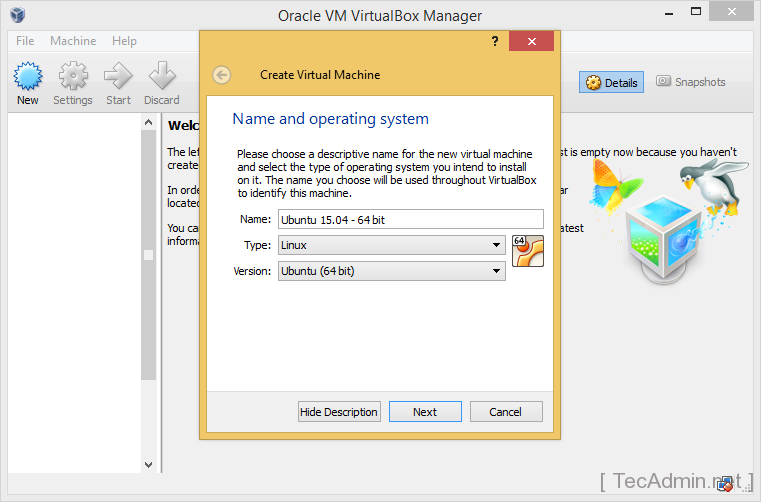
  • 1. Start VirtualBox and click New button to create virtual machine. Input name of your vm and select appropriate type and version and click Next.
    Install Ubuntu on VirtualBox Step 1
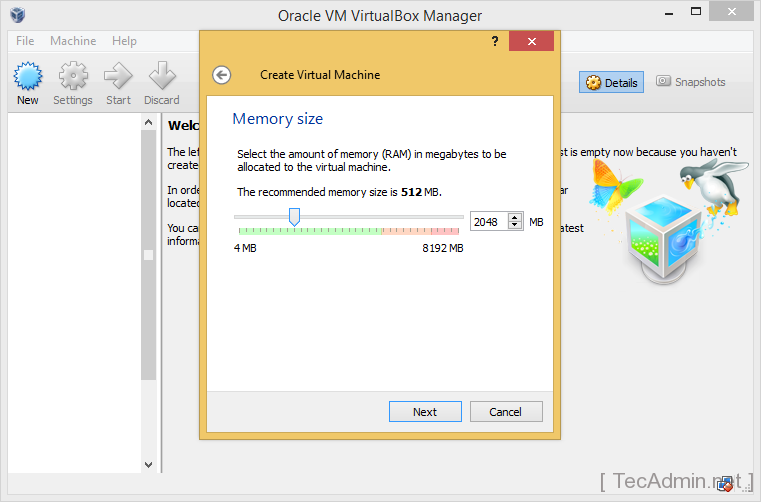
  • 2. Select the memory size to allot to new vm as per below screenshot.
    Install Ubuntu on VirtualBox Step 2
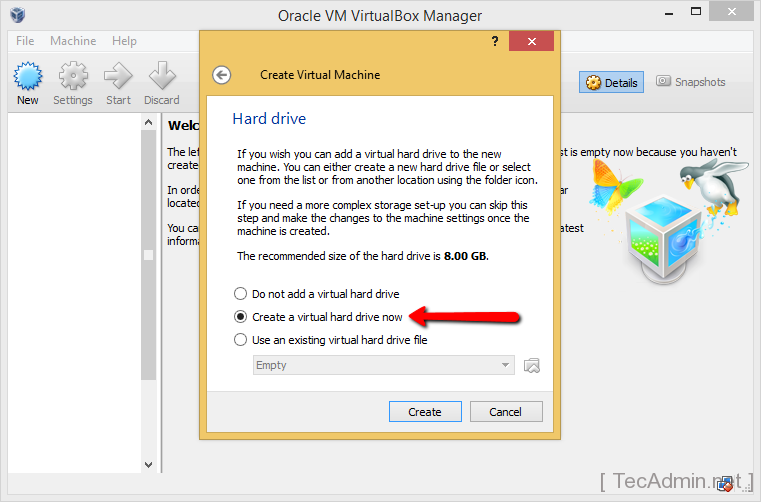
  • 3. As we are creating new virtul machine so just select option “Create a virtual hard drive now” and click Create button.
    Install Ubuntu on VirtualBox Step 3
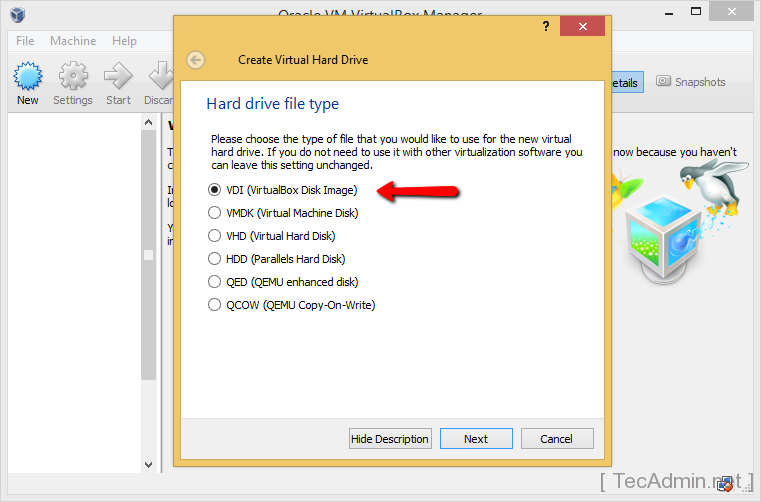
  • 4. Choose the type of virtual hard drive file to be created. Default VDI format is selected. You may select other formats If you want to use these hard drive with other virtualization software’s.
    Install Ubuntu on VirtualBox Step 4
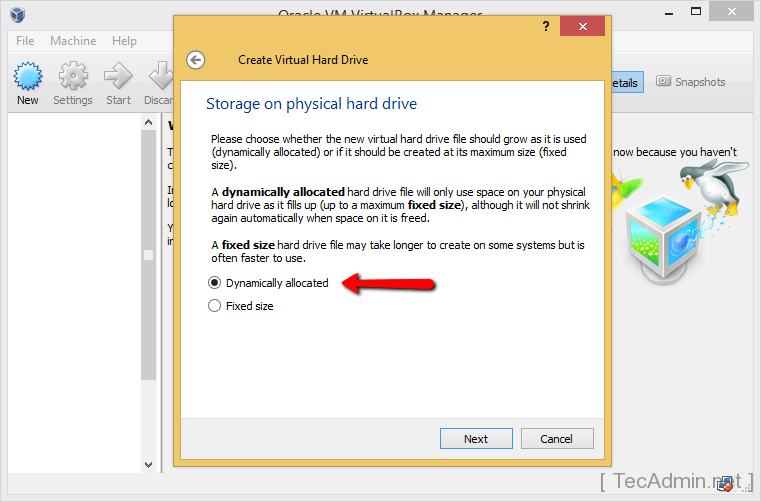
  • 5. Select type of disk allocation. We suggest to use option “Dynamically allocated”. Using this option hard drive grows on system as it fills only.
    Install Ubuntu on VirtualBox Step 5
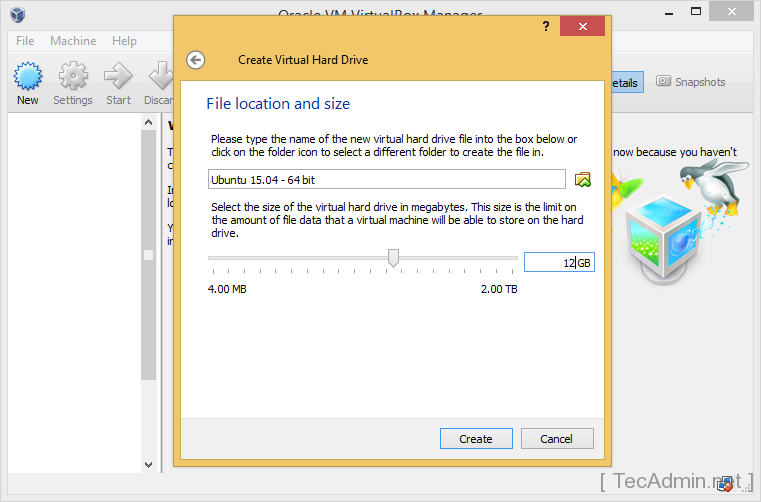
  • 6. Select eh location of files to be created in system and size of hard drive to be created. Now click “Create” button.
    Install Ubuntu on VirtualBox Step 6
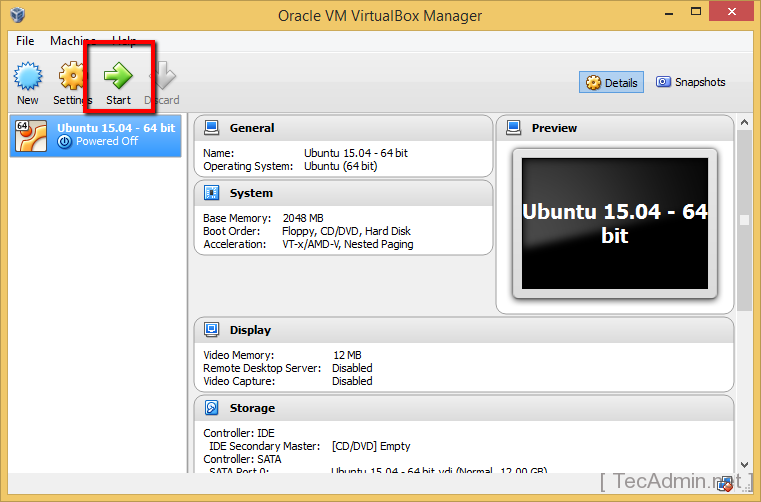
  • 7. At this stage you have create an Ubuntu virtual machine without operating system. Now We will install operating system on this virtual machine. Open VirtualBox and select create VM. Click on Start button as per showing below screenshot.
    Install Ubuntu on VirtualBox Step 7
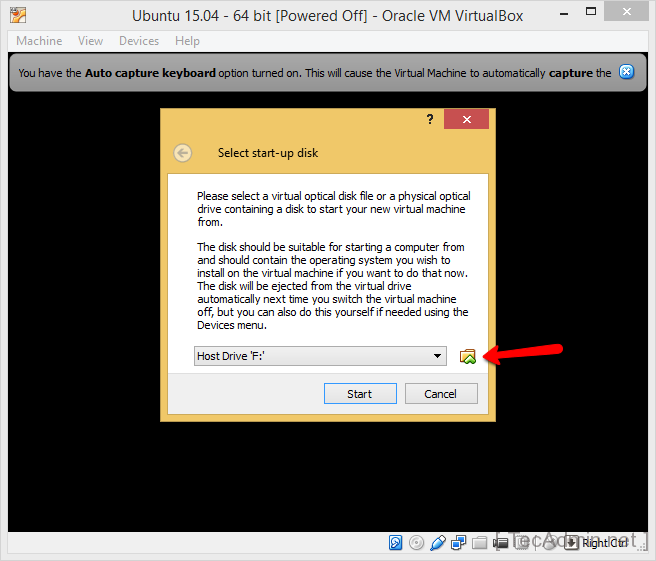
  • 8. As operating system is not installed, It will ask for bootable drive.
    Install Ubuntu on VirtualBox Step 8
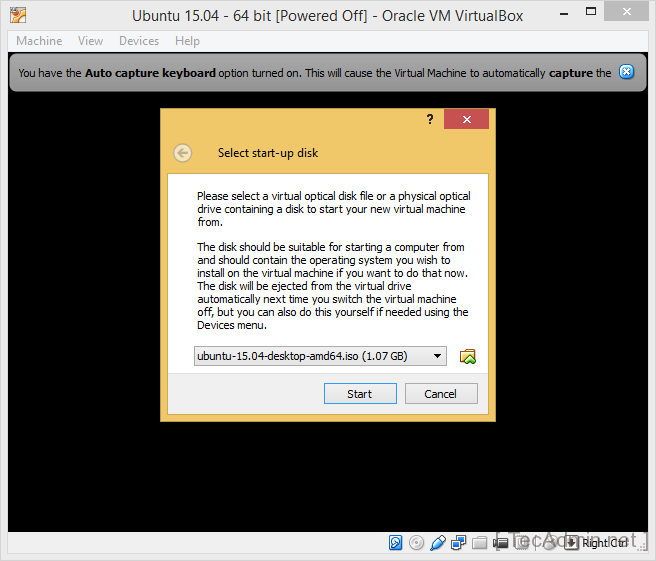
    Select the ISO of downloaded Ubuntu operating system and click Start button.
    Install Ubuntu on VirtualBox Step 9
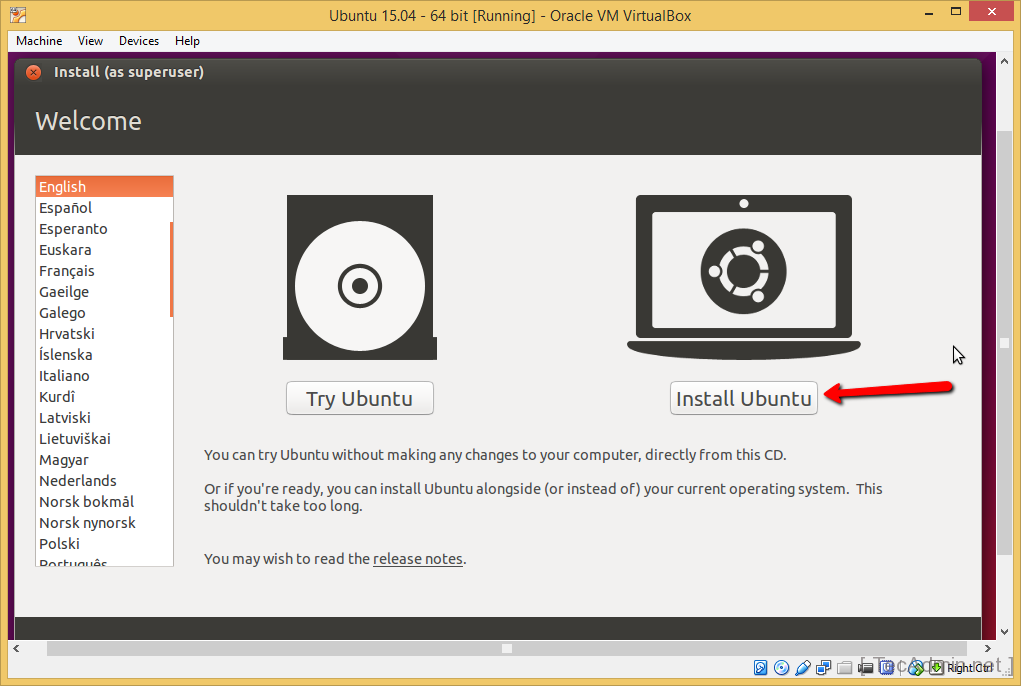
  • 9. After booting the vm, You will see screen like below. You can simply start ubuntu without installing. To install permanently select Install Ubuntu to begin installation.
    Install Ubuntu on VirtualBox Step 10
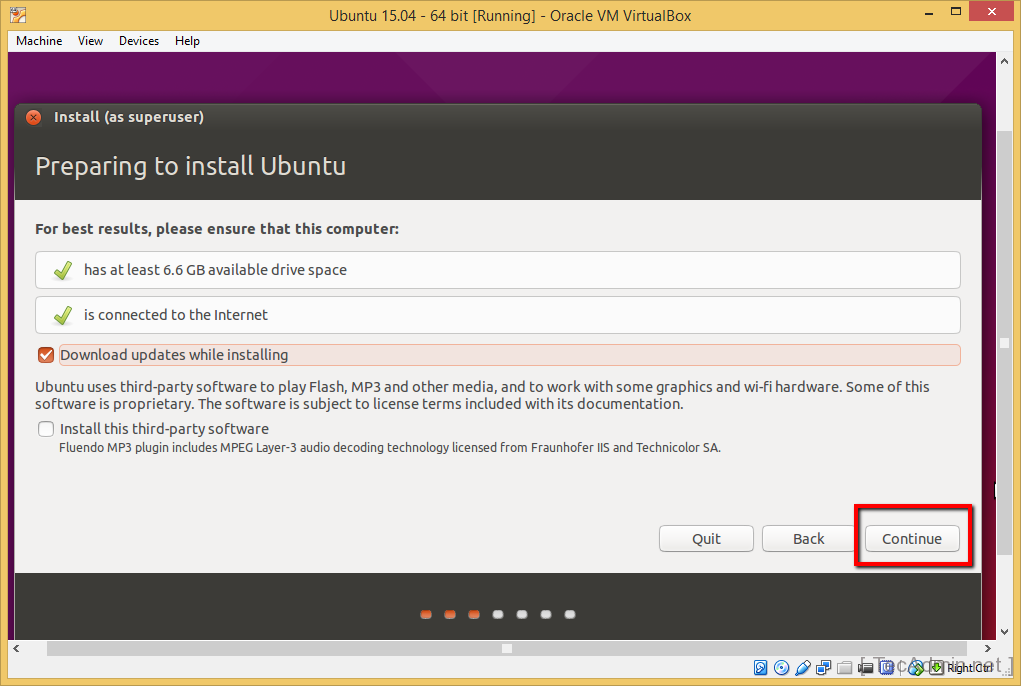
  • 10. Ubuntu will prepare to install. You can select option “Download updates while installing” to install updated packages and click Continue.
    Install Ubuntu on VirtualBox Step 11
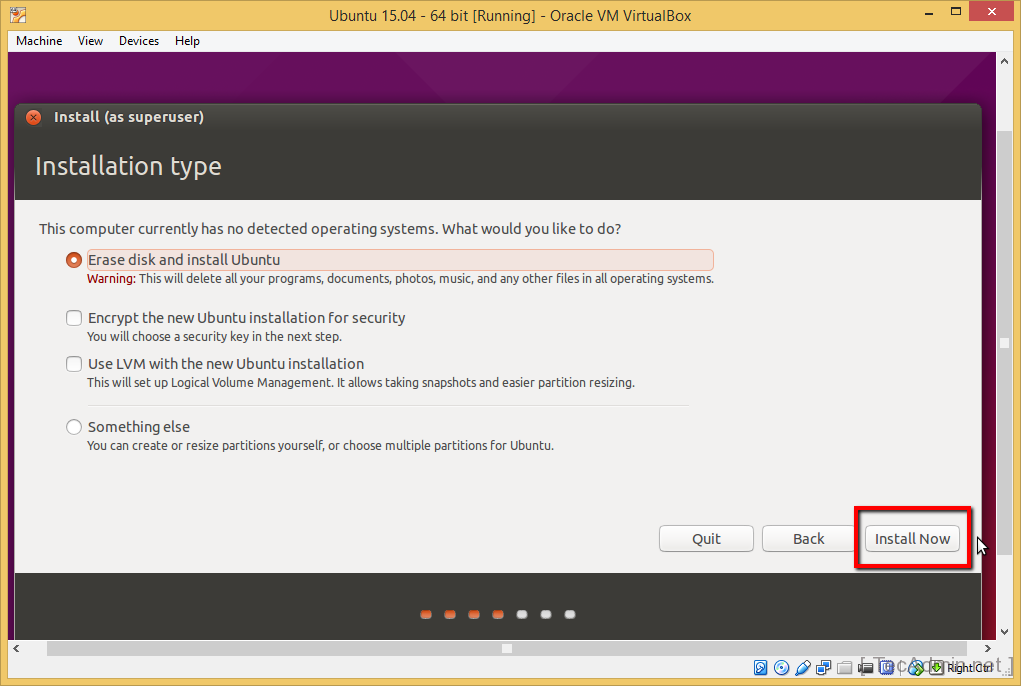
  • 11. Installation type:- Select Erase disk and install Ubuntu option and click on Install Now button.
    Install Ubuntu on VirtualBox Step 12
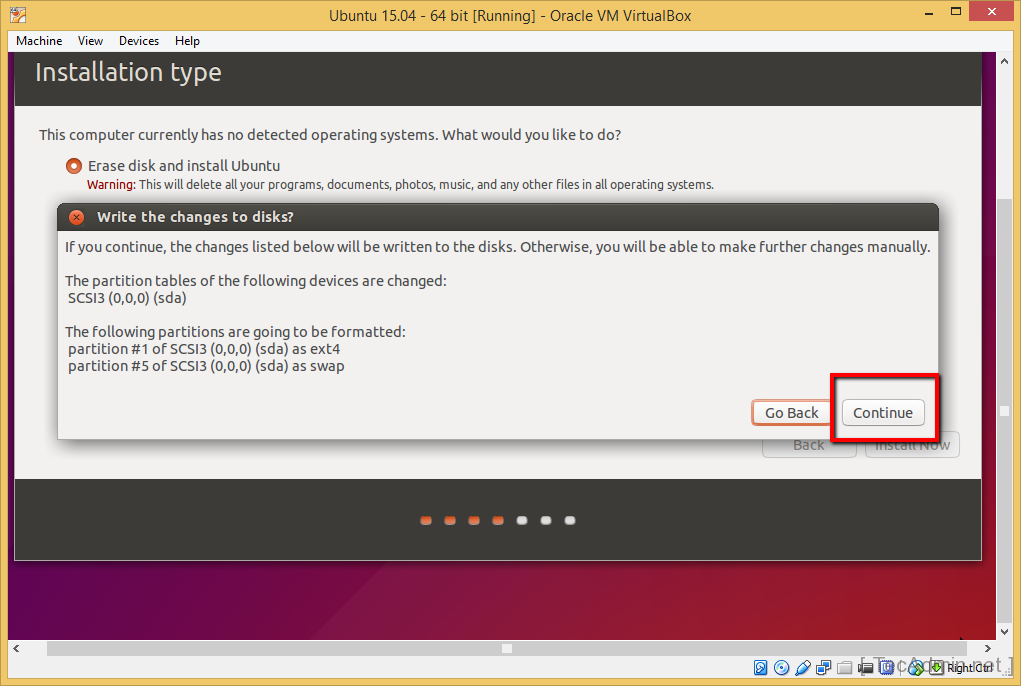
  • 12. Just click on Continue button.
    Install Ubuntu on VirtualBox Step 13
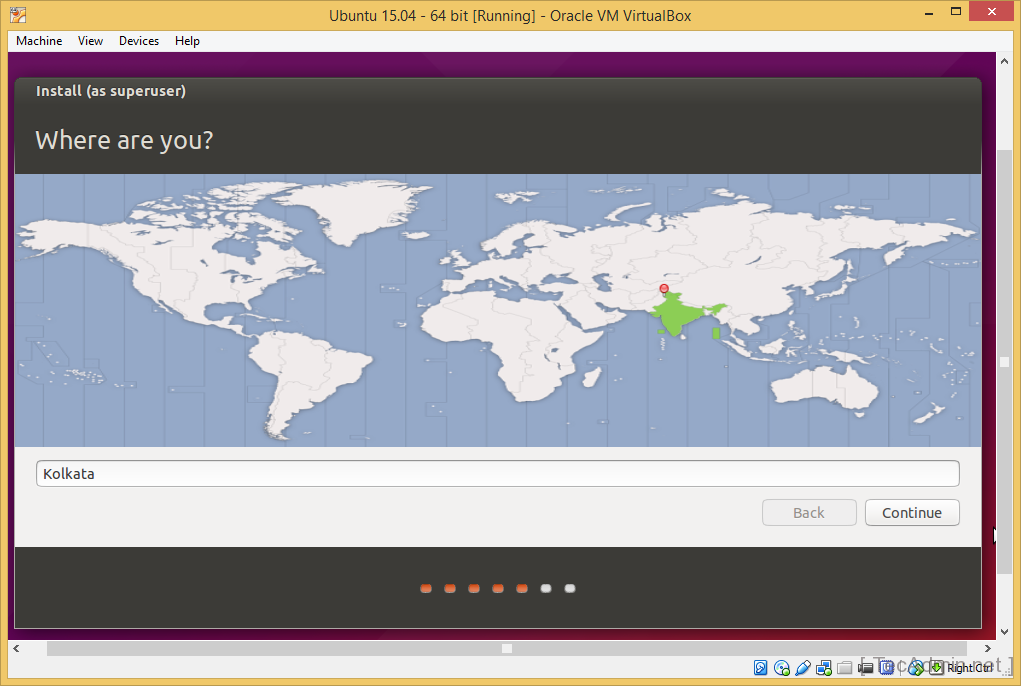
  • 13. Select the location the server resides to properly setting system date time and click on Continue button.
    Install Ubuntu on VirtualBox Step 14
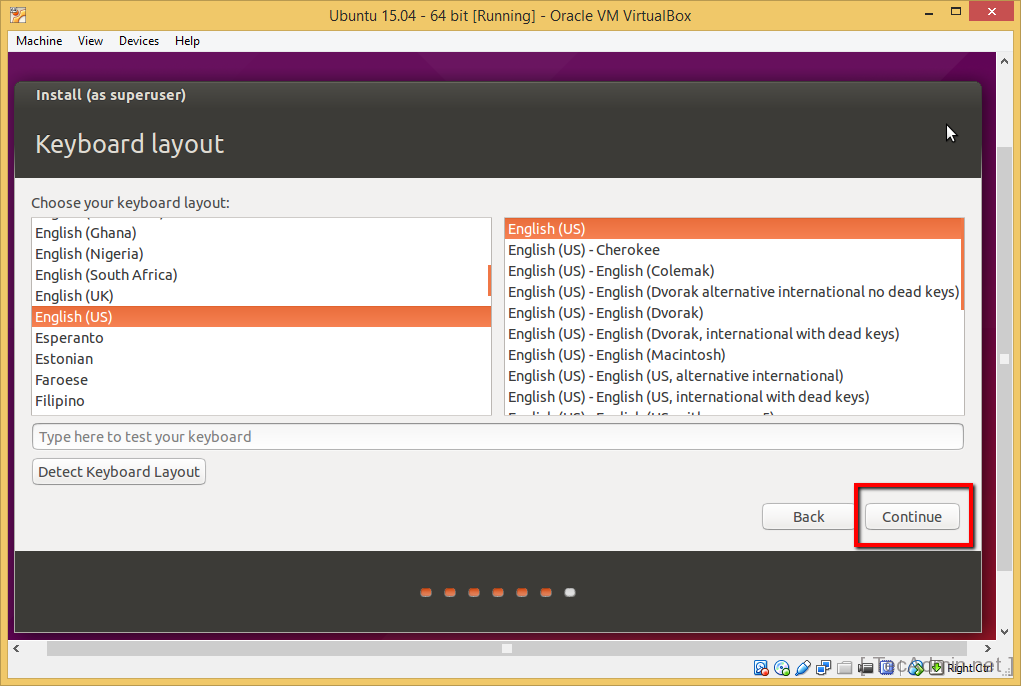
  • 14. Select the keyboard layout as per your language and click on Continue button.
    Install Ubuntu on VirtualBox Step 15
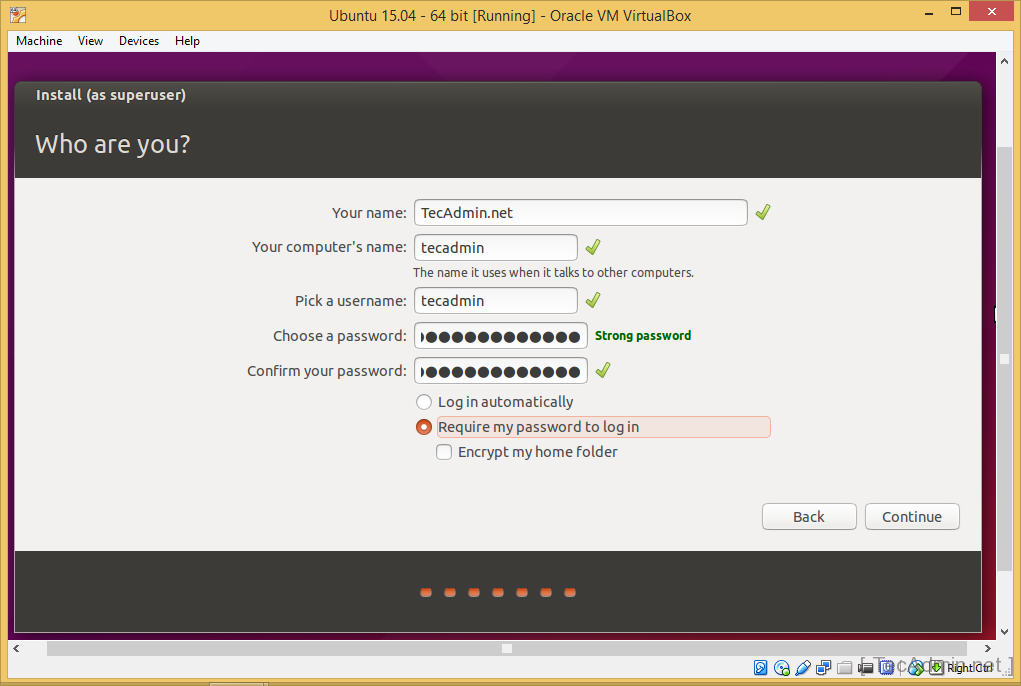
  • 15. Enter your name, username and password to configure your system identity and click on Continue button
    Install Ubuntu on VirtualBox Step 16
    This will start the Ubuntu installation on VirtualBox. Wait for installation completed.
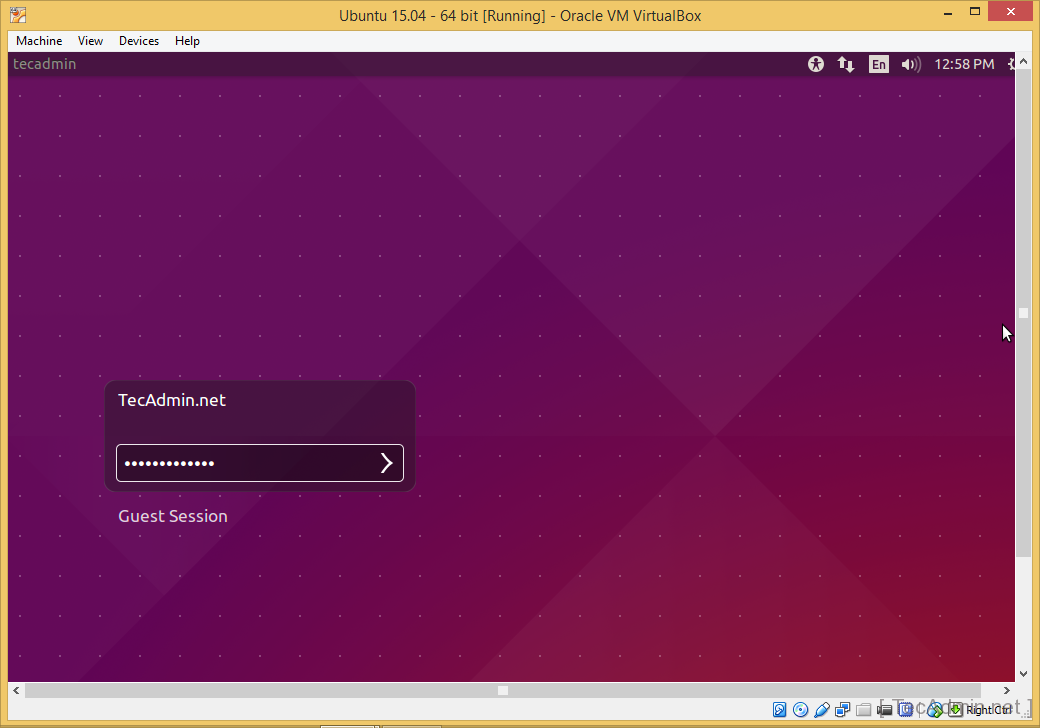
  • 16. After completing installation virtual machine will ask for reboot. Reboot the virtual machine to complete installation. After rebooting you will get login prompt like this.
    Install Ubuntu on VirtualBox Step 17

Your Ubuntu virtual machine has been successfully installed.

Wednesday, March 4, 2015

How to Convert the Unity Launcher into a Dock-Style Launcher

00_lead_image_dock_launcher

The Unity Launcher in Ubuntu is locked to the left side of the screen. If you would rather have a launcher at the bottom of the screen, there is a way to convert the Unity Launcher into a dock-style launcher at the bottom of the screen.

First, we will be installing the Unity Tweak Tool and Cairo-Dock. To install the Unity Tweak Tool, click the Ubuntu Software Center icon on the Unity Launcher.

01_opening_ubuntu_software_center

Start typing “unity tweak” in the search box in the upper-right corner of the Ubuntu Software Center window. Results start to display in the list as you type. When the “Unity Tweak Tool” displays in the list, click on it and then click the “Install” button.

02_clicking_install_for_unity_tweak_tool

When the “Authenticate” dialog box displays, enter your password in the “Password” edit box and click “Authenticate.”

03_authenticate_dialog

The progress of the installation is displayed on the right side of the “Unity Tweak Tool” item in the list.

04_installation_progress

Now, search for Cairo-Dock and install it using the same procedure we described for installing the Unity Tweak Tool.

05_installing_cairo_dock

When the installation of Cairo-Dock is finished, click the X button in the upper-left corner of the Ubuntu Software Center window to close it.

05a_closing_ubuntu_software_center
To open the Unity Tweak Tool, click the icon on the Unity Launcher.
06_opening_unity_tweak_tool_from_unity

NOTE: If you don’t have an icon on the Unity Launcher for the Unity Tweak Tool, open the Dash and type “unity”. The Unity Tweak Tool icon should display under “Applications” in the results. Click the icon to start the tool.

07_starting_unity_tweak_using_dash

In the “Unity” section of the Unity Tweak Tool, click “Launcher.”

08_clicking_launcher

On the “Launcher” tab, click the “Auto-hide” switch so it reads “ON.” The Unity Launcher immediately hides. You can change the “Auto-hide animation,” “Reveal location,” and “Reveal sensitivity” as well.

09_turning_auto_hide_on

To start Cairo-Dock, move your mouse to the left side of the screen (or top left corner, depending on your settings) to show the Unity Launcher. Then, click the Cairo-Dock icon on the launcher.

10_running_cairo_dock

The Cairo-Dock displays at the bottom of the screen. For more information about customizing and using Cairo-Dock.

11_cairo_dock_visible_unity_hidden

If you want Cairo-Dock to display automatically when you log in, right-click anywhere on the dock and move your mouse over “Cairo-Dock.” Then, select “Launch Cairo-Dock on startup” from the sub-menu that displays.

NOTE: Once you select the “Launch Cairo-Dock on startup” option, it is removed from the menu. If you change your mind and don’t want Cairo-Dock to start automatically when you log in, you can disable it in the Startup Applications tool.

12_selecting_launch_cairo_dock_on_startup

This method of switching to a dock-style launcher gives you the best of both worlds. You can have a dock at the bottom of the screen and still access the Unity Launcher by hovering your mouse over the left side of the screen.