Sunday, May 27, 2012

Top 7 Free SFTP or SCP Clients for Windows (Transfer Files to Linux)

Most organizations run Linux servers for their enterprise databases and applications. However the developers and admins might have Windows laptops. In those cases, you might be using PuTTY (or related tools like PuttyCM) to ssh from Windows to Linux. You might also want to transfer files from Windows to Linux and vice versa. You can use any one of the free SFTP clients mentioned in this article.
Even if you are already using some SFTP client, check-out these tools, you might end-up liking one of these sFTP clients better than your current one.
Did we miss any of your favorite SFTP or SCP client?

1. WinSCP

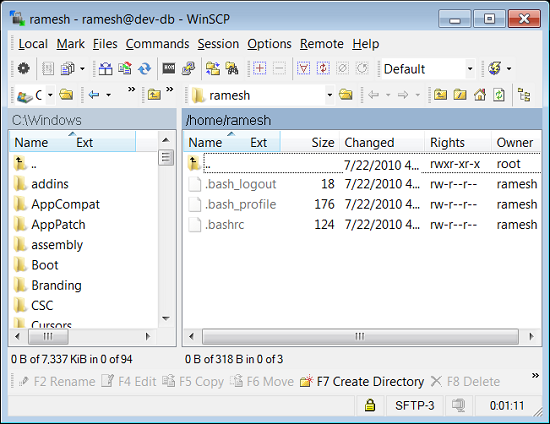
WinSCP Supports SFTP, SCP and FTP. This is the best and efficient SFTP and SCP graphical tool for Windows. Following are few features of WinSCP.
  • Its integrated well with Windows using the drag and drop feature. From Windows Explorer, you can right mouse click on a file, select “Send To”, and transfer the file to remote Linux server.
  • Apart from GUI, WinSCP also provides a command line interface to transfer files.
  • If you frequently connect to multiple servers, you can store those session information (ip-address, username) in WinSCP. Storing the password is not recommended.
  • You can automate the file transfer by writing scripts in WinSCP.
  • WinSCP can monitor a local directory for changes and automatically sync with the remote directory.
  • WinSCP is open source.

2. PSCP and PSFTP (from PuTTY)

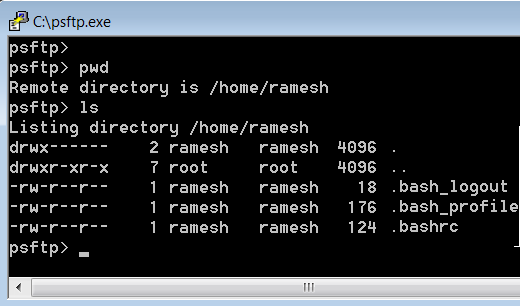
PuTTY is used to SSH from Windows to Linux. Apart from the SSH client, PuTTY also has both SCP and SFTP client. It is called PSCP and PSFTP. Just like PuTTY, these are very light weight, easy to use, reliable, and open source.

Please note that PSCP and PSFTP are just command-line tools without any GUI.


Note: If you are using PuTTY, don’t forget to check-out these PuTTY tips, and 12 powerful PuTTY Add-ons.

3. Filezilla

FileZilla is a GUI tool that supports FTP, FTPS and SFTP. Following are some of the features.
  • It is cross platform and works on Windows, Linux and Mac OS.
  • Filezilla is open source.
  • Supports IPv6.
  • You can drag and drop files.
  • Edit remote files directly from Filezilla.
  • Compare local and remote directory contents.

4. FireFTP

FireFTP is a FTP addon for Firefox, which can also do SFTP.
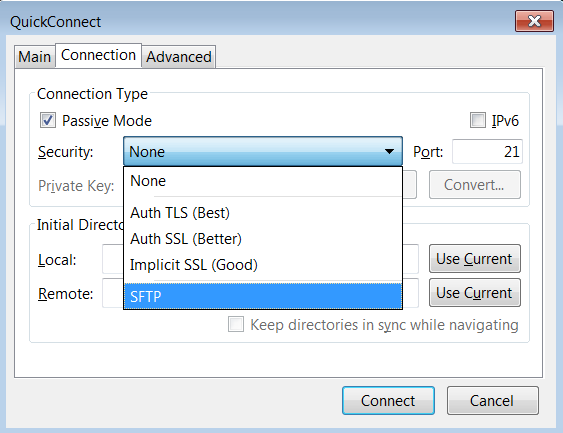
To use SFTP in FireFTP, from Firefox browser, click on Tools -> FireFTP -> From the drop-down list, select either “Quick Connect” or “Create an Account” -> In the “Main” tab, enter the ip-address, uid, and pwd for the Linux server -> Click on “Connection” Tab -> Click on “Security” drop-down list and select “SFTP” from here, as shown below.


5. CoreFTP LE

CoreFTP is a commercial product that has both Pro and Free version. The free version pretty much has every feature that you would need for your typical SFTP file transfer needs.
  • Drag and drop support.
  • You can stop and resume the file transfer.
  • File transfer bandwidth can be controlled
  • command line mode is available

6. Swish – SFTP from Windows Explorer

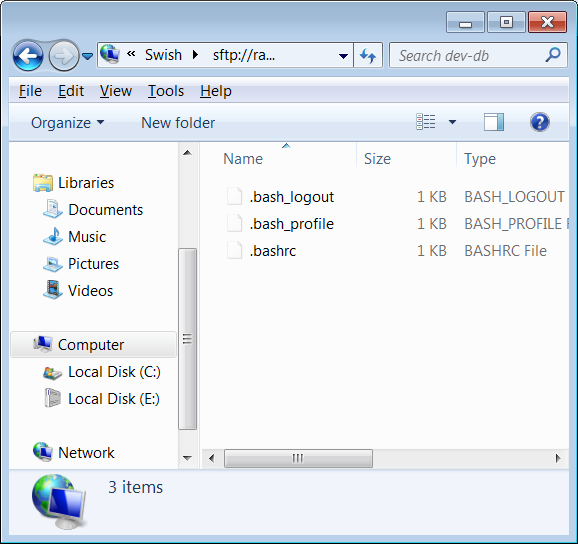
This is very different from all other SFTP clients. This integrates directly to your Windows Explorer. You can just browse remote files from your Windows Explorer directly, and drag and drop files to transfer it.
Please note that this is still in “alpha” stage.
Once you’ve installed it, do the following to create a remote SFTP connection from the Windows Explorer:
  • On Windows XP -> My Computer -> Click on Swish Icon -> Tools menu bar -> Add SFTP Connection.
  • On Windows 7 -> Click on “Computer” in your Windows Explorer -> Click on Swish Icon -> Click on “Add SFTP Connection”.

7. BitKinex

BitKinex is a freeware SFTP Clienit. Following are some of the features.
  • Uses multipart and multithreaded file transfer for speed.
  • Support FTP, FTPS, SFTP, HTTP, HTTPS and WebDAV protocols.
  • Supports server-to-server file transfer.
  • Command line interface to transfer files


source : http://www.thegeekstuff.com/2011/06/windows-sftp-scp-clients/

Friday, May 25, 2012

Top 5 Best Linux OS Distributions

Ubuntu
My personal favorite was Ubuntu for desktop (#1 in this list) and Red Hat for servers (#5 in this list).

If you are new to any of the distros listed in the top 5, read the rest of the article to understand little bit more about those distros and find out whether your favorite Linux distribution made it in the top 5.


Linux Distro Review
Fig: Favorite Linux Distribution Voting Results

1. Ubuntu

Ubuntu 8.04 LTS Desktop
Like most of you, Ubuntu is my #1 choice for desktop Linux. I use it both at home and work. Ubuntu is the #1 in the Linux desktop market and some use Ubuntu for the servers also. Ubuntu offers the following three editions.
  • Ubuntu Desktop Edition
  • Ubuntu Server Edition
  • Ubuntu Notebook Remix

Additional Details:

Refer to our Ubuntu Tips and Tricks article series.

2. Debian

Debian 4.0r8, or etch
Debian is also called as Debian GNU/Linux, as most of the basic OS tools comes from the GNU Project. Lot of other famous distributions are based on Debian, which includes our #1 distro Ubuntu and many others — such as Knoppix, Linspire, Damn Small Linux etc.,

Additional Details:

Read more about Debian Distribution at wikipedia.

3. Fedora

Fedora 10 Server Edition
Fedora is sponsored by Red Hat. If you are interested in experimenting with the the leading technologies, you should use fedora, as the release cycle is very short and fedora tends to include the latest technology software/packages in it’s distribution.

Additional Details:

Read more about Fedora Distribution at wikipedia.

4. CentOS

CentOS 5 Linux Distro
If your organization does not want to spend money on purchasing Red Hat support, but still want all the benefits of the red-hat distribution, this is obviously the best choice, as this is totally based on the red-hat enterprise Linux.

As you can imagine the Nort American Enterprise Linux vendor mentioned in the quote below is Red Hat.
From the CentOS website: CentOS 2, 3, and 4 are built from publically available open source SRPMS provided by a prominent North American Enterprise Linux vendor. CentOS is designed for people who need an enterprise class OS without the cost or support of the prominent North American Enterprise Linux vendor.

Additional Details:

Read more about CentOS Distribution at wikipedia

5. Red Hat

Linux Red Hat 4 Enterprise Linux for Server
This is my favorite server distribution.  If an organization doesn’t mind spending dollars on purchasing the red-hat support, this is always my #1 recommendation to any organization who runs mission critical applications.

On a side note, one of the reason I like Red Hat Linux for mission critical production application is that Red Hat tends to take some of the new features from Fedora, which is well tested by the community.

Additional Details:

Read more about Red Hat Distribution at wikipedia.


source:      http://www.thegeekstuff.com/2009/06/top-5-best-linux-os-distributions/

Top 5 Best System Monitoring Tools

Nagios
If you are new to any of the top 5 tools mentioned here, please read the rest of the article to understand more about them.

Top 5 Best Free Network Monitoring Tool
Fig: Favorite System Monitoring Tool Voting Results

1. Nagios – Network Monitoring Software

Nagios System Monitoring Tools for LinuxNagios won by a huge margin. This is not a suprise to lot of people, as Nagios is hands-down the best monitoring tool.  As you already know, I love Nagios and have been using it for a long time. I have also written several tutorials on Nagios (and many more to come).
Nagios Core 3 eBook is the only guide you’ll ever need to monitor everything, be proactive, and sleep well.

2. Cacti – Network Monitoring Software

Cacti Network Monitoring Tool for UnixCacti uses RRDtool for the network graphing solution. Using Caci you can monitor and graph – CPU Load, Network bandwidth utilization, network traffic monitor etc.,
Cacti also supports plugin architecture. Some admins like the powerful graphing feature provided by Cacti, they use both Nagios and Cacti in their environment as the network monitoring tools.

3. Top (and other top variations)

Unix top, ntop command for Network Monitoring
  • Top Command – Few of you have mentioned top command as your favorite monitoring tool :-)
  • ntop (Network Top) – Ntop is a free network monitoring software. ntop displays network usage information in a similar fashion to top command output. You can also create HTML output file (dump) of the network status using ntop.  Apart from the command line, you can also launch the web version of the ntop once you’ve started the ntopd service and visit http://{ip-address}:3000 from browser.
  • htop (interactive process viewer for Linux) – htop is similar to top command with few additional features. The main difference is that you can use mouse to interact with the htop command output.

4. Zabbix

Zabbix Open Source Infrastructure Monitoring Solution for Unix PlatformsZabbiz is an open source monitoring solution with a commercial support provided by a company – Zabbix SIA, who primarily develops the software.  Zabbix requires a database to store the monitoring data. You can choose any DB of your choice – MySQL, PostgreSQL, Oracle, or SQLite.
Zabbix has the following three main modules:
  • Server (written in C)
  • Agents (written in C)
  • Frontend (PHP and Javascript)
Additional information about Zabbix:

5. Munin

Munin Network Badwidth Monitoring Platform Using PluginsSimilar to Cacti, Munin uses RRDTool to present the output in a pretty graph via web interface. The primary emphasis of Munin is on the plug and play architecture for it’s plugin. There are lot of plugins available for Munin, which will just work out-of-the box without lot of tweaking.
source :    http://www.thegeekstuff.com/2009/09/top-5-best-network-monitoring-tools/

RAID 0, RAID 1, RAID 5, RAID 10 Explained with Diagrams

RAID stands for Redundant Array of Inexpensive (Independent) Disks.
On most situations you will be using one of the following four levels of RAIDs.
  • RAID 0
  • RAID 1
  • RAID 5
  • RAID 10 (also known as RAID 1+0)
This article explains the main difference between these raid levels along with an easy to understand diagram.

In all the diagrams mentioned below:
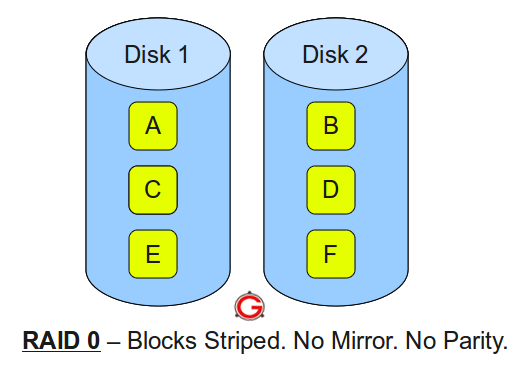
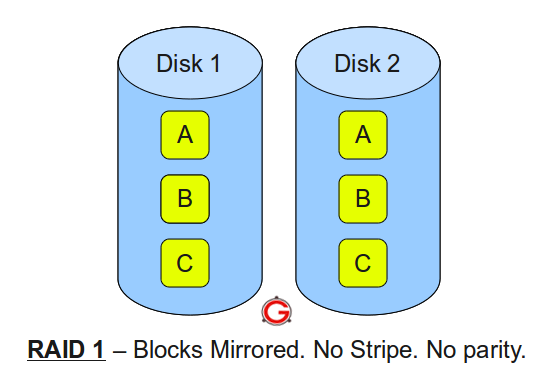
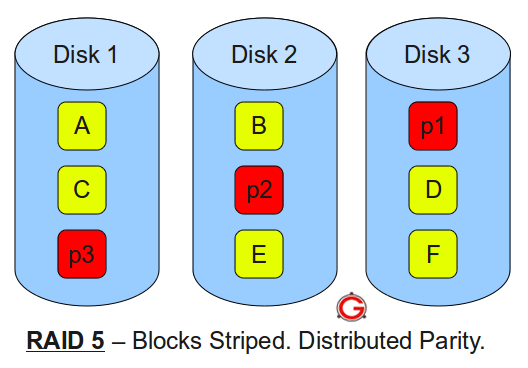
  • A, B, C, D, E and F – represents blocks
  • p1, p2, and p3 – represents parity

RAID LEVEL 0


Following are the key points to remember for RAID level 0.
  • Minimum 2 disks.
  • Excellent performance ( as blocks are striped ).
  • No redundancy ( no mirror, no parity ).
  • Don’t use this for any critical system.

RAID LEVEL 1

Following are the key points to remember for RAID level 1.
  • Minimum 2 disks.
  • Good performance ( no striping. no parity ).
  • Excellent redundancy ( as blocks are mirrored ).

RAID LEVEL 5


Following are the key points to remember for RAID level 5.
  • Minimum 3 disks.
  • Good performance ( as blocks are striped ).
  • Good redundancy ( distributed parity ).
  • Best cost effective option providing both performance and redundancy. Use this for DB that is heavily read oriented. Write operations will be slow.

RAID LEVEL 10


Following are the key points to remember for RAID level 10.
  • Minimum 4 disks.
  • This is also called as “stripe of mirrors”
  • Excellent redundancy ( as blocks are mirrored )
  • Excellent performance ( as blocks are striped )
  • If you can afford the dollar, this is the BEST option for any mission critical applications (especially databases).

Additional RAID Tutorials:

source :      http://www.thegeekstuff.com/2010/08/raid-levels-tutorial/

Linux Traceroute Command Examples

There are scenarios in which one would like to know the route which a connection follows. By route here we mean the IP addresses of all the forwarding entities (like routers in between).
Although there is no guarantee that the route will remain same for all the packets of a connection but usually it is same. This route related information can be very handy while debugging network related issues.

traceroute utility prints out complete route to a particular destination. In this article we will discuss how traceroute works and will see some practical examples.


How Traceroute Works?

Before beginning with examples, lets understand the concept on which traceroute works.
Traceroute utility uses the TTL field in the IP header to achieve its operation. For users who are new to TTL field, this field describes how much hops a particular packet will take while traveling on network.
So, this effectively outlines the lifetime of the packet on network. This field is usually set to 32 or 64. Each time the packet is held on an intermediate router, it decreases the TTL value by 1. When a router finds the TTL value of 1 in a received packet then that packet is not forwarded but instead discarded.
After discarding the packet, router sends an ICMP error message of “Time exceeded” back to the source from where packet generated. The ICMP packet that is sent back contains the IP address of the router.
So now it can be easily understood that traceroute operates by sending packets with TTL value starting from 1 and then incrementing by one each time. Each time a router receives the packet, it checks the TTL field, if TTL field is 1 then it discards the packet and sends the ICMP error packet containing its IP address and this is what traceroute requires. So traceroute incrementally fetches the IP of all the routers  between the source and the destination.You should also understand the IP header fields that we discussed a while back.

Traceroute Examples


 1. How to run traceroute?

$ traceroute <server-name>
The server-name above is the destination name or IP address.  For example, traceroute is used to find the network path from my machine to google.com :

$ traceroute google.com
traceroute to google.com (74.125.236.132), 30 hops max, 60 byte packets
1  220.224.141.129 (220.224.141.129)  89.174 ms  89.094 ms  89.054 ms
2  115.255.239.65 (115.255.239.65)  109.037 ms  108.994 ms  108.963 ms
3  124.124.251.245 (124.124.251.245)  108.937 ms  121.322 ms  121.300 ms
4  * 115.255.239.45 (115.255.239.45)  113.754 ms  113.692 ms
5  72.14.212.118 (72.14.212.118)  123.585 ms  123.558 ms  123.527 ms
6  72.14.232.202 (72.14.232.202)  123.499 ms  123.475 ms  143.523 ms
7  216.239.48.179 (216.239.48.179)  143.503 ms  95.106 ms  95.026 ms
8  bom03s02-in-f4.1e100.net (74.125.236.132)  94.980 ms  104.989 ms  104.954 ms
 
Each lines gives the details of interaction with each router encountered. So we see that traceroute not only gives the IP addresses of the intermediate routers but also three round trip times for that particular router as for each router the traceroute commands fires three packets.

The ‘*’ field in output

There are times when one could encounter an ‘*’ in the output rather than a value. This depicts that the required field could not be fetched. The reason can be anything from reverse DNS lookup failure to packets not hitting the target router to packets getting lost on their way back. So we see that the reason could be many but for all these type of cases the traceroute utility provides an * in the output.

2. Disable IP address and host name mapping

Traceroute provides and option through which the mapping of IP addresses with host name (that traceroute tries) is disabled. The option for doing this is ‘-n’ . Following example illustrates it :


$ traceroute google.com -n
traceroute to google.com (173.194.36.7), 30 hops max, 60 byte packets
1  220.224.141.129  109.352 ms  109.280 ms  109.248 ms
2  115.255.239.65  131.633 ms  131.598 ms  131.573 ms
3  124.124.251.245  131.554 ms  131.529 ms  131.502 ms
4  115.255.239.45  131.478 ms  131.464 ms  199.741 ms
5  72.14.212.118  199.674 ms  199.637 ms  199.603 ms
6  209.85.241.52  199.578 ms  199.549 ms  209.838 ms
7  209.85.241.187  199.488 ms  177.264 ms  177.196 ms
8  173.194.36.7  177.159 ms  187.463 ms  187.434 ms
 
So we see that no host name is displayed in the output.

3. Configure Response Wait Time

The time for which traceroute utility waits after issuing a probe can also be configured. This can be done through ‘-w’ option that it provides. The -w option expects a value which the utility will take as the response time to wait for. In this example, the wait time is 0.1 seconds and the traceroute utility was unable to wait for any response and it printed all the *’s.

$ traceroute google.com -w 0.1
traceroute to google.com (74.125.236.101), 30 hops max, 60 byte packets
1  * * *
2  * * *
3  * * *
..
26  * * *
27  * * *
28  * * *
29  * * *
30  * * *

So we see that traceroute tried 30 attempts (the max hop attempts) and then gave up as no ICMP packet was received in 0.1 seconds.

4. Configure Number of Queries per Hop

As already explained earlier, the traceroute utility sends 3 packets per hop to provide 3 round trip times. This default value of 3 is configurable using the option ‘-q’. This option expects an integer which it sets as new value of number of probes per hop.

$ traceroute google.com -q 5
traceroute to google.com (173.194.36.46), 30 hops max, 60 byte packets
1  220.224.141.129 (220.224.141.129)  91.579 ms  91.497 ms  91.458 ms  91.422 ms  91.385 ms
2  115.255.239.65 (115.255.239.65)  91.356 ms  91.325 ms  98.868 ms  98.848 ms  98.829 ms
3  124.124.251.245 (124.124.251.245)  94.581 ms  107.083 ms  107.044 ms  107.017 ms  106.981 ms
4  115.255.239.45 (115.255.239.45)  106.948 ms  106.918 ms  144.432 ms  144.412 ms  144.392 ms
5  72.14.212.118 (72.14.212.118)  115.565 ms  115.485 ms  115.446 ms 115.408 ms  115.381 ms
6  72.14.232.202 (72.14.232.202)  115.351 ms  87.232 ms  117.157 ms  117.123 ms  117.049 ms
7  209.85.241.189 (209.85.241.189)  126.998 ms  126.973 ms  126.950 ms  126.929 ms  126.912 ms
8  bom04s02-in-f14.1e100.net (173.194.36.46)  126.889 ms  95.526 ms  95.450 ms  95.418 ms  105.392 ms

So we see that after configuring the number of probes to 5, the output started showing five round trip times per hop.

5. Configure the TTL value to start with

Traceroute utility is flexible enough to accept the TTL value that the user wants to start the utility with. By default its value is 1 which means it starts off with the first router in the path but using the ‘-f’ option (which expects the new value of TTL) a new value of the TTL field can be set. For example, I tried a normal traceroute operation and then tried a traceroute with a different TTL value.

$ traceroute google.com
traceroute to google.com (74.125.236.132), 30 hops max, 60 byte packets
1  220.224.141.129 (220.224.141.129)  89.181 ms  101.540 ms  101.503 ms
2  115.255.239.65 (115.255.239.65)  101.468 ms  101.431 ms  101.324 ms
3  124.124.251.245 (124.124.251.245)  121.373 ms  121.350 ms  158.694 ms
4  115.255.239.45 (115.255.239.45)  101.223 ms  141.135 ms  123.932 ms
5  72.14.212.118 (72.14.212.118)  123.867 ms  123.832 ms  123.802 ms
6  72.14.232.202 (72.14.232.202)  123.773 ms  123.742 ms  587.812 ms
7  216.239.48.179 (216.239.48.179)  587.723 ms  587.681 ms  587.642 ms
8  bom03s02-in-f4.1e100.net (74.125.236.132)  577.548 ms  577.524 ms  587.512 ms

$ traceroute google.com -f 8
traceroute to google.com (74.125.236.129), 30 hops max, 60 byte packets
8  bom03s02-in-f1.1e100.net (74.125.236.129)  96.961 ms  96.886 ms  96.849 ms 

So we see that after using the -f option with value 8, only the last (8th) line from the previous output was shown.
How To Generate SSL Key, CSR and Self Signed Certificate For Apache

Apache mod_ssl certificate
If you want to convert your website from HTTP to HTTPS, you need to get a SSL certificate from a valid organization like Verisign or Thawte. You can also generate self signed SSL certificate for testing purpose.

In this article, let us review how to generate private key file (server.key), certificate signing request file (server.csr) and webserver certificate file (server.crt) that can be used on Apache server with mod_ssl.

Key, CSR and CRT File Naming Convention

I typically like to name the files with the domain name of the HTTPS URL that will be using this certificate. This makes it easier to identify and maintain.
  • Instead of server.key, I use www.thegeekstuff.com.key
  • Instead of server.csr, I use www.thegeekstuff.com.csr
  • Instead of server.crt, I use www.thegeekstuff.com.crt

1. Generate Private Key on the Server Running Apache + mod_ssl

First, generate a private key on the Linux server that runs Apache webserver using openssl command as shown below.

# openssl genrsa -des3 -out www.thegeekstuff.com.key 1024
Generating RSA private key, 1024 bit long modulus
.......................................++++++
...................................................++++++
e is 73547 (0x01001)
Enter pass phrase for www.thegeekstuff.com.key:
Verifying - Enter pass phrase for www.thegeekstuff.com.key:

# ls -ltr www.thegeekstuff.*
-rw-r--r-- 1 root root   963 Jun 13 20:26 www.thegeekstuff.com.key
The generated private key looks like the following.
# cat www.thegeekstuff.com.key
-----BEGIN RSA PRIVATE KEY-----
Proc-Type: 4,ENCRYPTED
DEK-Info: DES-EDE3-CBC,485B3C6371C9916E

ymehJu/RowzrclMcixAyxdbfzQphfUAk9oK9kK2
jadfoiyqthakLKNqw9z1MoaqkPyqeHevUm26no
AJKIETHKJADFS2BGb0n61/Ksk8isp7evLM4+QY
KAQETKjdiahteksMJOjXLq+vf5Ra299fZPON7yr
-----END RSA PRIVATE KEY-----

2. Generate a Certificate Signing Request (CSR)

Using the key generate above, you should generate a certificate request file (csr) using openssl as shown below.

# openssl req -new -key www.thegeekstuff.com.key -out 
www.thegeekstuff.com.csr
Enter pass phrase for www.thegeekstuff.com.key:
You are about to be asked to enter information that will be incorporated
into your certificate request.
What you are about to enter is what is called a Distinguished Name or a DN.
There are quite a few fields but you can leave some blank
For some fields there will be a default value,
If you enter '.', the field will be left blank.
-----
Country Name (2 letter code) [GB]:US
State or Province Name (full name) [Berkshire]:California
Locality Name (eg, city) [Newbury]:Los Angeles
Organization Name (eg, company) [My Company Ltd]:The Geek Stuff
Organizational Unit Name (eg, section) []:IT
Common Name (eg, your name or your server's hostname) []: thegeekstuff
Email Address []:

Please enter the following 'extra' attributes
to be sent with your certificate request
A challenge password []:
An optional company name []:

# ls -ltr www.thegeekstuff.*
-rw-r--r-- 1 root root   963 Jun 13 20:26 www.thegeekstuff.com.key
-rw-r--r-- 1 root root   664 Jun 13 20:35 www.thegeekstuff.com.csr

3. Generate a Self-Signed SSL Certificate

For testing purpose, you can generate a self-signed SSL certificate that is valid for 1 year using openssl command as shown below.

# openssl x509 -req -days 365 -in www.thegeekstuff.com.csr -signkey 
www.thegeekstuff.com.key -out www.thegeekstuff.com.crt
Signature ok
subject=/C=US/ST=California/L=Los Angeles/O=thegeekstuff/OU=IT
/CN=www.thegeekstuff.com
Getting Private key
Enter pass phrase for www.thegeekstuff.com.key:

# ls -l www.thegeekstuff*
-rw-r--r-- 1 root root   963 Jun 13 20:26 www.thegeekstuff.com.key
-rw-r--r-- 1 root root   664 Jun 13 20:35 www.thegeekstuff.com.csr
-rw-r--r-- 1 root root   879 Jun 13 20:43 www.thegeekstuff.com.crt

# cat www.thegeekstuff.com.crt
-----BEGIN CERTIFICATE-----
haidfshoaihsdfAKDJFAISHTEIHkjasdjadf9w0BAQUFADCB
kjadfijadfhWQIOUQERUNcMNasdkjfakljasdBgEFBQcDAQ
kjdghkjhfortoieriqqeurNZXCVMNCMN.MCNaGF3dGUuY29
-----END CERTIFICATE-----

You can use this method to generate Apache SSL Key, CSR and CRT file in most of the Linux, Unix systems including Ubuntu, Debian, CentOS, Fedora and Red Hat.

4. Get a Valid Trial SSL Certificate (Optional)

Instead of signing it youself, you can also generate a valid trial SSL certificate from thawte. i.e Before spending the money on purchasing a certificate, you can also get a valid fully functional 21 day trial SSL certificates from Thawte. Once this valid certificate works, you can either decide to purchase it from Thawte or any other SSL signing organization.

This step is optional and not really required. For testing purpose, you can always use the self-signed certificate that was generated from the above step.

Go to Thwate trial certificate request page and do the following:
  • Select “SSL Web Server Certificate (All servers)” under the “select your trial certificate”.
  • Do not check the PKCS #7 check-box under the “configure certificate”
  • Copy/Paste the *.csr file that you generate above in the textbox under “certificate signing request (CSR)”
  • Click on next at the bottom, which will give you a 21-day free trial certificate.

Copy/Paste the trial certificate to the www.thegeekstuff.com.crt file as shown below.

# cat www.thegeekstuff.com.crt
-----BEGIN CERTIFICATE-----
haidfshoaihsdfAKDJFAISHTEIHkjasdjadf9w0BAQUFADCB
kjadfijadfhWQIOUQERUNcMNasdkjfakljasdBgEFBQcDAQ
kjdghkjhfortoieriqqeurNZXCVMNCMN.MCNaGF3dGUuY29
-----END CERTIFICATE----- 
 
 
source : http://www.thegeekstuff.com/2009/07/
                linux-apache-mod-ssl-generate-key-csr-crt-file/ 

Friday, May 11, 2012

How to Create a Password Protected Folder without any Extra Software

There are a lot of methods that you can use to create a password protected folder, most of which require the use of some third party software. Using this neat method you can hide your folders with a quick batch script. It’s important to note that this will not actually conceal your data from somebody that knows what they are doing.

Create Your Password Protected Folder

Before you get started you need to create a folder that will house your password protected folder, this is just an ordinary folder and can be located anywhere and named anything.

Navigate into your newly created folder and create a new Text Document. This can easily be done from the context menu.

Open the document, now paste the following code into the contents of the document:
cls
@ECHO OFF
title Folder Private
if EXIST "HTG Locker" goto UNLOCK
if NOT EXIST Private goto MDLOCKER
:CONFIRM
echo Are you sure you want to lock the folder(Y/N)
set/p "cho=>"
if %cho%==Y goto LOCK
if %cho%==y goto LOCK
if %cho%==n goto END
if %cho%==N goto END
echo Invalid choice.
goto CONFIRM
:LOCK
ren Private "HTG Locker"
attrib +h +s "HTG Locker"
echo Folder locked
goto End
:UNLOCK
echo Enter password to unlock folder
set/p "pass=>"
if NOT %pass%== PASSWORD_GOES_HERE goto FAIL
attrib -h -s "HTG Locker"
ren "HTG Locker" Private
echo Folder Unlocked successfully
goto End
:FAIL
echo Invalid password
goto end
:MDLOCKER
md Private
echo Private created successfully
goto End
:End
Change the PASSWORD_GOES_HERE text to the password you want to set. Now go ahead and save the file as locker.bat.

Once the file is saved as a batch file you can delete the original text file.

Now run your batch file by double clicking on it–the first time you run it, it will create a folder called Private. This is where you can store all your secret things. When you have finished adding all your stuff to the Private folder, run locker.bat again.

This time you will be asked if you sure that you want to lock the folder, press the “Y” key and hit enter to lock your folder.

You will see that your Private folder quickly disappears.

If you run the script yet again, you will prompted for a password.

If you enter the same password as you set in the script the Private folder will reappear if you enter the incorrect password the script will just Terminate.

Warning

Most people don’t know how to show system files, but anybody who has some experience will probably be able to quickly figure it out in the Folder Options.

Also, any ordinary user who unchecks the box will most probably be scared off by the warning message that appears.

The second way someone could comprise the folder is to open the batch file and read your password. It’s definitely not a really secure way to hide your files, but it is fun.
Attribution note: We found this script on dozens of different web sites going back many years. We have no idea who first created the script, so we’ve omitted any sort of attribution link. If you do have proof that you first created the script, contact us and we’ll adjust the article accordingly.

Saturday, May 5, 2012

How to Use SkyDrive’s 25 GB as a Mapped Drive for Easy Access

header1

SkyDrive is an online storage system included in Windows Live, which gives you 25 GB of space that you can sync to your desktop. Here’s how to connect it to your Windows 7 computer as a mapped drive.

First of all, you need to go to http://skydrive.live.com and use your Windows Live account (the same you use to access Hotmail, Messenger, Windows Live Mail or MSN) to log in and create the folders you want to use by using the New menu. You can create private and shared folders and customize the access for every one of them.

online_drive1

After your have created your folders, you will need to link your computer to your online ID so it can access them without asking for credentials every time.

Click on the Start Menu button and select Control Panel.

link_ID01

Select User Accounts and Family Safety.

link_ID02

Go to User Accounts.

link_ID03

Click on Link Online IDs located on the left side of the window.

link_ID04

Click on Link Online ID.

link_ID05

If you haven´t installed the Windows Live ID provider, you will be taken to a website to download it.

link_ID06

Install the Online ID provider.

link_ID07

Now you will be taken back to the Online ID providers and click on Link Online ID to sign in.

link_ID08

Now you have to enter your credentials and click on Sign In.

link_ID09

Now you have linked your computer to your Windows Live account. If you update your password, you can click on Update credential and if you want to disconnect your computer to your account, you can click on Remove linked ID.

link_ID10
Now, to get the address where to map your SkyDrive´s folders, you can open Excel, Word, PowerPoint or OneNote 2010 click on File and then on Save & Send.

map_HD1

Select Save to Web and then click on the folder you want to map.

map_HD2

Double click on the folder you want to map and copy the folder´s address.

map_HD3

Now, you have to go to Computer.

map_HD4

Click on Map network drive.

map_HD5
 
And you can paste the folder´s address, select a drive letter and select Reconnect at logon.

map_HD6

The folder will open in a new window.

map_HD8

And you will see and access your mapped drive in the Computer window.

map_HD9

Remember you have 25GB space to upload to SkyDrive and you can check how much space you have at the SkyDrive

website: http://skydrive.live.com

online_drive2